|
|
Post by Mr. Metallic on Apr 25, 2022 8:44:26 GMT -5
I know what you might be thinking, another Little Deuce.(yawn) We've all seen them, the kit in various forms has been around for nearly 60 years. I've even built 3 recently myself, all with a twist. Well, this one is another one with a twist. If you are familiar with the Little Deuce and the Big Deuce you are aware that there are quite a few differences between the two as far as parts content. For whatever reason when Monogram decided to tool up smaller version of their highly successful Big Deuce kit they made quite a few changes. Several of these were probably done to reduce complexity, but others (especially the switch from a quick change rear to a stock style item) kinda make you scratch your head. At least they made me scratch mine. I have had this build floating around in my head in various iterations for nearly 13 years now. It started out as being on a mission to find the Little Deuce parts and adapt them to the much more readily available Revell 32 roadster kit. That was done out of budget considerations. I even started that build, but abandoned it after a painting mishap, trying to match the old Monogram red plastic color. It went through various starts and stops over the years, and then I got bitten by the vintage Monogram hot rod kit bug. That's when I started to notice all the differences between the Little and Big Deuce kits. I set about mastering a set of the American Racing LeMans wheels for Ed to cast back in 2018. Last year I got on the kick of building up kits molded in color, and that's when the project evolved into it's final form. Unlike the other 3 kits in the Monogram hot rod series which came molded in multiple colors of plastic(Little T, Woody Wagon and Blue Beetle) the Little Deuce was all in white. This build proposes, what if they had molded it in color, and also steered closer content wise to the Big Deuce... After a lot of words, here we arrive at the "proof of concept" mock up. 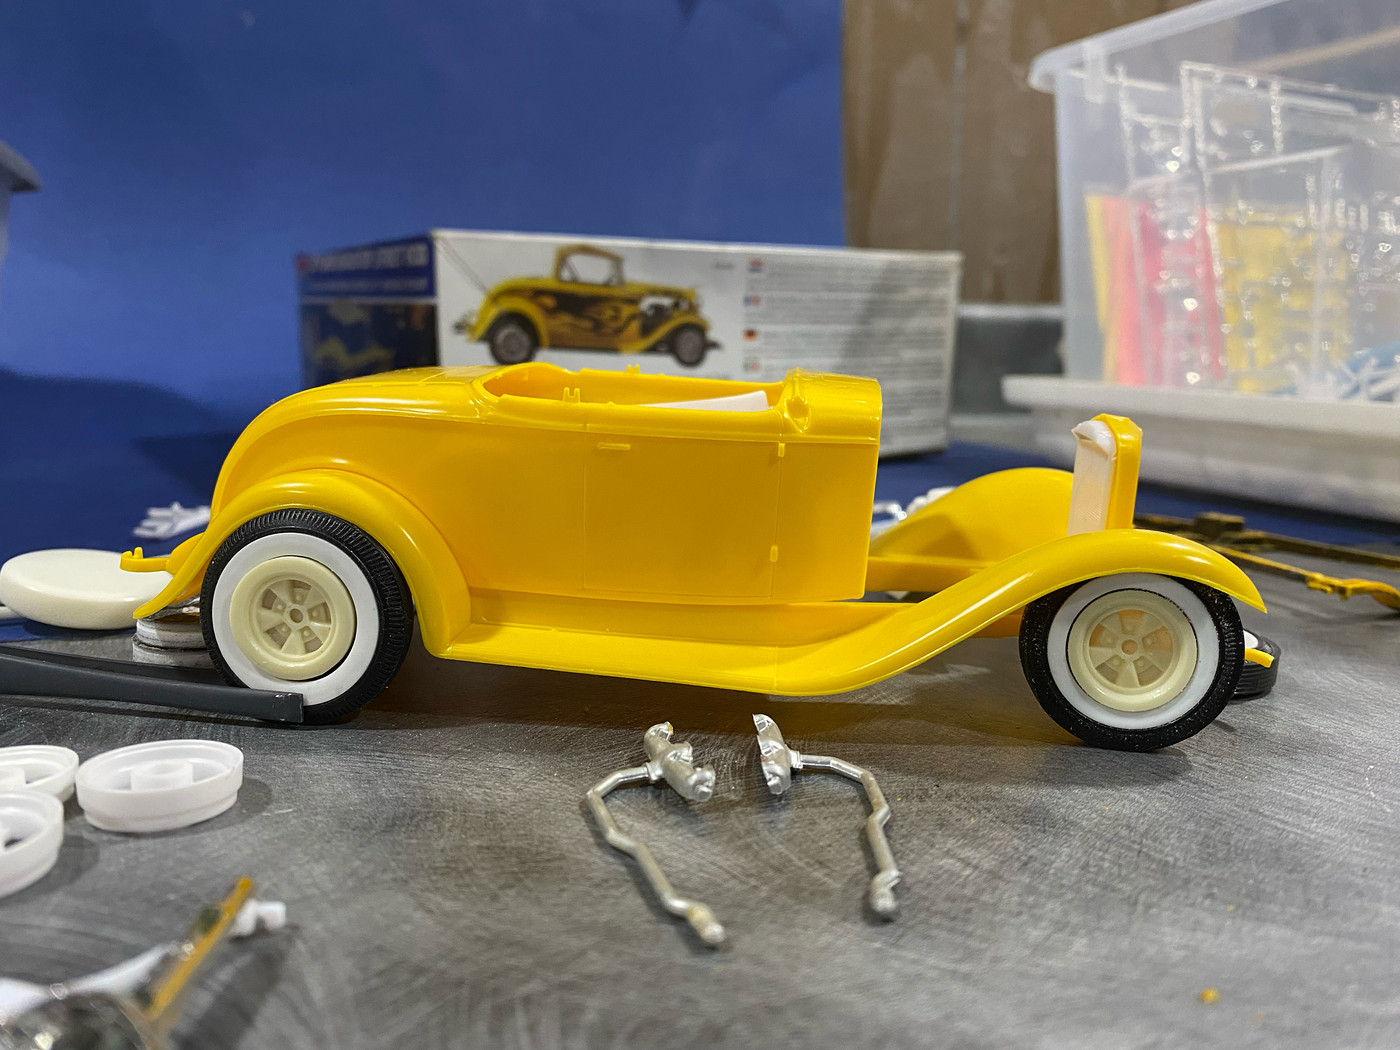 And here's a couple pics of the parts I have accumulated for this project. The yellow parts are actually from my parts box, not the virgin 80's kit seen in the background. Apparently the molded color of this kit when it was in the Monogram catalog back at that time varied quite a bit. The example in the box is a much darker yellow, where this one steers closer (but still a bit darker) than the color of the 2nd issue Big Deuce yellow. This is close enough for me. 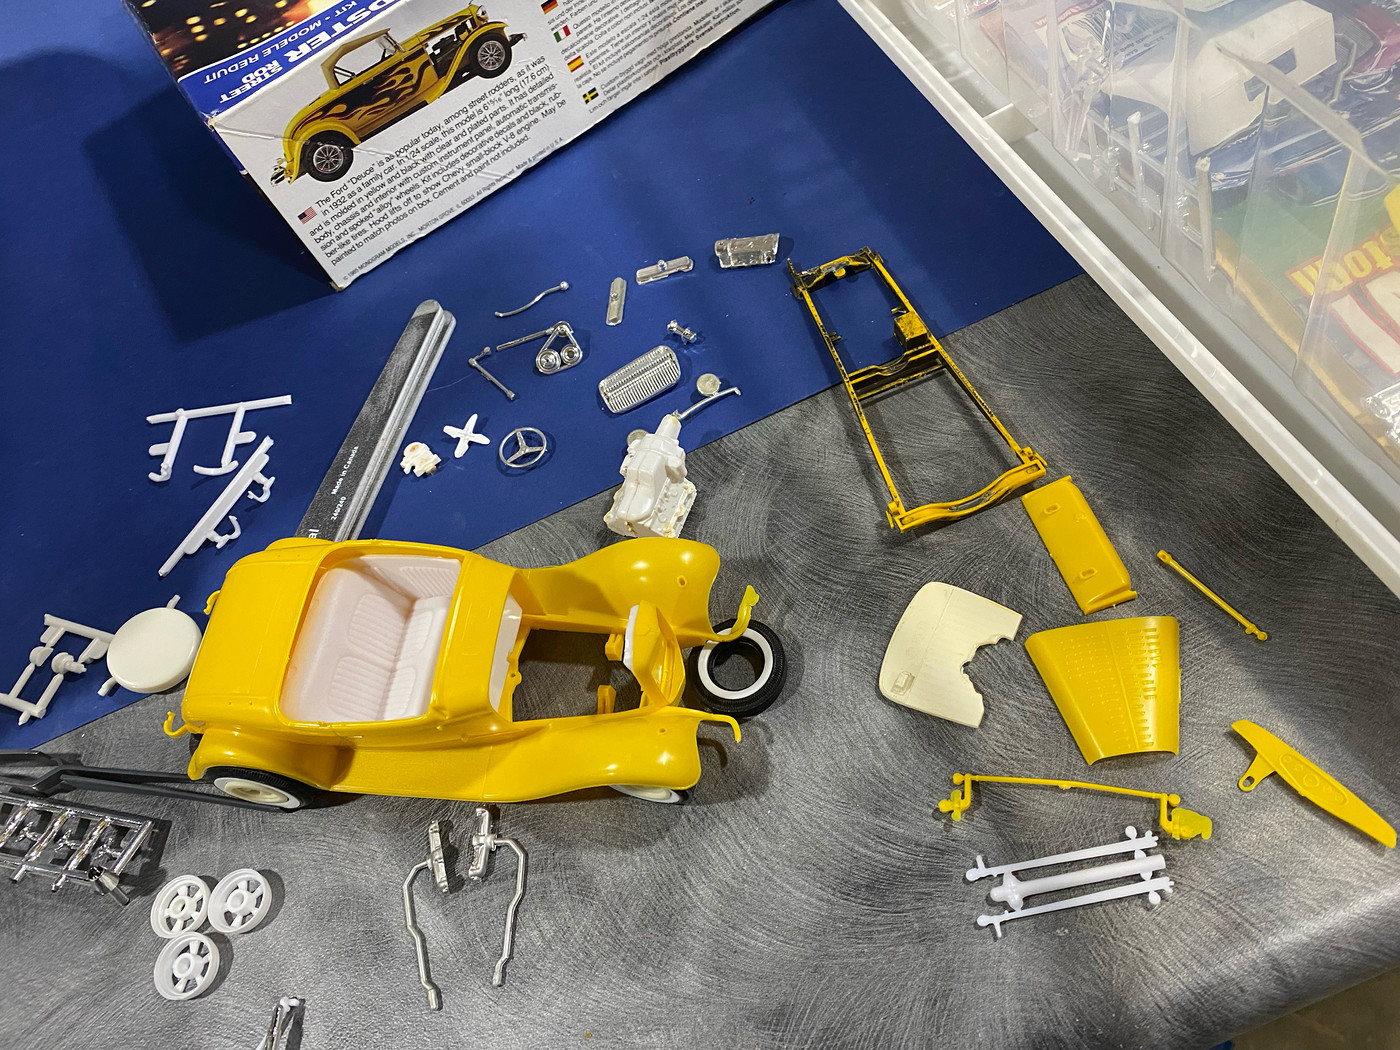 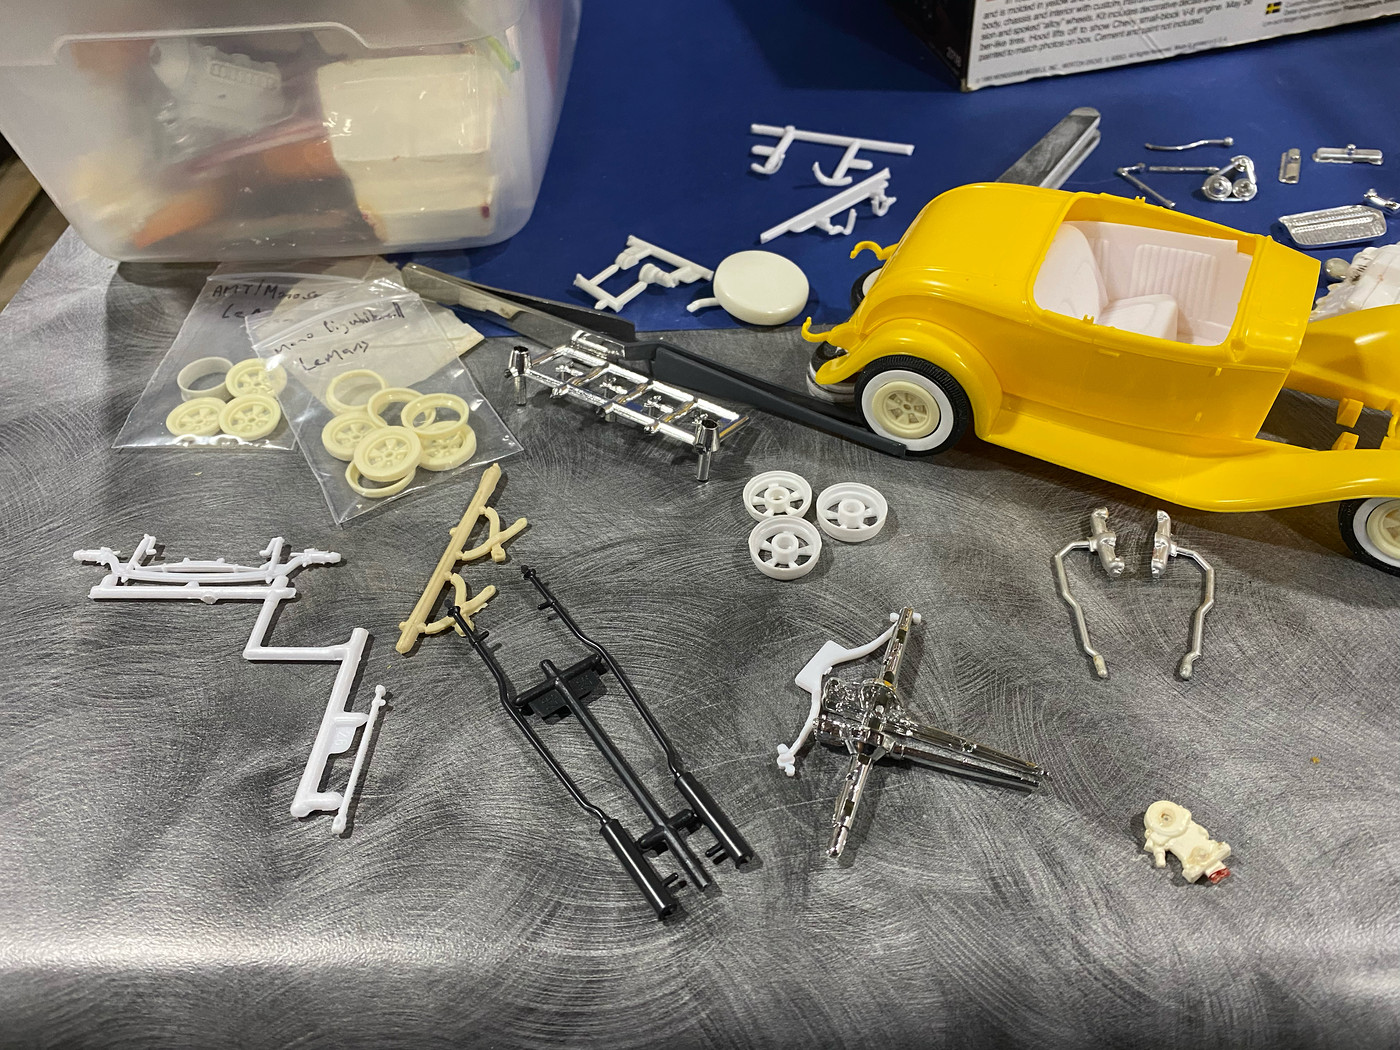 The usual suspect parts from the various retools of the Little Deuce have been gathered together, with these additions QC rear from the Little T (wide enough?) Molded in yellow rear crossmember from a Monogram 29 Ford pickup Spare tire cover and bracket from an AMT 32 Ford (Vicky?) Air cleaners from the Revell new Model A kits parts box seat belts (may not use) Drag City Casting Lemans wheels parts box 2 blade knock offs horn from the Monogram 29 Ford pickup Bumper bracketry from a Revell 32 Ford (may not use, but the ones on the Big Deuce were chrome) I need to find a better Little Deuce pleated firewall. The only one I have is badly discolored. I need to find a better brake reservoir I was hoping to find a plastic 5 gauge insert for the dash, but have given up on that. As always, comments and questions are welcome. |
|
|
|
Post by Dave from Pleasanton on Apr 25, 2022 11:15:22 GMT -5
Interesting project Craig. I haven't not painted a model since my first kit when I was about 9 or 10. It's got to be incredibly hard to figure out how to glue up without any showing since you can't sand, putty or paint over it.
|
|
|
|
Post by Mr. Metallic on Apr 25, 2022 11:27:35 GMT -5
Interesting project Craig. I haven't not painted a model since my first kit when I was about 9 or 10. It's got to be incredibly hard to figure out how to glue up without any showing since you can't sand, putty or paint over it. It's really not hard, at least with these Monogram kits, just takes a little planning and clean technique. Something with multi piece bodies could get tricky. But there are work arounds there too. If you use the plastic welding glue (I use Tamiya thin) and fuse the parts together the joint can be sanded and almost completely disappear. Take note on the frame of this Little T I'm working on. If you note, the joint where I Z'd the frame is hardly noticeable unless you look for it, and I'm not even done sanding it yet. However, not using filler provides limitations, as evident on the sides of the frame. Normally I would fill and sand those waves away before paint, but fortunately those spots will be mostly hidden. These aren't intended to be show quality pieces, more a challenge to myself to use clean execution, and at the same time avoiding the pitfalls that can come with painting. Plus, they get something cool on the shelf really quickly.  |
|
|
|
Post by 41chevy on Apr 25, 2022 11:53:13 GMT -5
Cool project!
Try taping the pleated firewall to a window in the sun for a week, I've found the sun many times the UV in the sunlight "bleaches" the part back to the original styrene color.I tried it years ago on an AMT Buick wagon hood. It worked pretty well. Paul
|
|
|
|
Post by Mr. Metallic on Apr 25, 2022 12:10:58 GMT -5
Cool project! Try taping the pleated firewall to a window in the sun for a week, I've found the sun many times the UV in the sunlight "bleaches" the part back to the original styrene color.I tried it years ago on an AMT Buick wagon hood. It worked pretty well. Paul Didn't even think of that. I'll give it a try |
|
|
|
Post by krassandbernie on Apr 27, 2022 13:55:22 GMT -5
This idea was one of my own for many years as well; but I never got off the ground with it.............mainly because it kept evolving into the same idea but more as a 'what if' with a different body.......i.e. the chopped '32 Ford pickup project I had on the bench years ago. Then after selling that project off minus the unique parts I had made up my mind to build a '30 Model A closed cab pickup utilizing the key "Little Deuce" parts that mimicked the second release of the "Big Deuce" molded in black....right down to the "Little T" quick change and as you have done. I found the chrome air cleaners from the custom version of the Revell '50 Olds coupe to be a more perfect match to the "Big Deuce" if I recall correctly. I believe they were what I had set aside anyway. Naturally, that project never became more than a thought and box of parts yet to be altered, scratch built, or otherwise turned into anything tangible. I have all but given up on building models at this point in my life; but still very much enjoy looking at them; and cannot stop creating new 'projects' in my head. I still have a "Little Deuce" second release (technically the third if you count the first release was released in two different box art variations) molded in black with most of the key parts, if not all (minus wheels and tires I believe). I will have to check and see if I have an extra firewall.
|
|
|
|
Post by Mr. Metallic on May 10, 2022 6:24:15 GMT -5
This build is #3 currently on the bench, so activity comes in spurts. Over the weekend while I was making my way through the paint process on my challenge rail I was able to spend a little time making the biggest modification to this build, installing the quick change rear. I grabbed the QC from the former Little T tooling Boomer Bucket kit, but decided to use the better detailed spring from the Deuce tooling. In order to do that I needed to adapt the spring to sit on top of the axle instead of being mounted behind it because the tail of the QC would interfere with spring travel. It was a pretty straightforward mod, sanding a flat surface into the underside of the spring and then attaching small blocks of Evergreen onto the spring to slot into the top of the axle, just like the assembly out of the T kit. 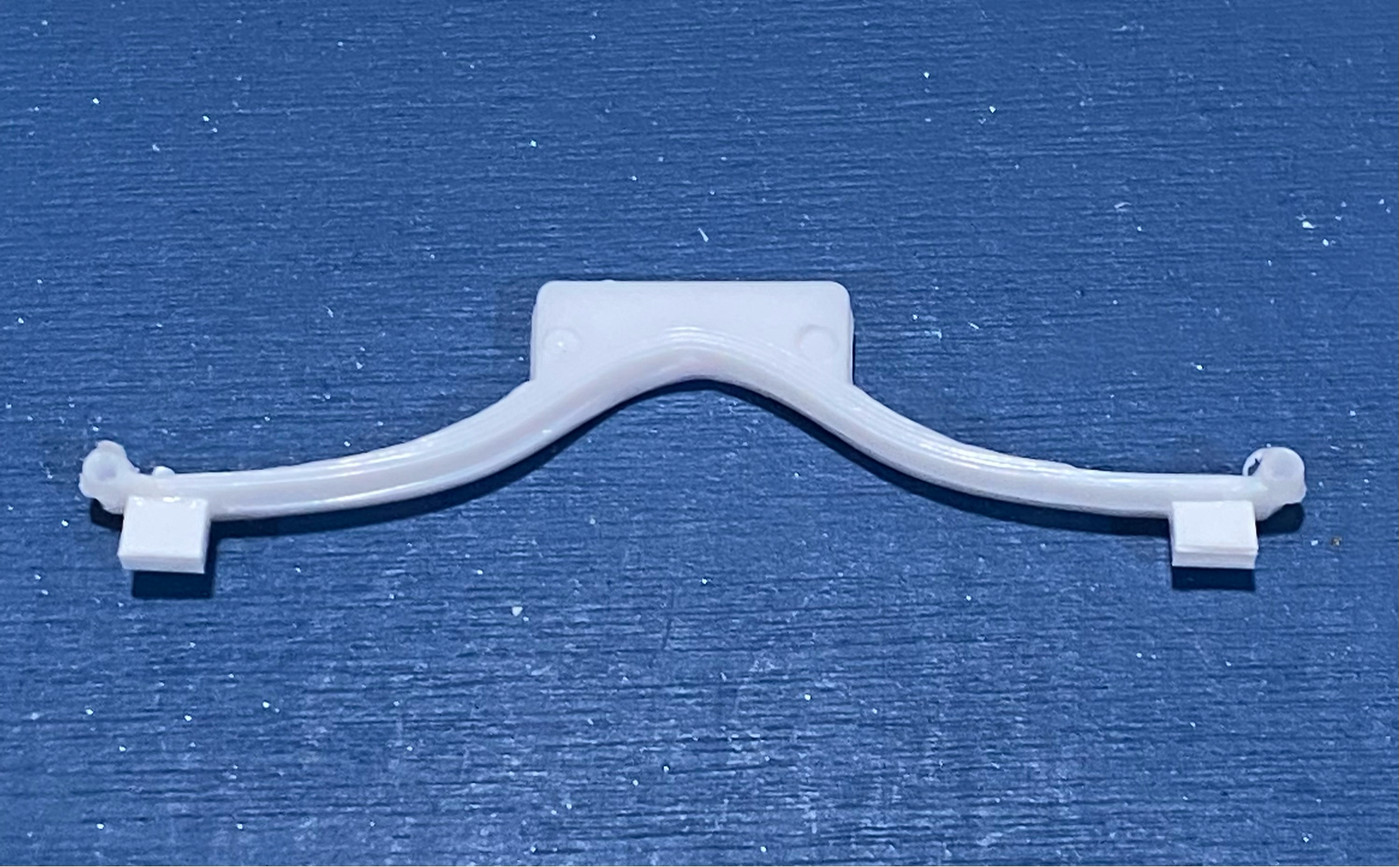 Due to the spring now being mounted above the axle that means the stock Deuce kit spring attachment point no longer works as it would set the wheelbase back 3-4 inches. Since this is another "paintless" build I needed a molded in yellow crossmember to stub into the Deuce frame. This came courtesy of a builtup Monogram 29 Ford pickup (former Blue Beetle tool). 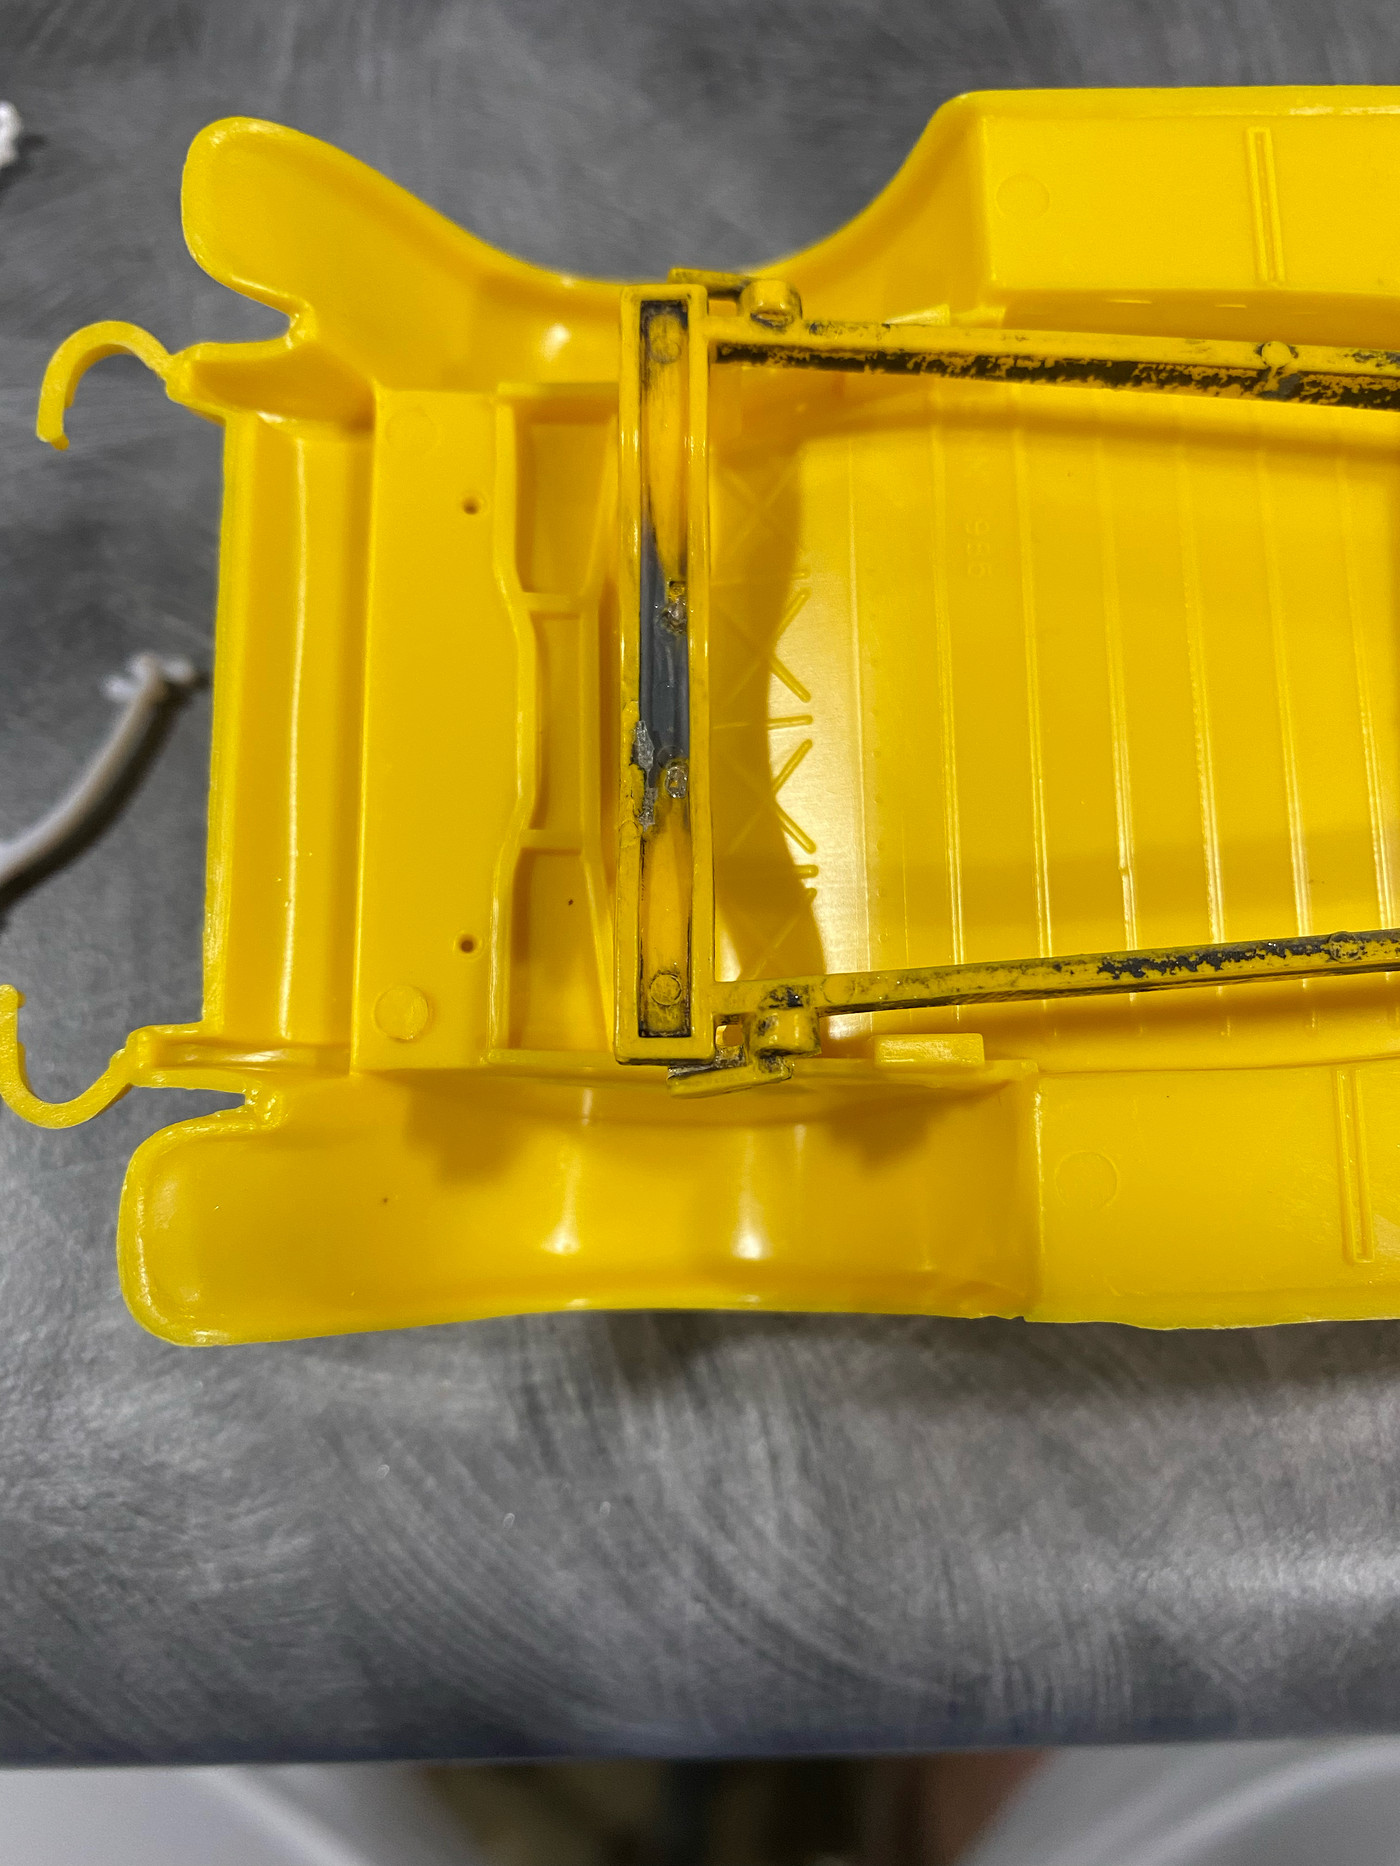 I severed the crossmember from the rest of the frame and proceeded to clean up the paint residue that was left after stripping and trimmed the ends to fit between the Deuce rails. Then I marked the area of the Deuce floor I would need to remove to slot the new crossmember in. Fortunately I mostly fit between a couple molded in details on the floor, so I broke out the Dremel and made quick work of it. 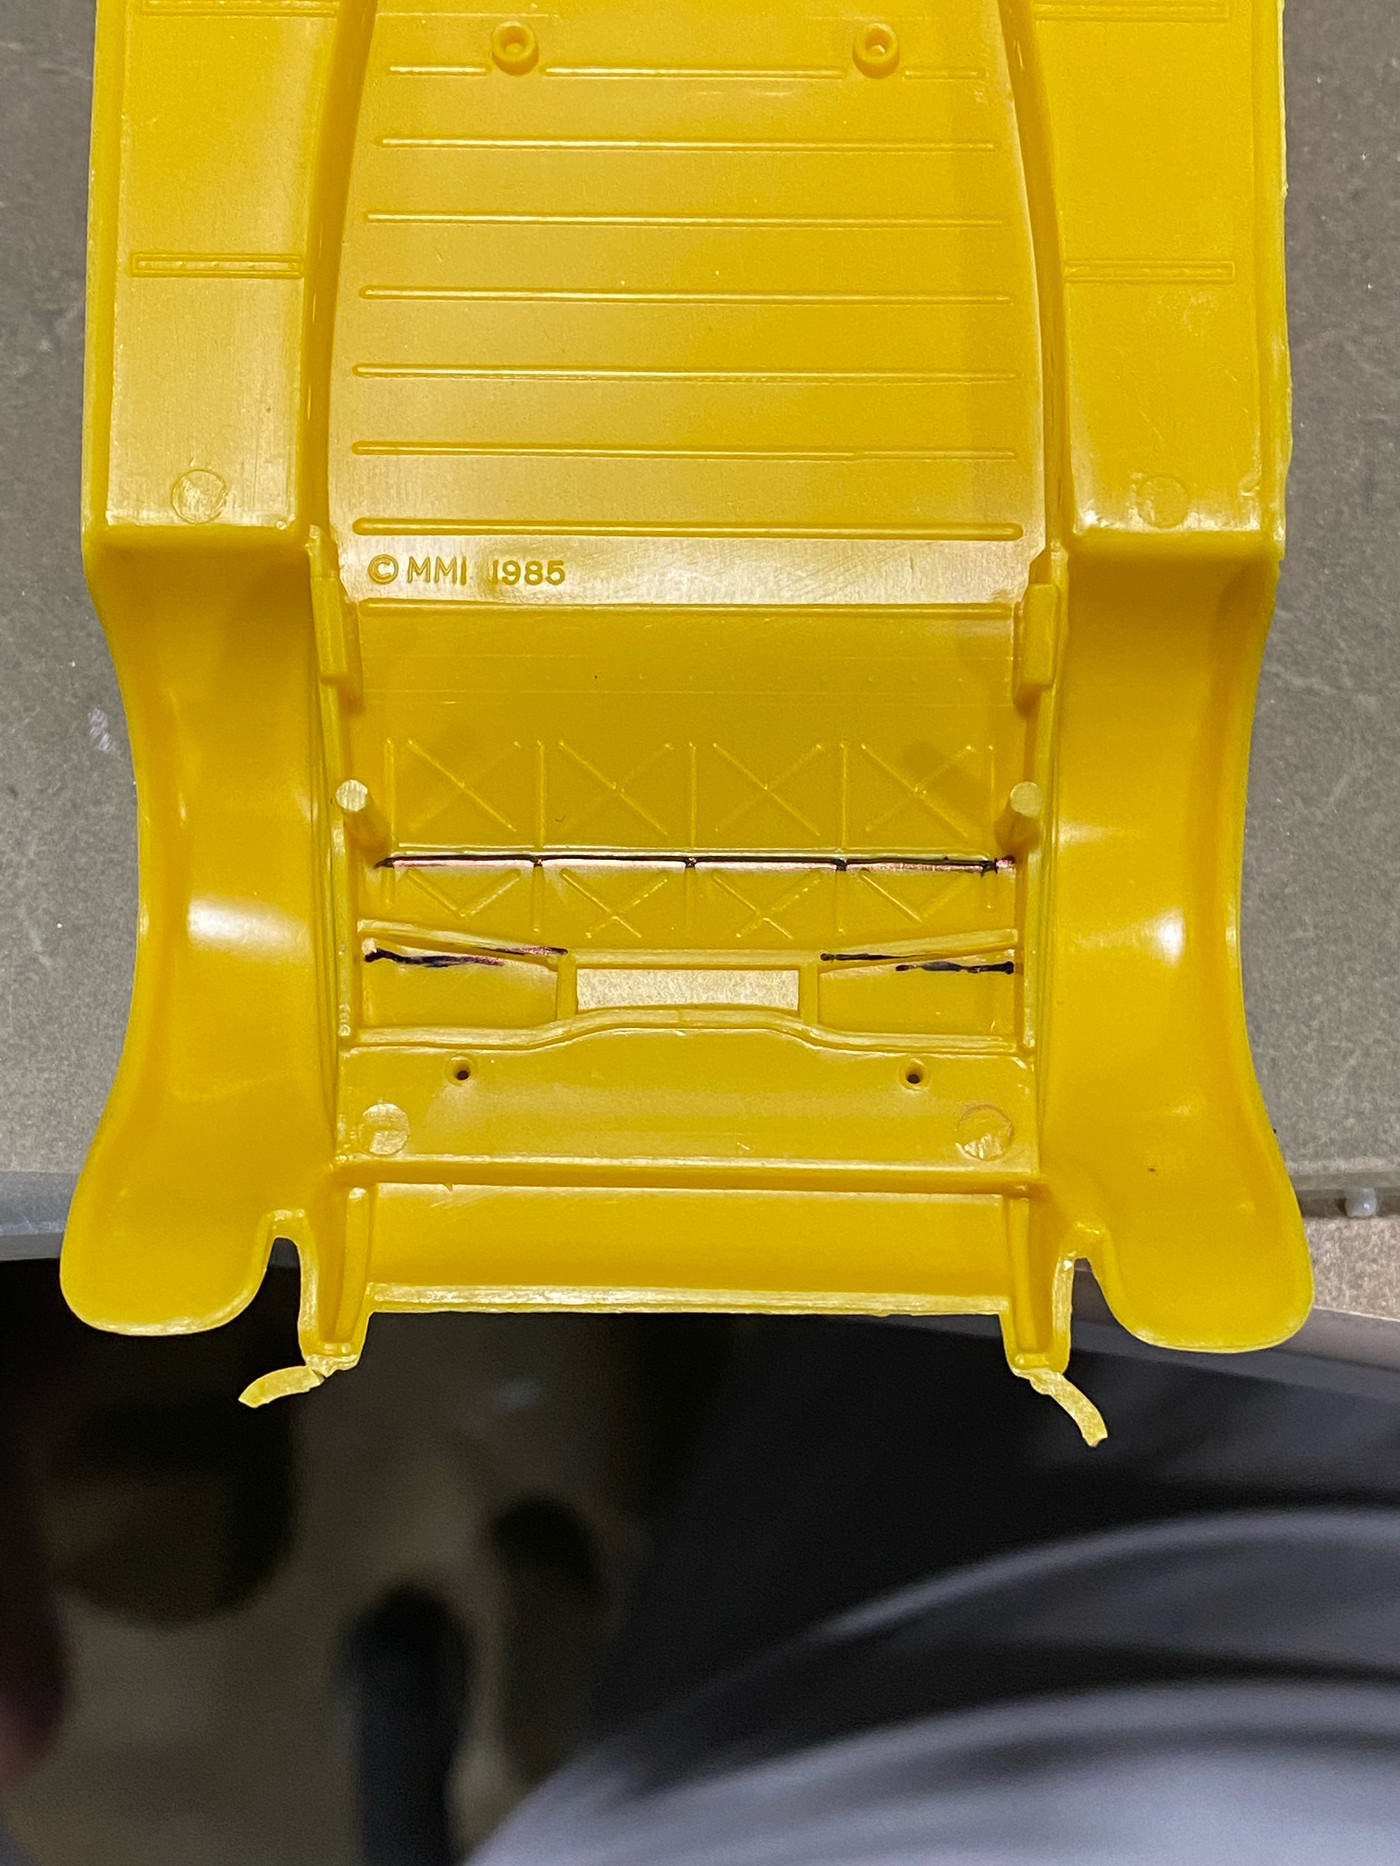 After a little sanding of the opening and the crossmember it slid right into it's new home. Here's a mockup to show the new axle in it's home. I'll have to go back with some scrap yellow plastic to close in the gaps on the topside of the new crossmember, but otherwise this mod is complete. 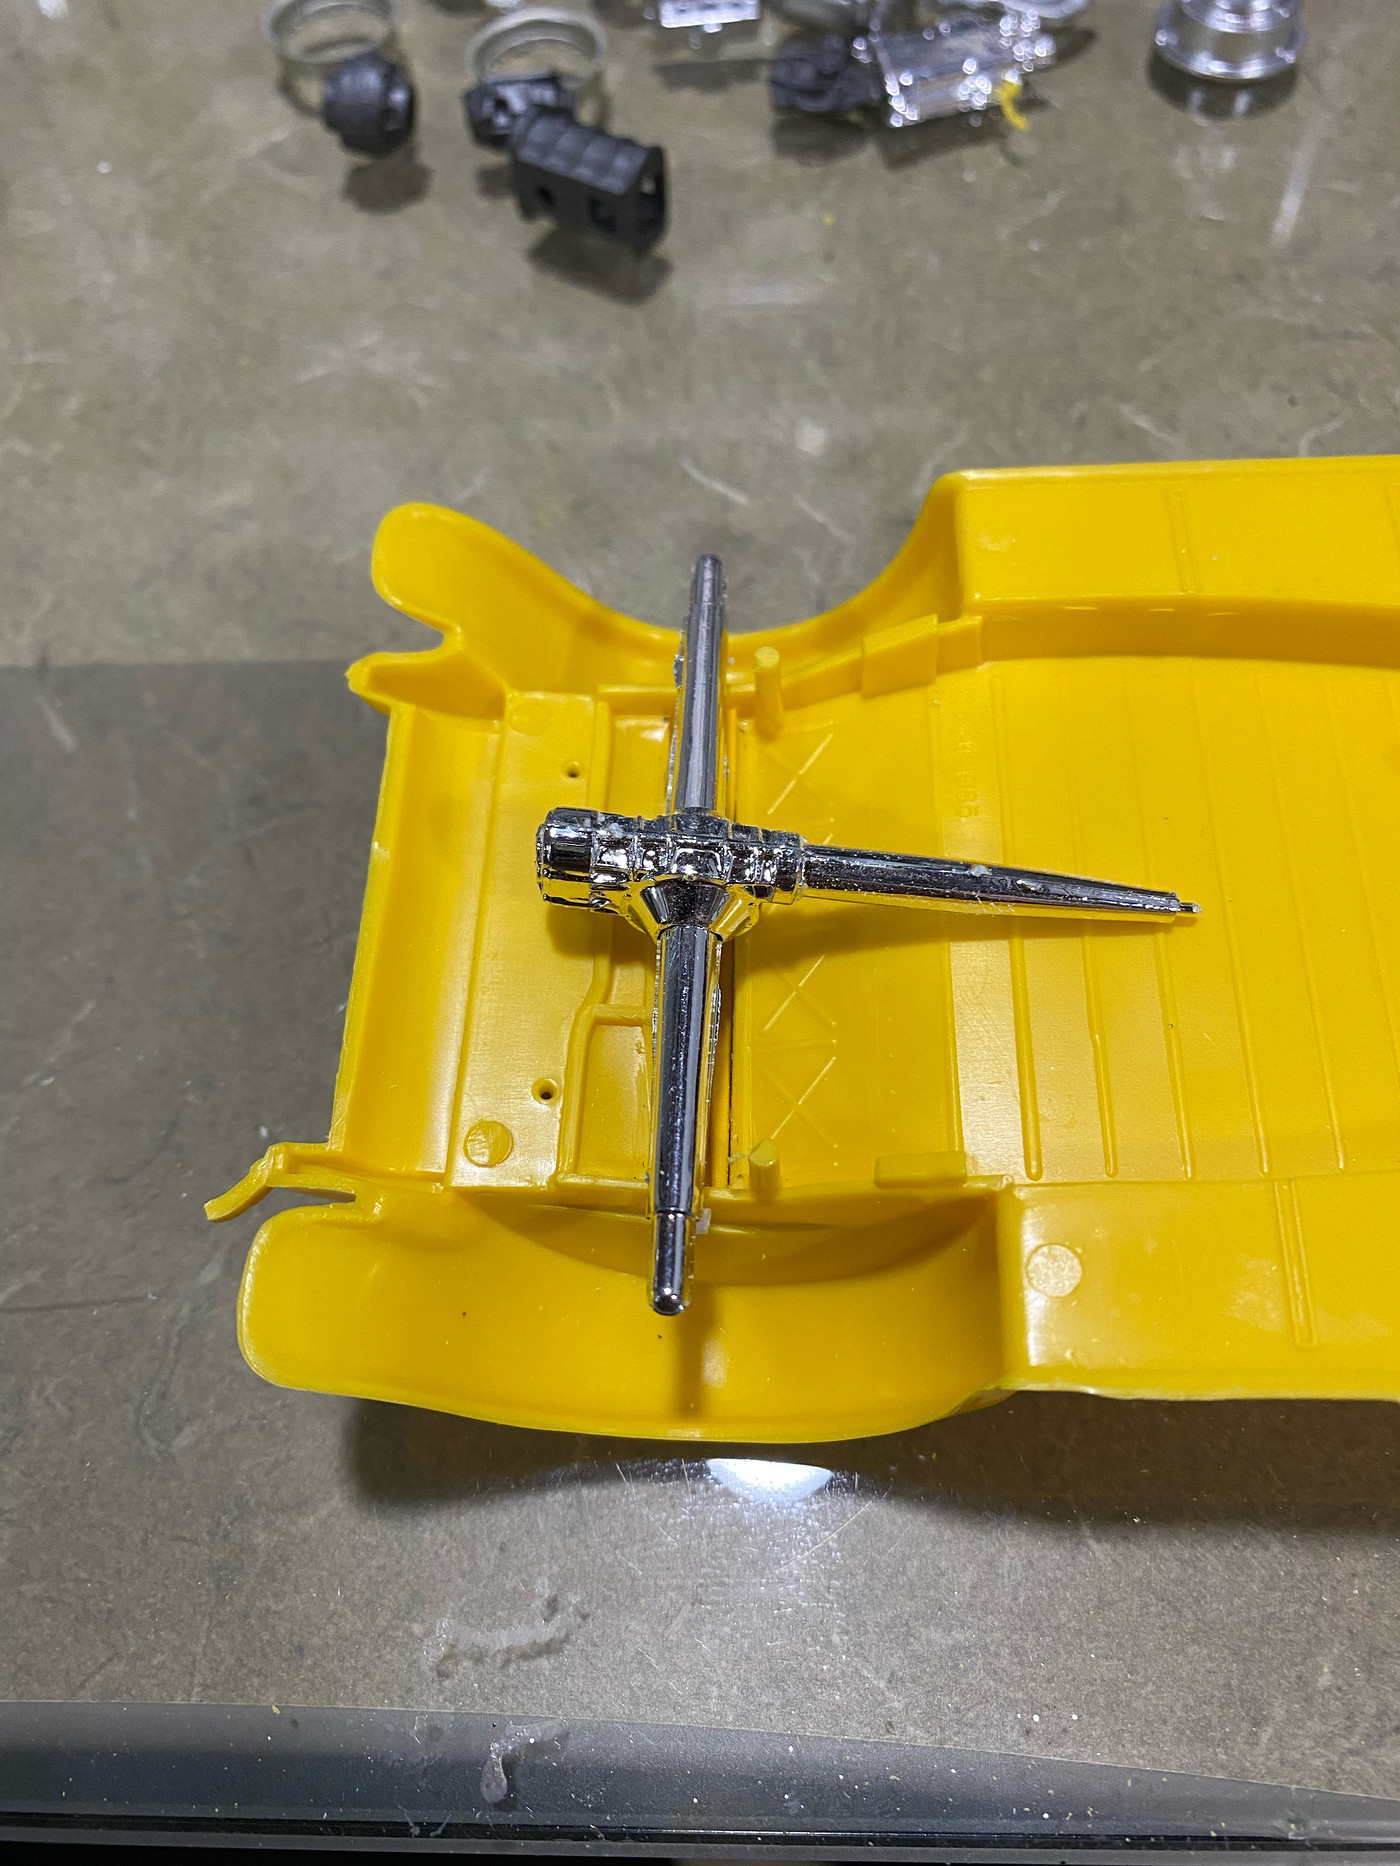 |
|
|
|
Post by Dave from Pleasanton on May 10, 2022 12:15:04 GMT -5
Looks like it was meant to be. I did notice from the beginning to the end the bumper brackets kind of crumbled away.
|
|
|
|
Post by Mr. Metallic on May 10, 2022 12:39:53 GMT -5
Looks like it was meant to be. I did notice from the beginning to the end the bumper brackets kind of crumbled away. Yes, they are fragile to begin with. When you see vintage builtups they are usually broken. I inadvertently broke them off while working on it. From the beginning I was debating whether to replace them with the separate pieces from a Revell 32 kit, since in the Big Deuce kit they are separate plated part. It is doubtful that Monogram would have made them a separate part back then in the small scale, but now I have no choice.  |
|
|
|
Post by Mr. Metallic on May 13, 2022 6:08:05 GMT -5
Still finishing up the paint on the challenge dragster, so I had a little time to finish up the rear end mods. Boxed in the front and back of the crossmember using pieces from the molded in yellow hood (note the remnants of the louvers). Much more finished look from the underside. 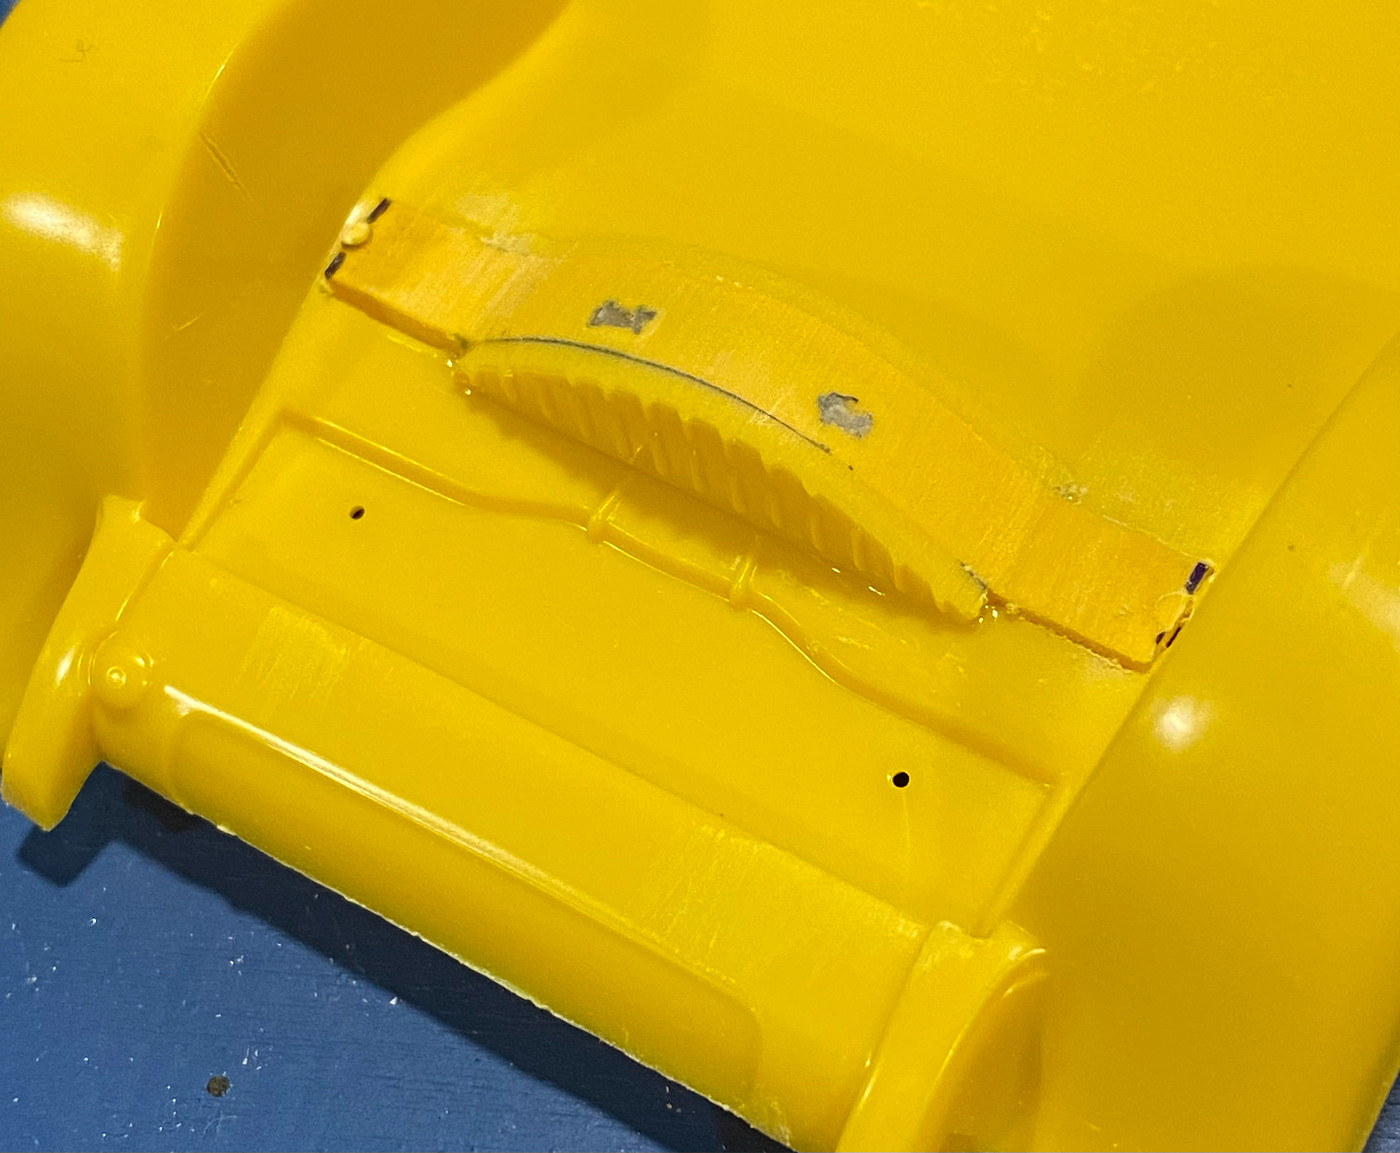  Also carved a semi-circle out of the gas tank to give the QC some clearance, and boxed in the resulting gap. It was either do this or shorten the tail shaft on the QC, and this mod is what they would have done in 1:1. Not sure how the Big Deuce accomplishes this setup without the same accommodation to the gas tank, but maybe the clearances are different on the big kit? So, even though it doesn't 100% match the big kit, this is a real world 1:1 mod that could have appeared in the kit. 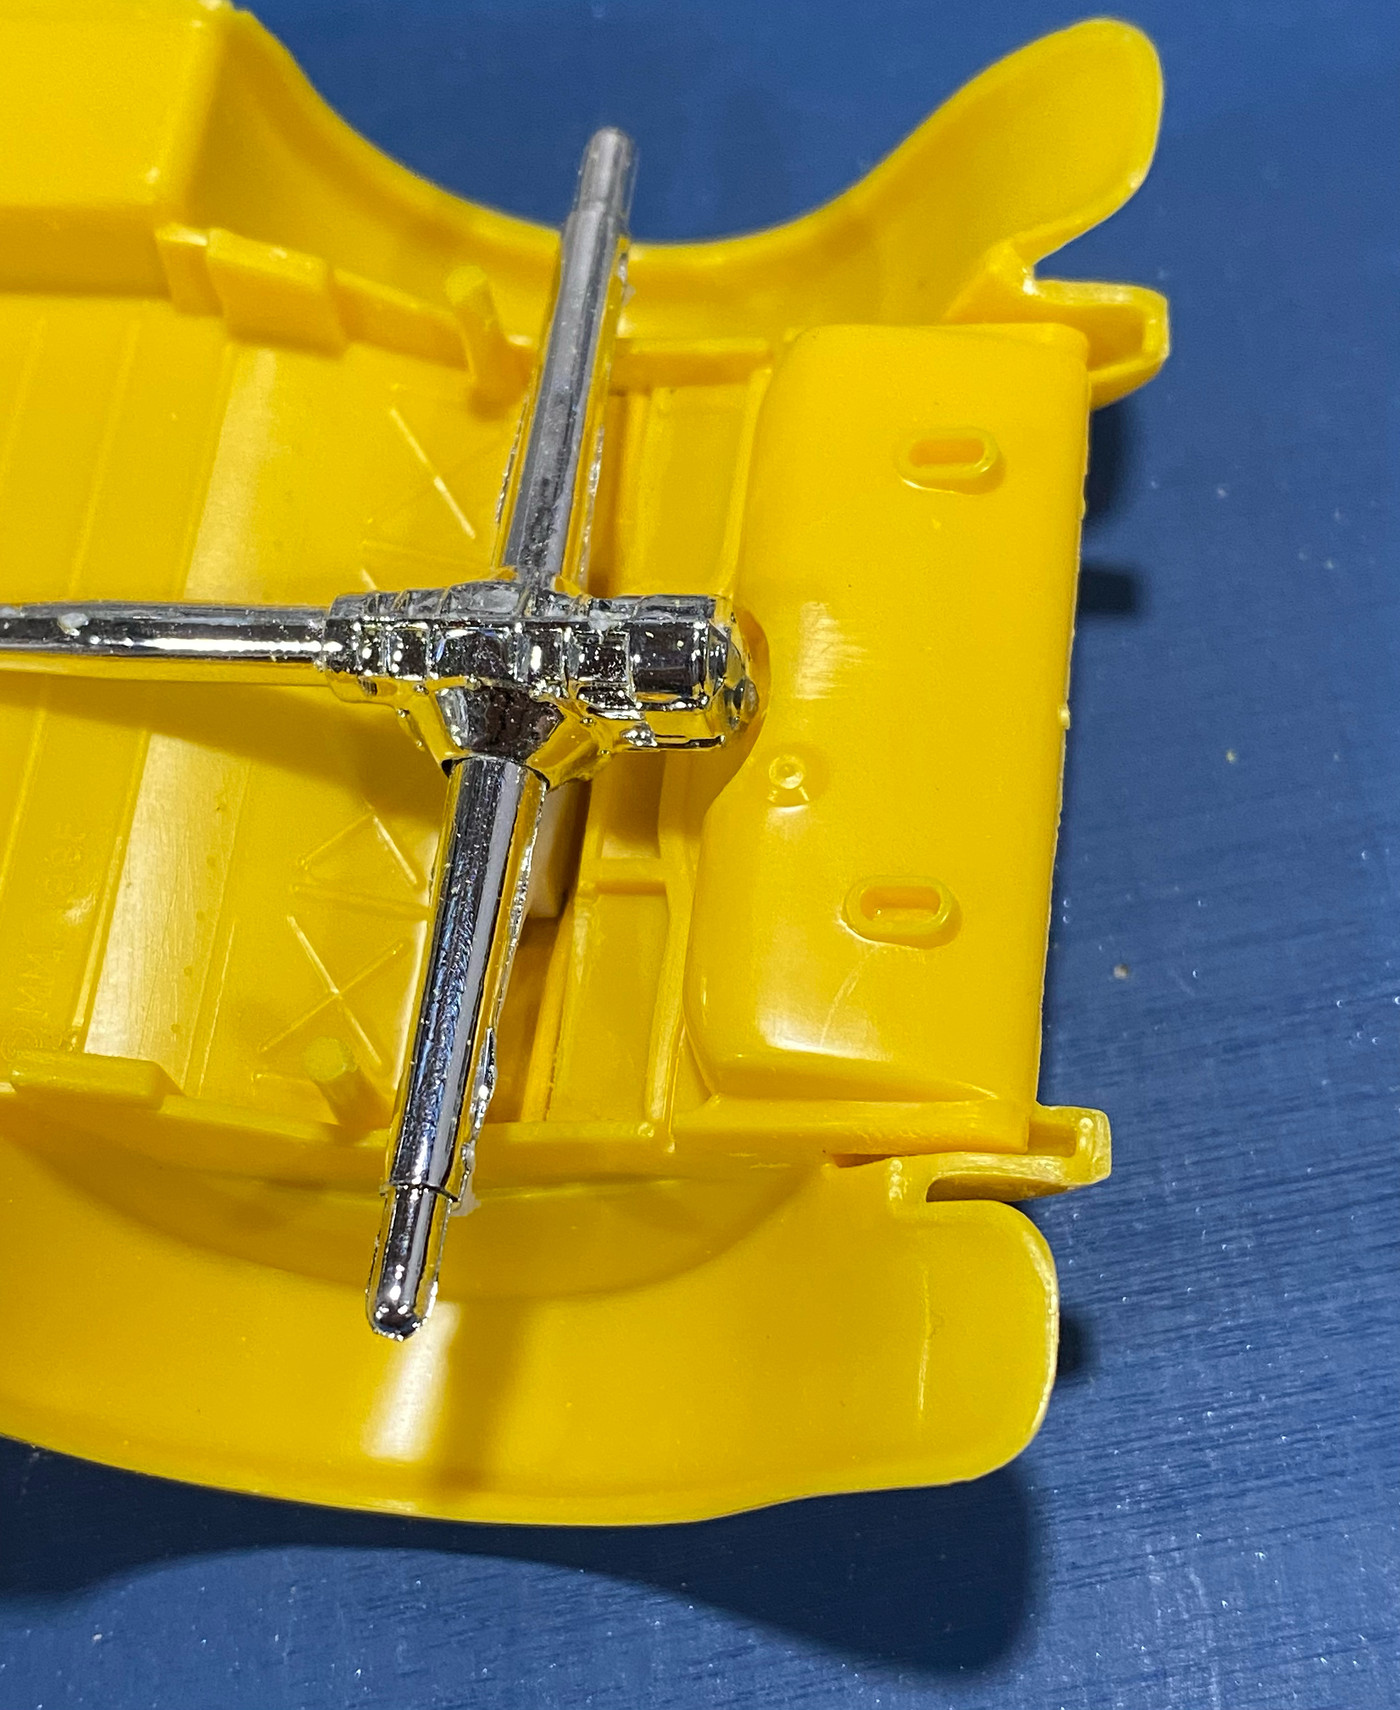 This may be the last update for a little bit since I have the challenge dragster to hopefully button up this weekend and then I need to finish up my nova wagon gasser before June 1. |
|
|
|
Post by Dave from Pleasanton on May 13, 2022 18:54:35 GMT -5
Craig, I looked at the instructions for the Big Deuce and the spring mounted to the back of the rear axle and the center section was in front of the fuel tank. If you were to move the rear axle forward it doesn't appear that it would be centered in the wheel wells. Curious. Big Deuce Instructions |
|
|
|
Post by Mr. Metallic on May 16, 2022 5:02:02 GMT -5
Craig, I looked at the instructions for the Big Deuce and the spring mounted to the back of the rear axle and the center section was in front of the fuel tank. If you were to move the rear axle forward it doesn't appear that it would be centered in the wheel wells. Curious. Big Deuce InstructionsDue to the bigger scale there is probably more space to allow for a certain fudge factor. Once you get down to the smaller size the gaps and tolerances may look tighter, but if scaled up to 1:1 may be adequate. |
|
|
|
Post by Mr. Metallic on Jun 3, 2022 6:08:46 GMT -5
Very busy right now with 2 seniors graduating 2 weeks apart. Getting projects wrapped up around the house since we are hosting parties/relatives/etc. Any bench time was allocated to finishing my challenge dragster which is now complete (public debut coming soon). Anyway, I have been able to work on this one a little bit. Decided to make the gauge cluster a separate piece like on the Big kit. Just because I could.  I cut out the gauge area on my yellow dash and harvested the cluster from another dash to slide in from the backside. I need to finesse the opening a little more, but otherwise it's ready to go. 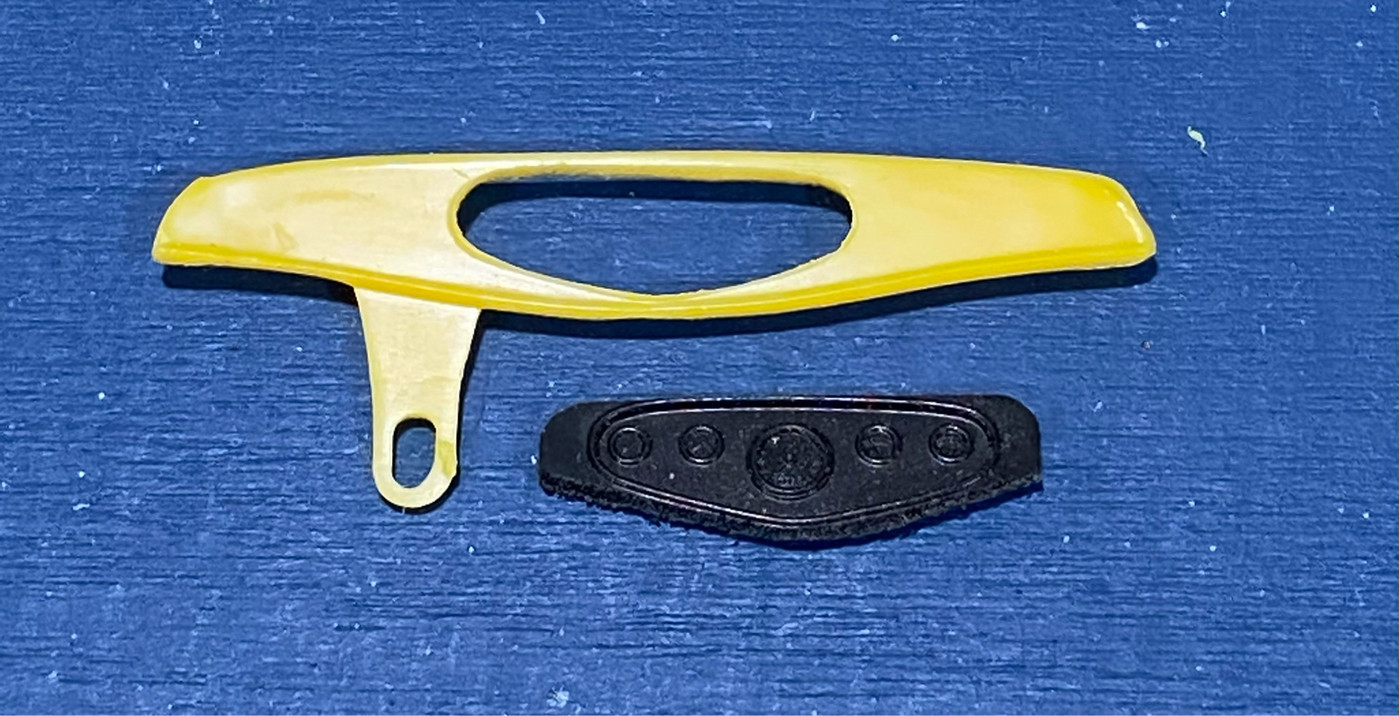 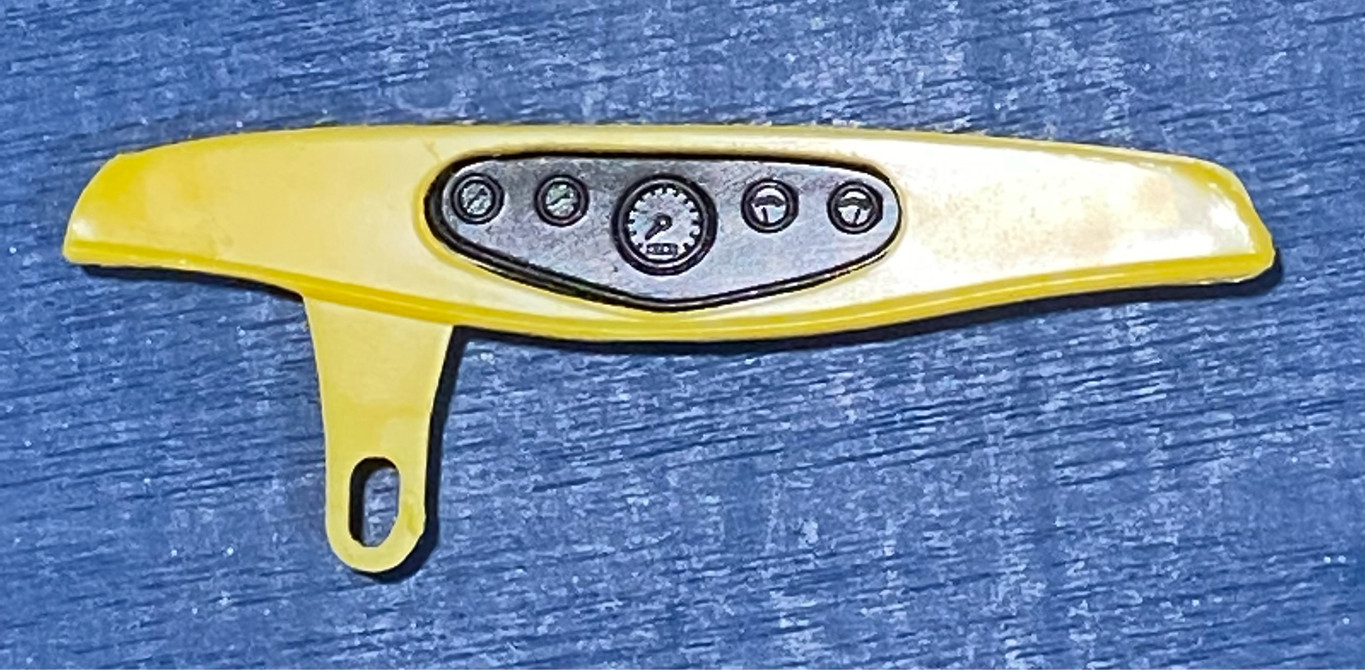 |
|
|
|
Post by Mr. Metallic on Jun 6, 2022 6:10:28 GMT -5
Should I be working on my Nova wagon gasser so I don't miss the deadline? Probably. But here we are anyway I have been unable to get my hands on a bright white Little Deuce firewall. The only one I had left had been modified slightly, and was discolored. Since this is another minimal paint project I decided to replicate the firewall. But in doing so allows me to more easily add a key detail of the Big Deuce more easily, the chromed upper portion. Here you can see the last LD firewall I have left, the firewall that it got retooled into for later editions of the tooling (after the Early Iron edition) and the backer for the new piece I made out of .020 Evergreen. I used the new tool part as a template and put it back in the box it came from.  After severing the upper portion from the LD firewall I used it to mark the height of the upholstered portion of the new dash. I marked the center if the firewall so I could start laying out my pleats using .080 Evergreen half round. 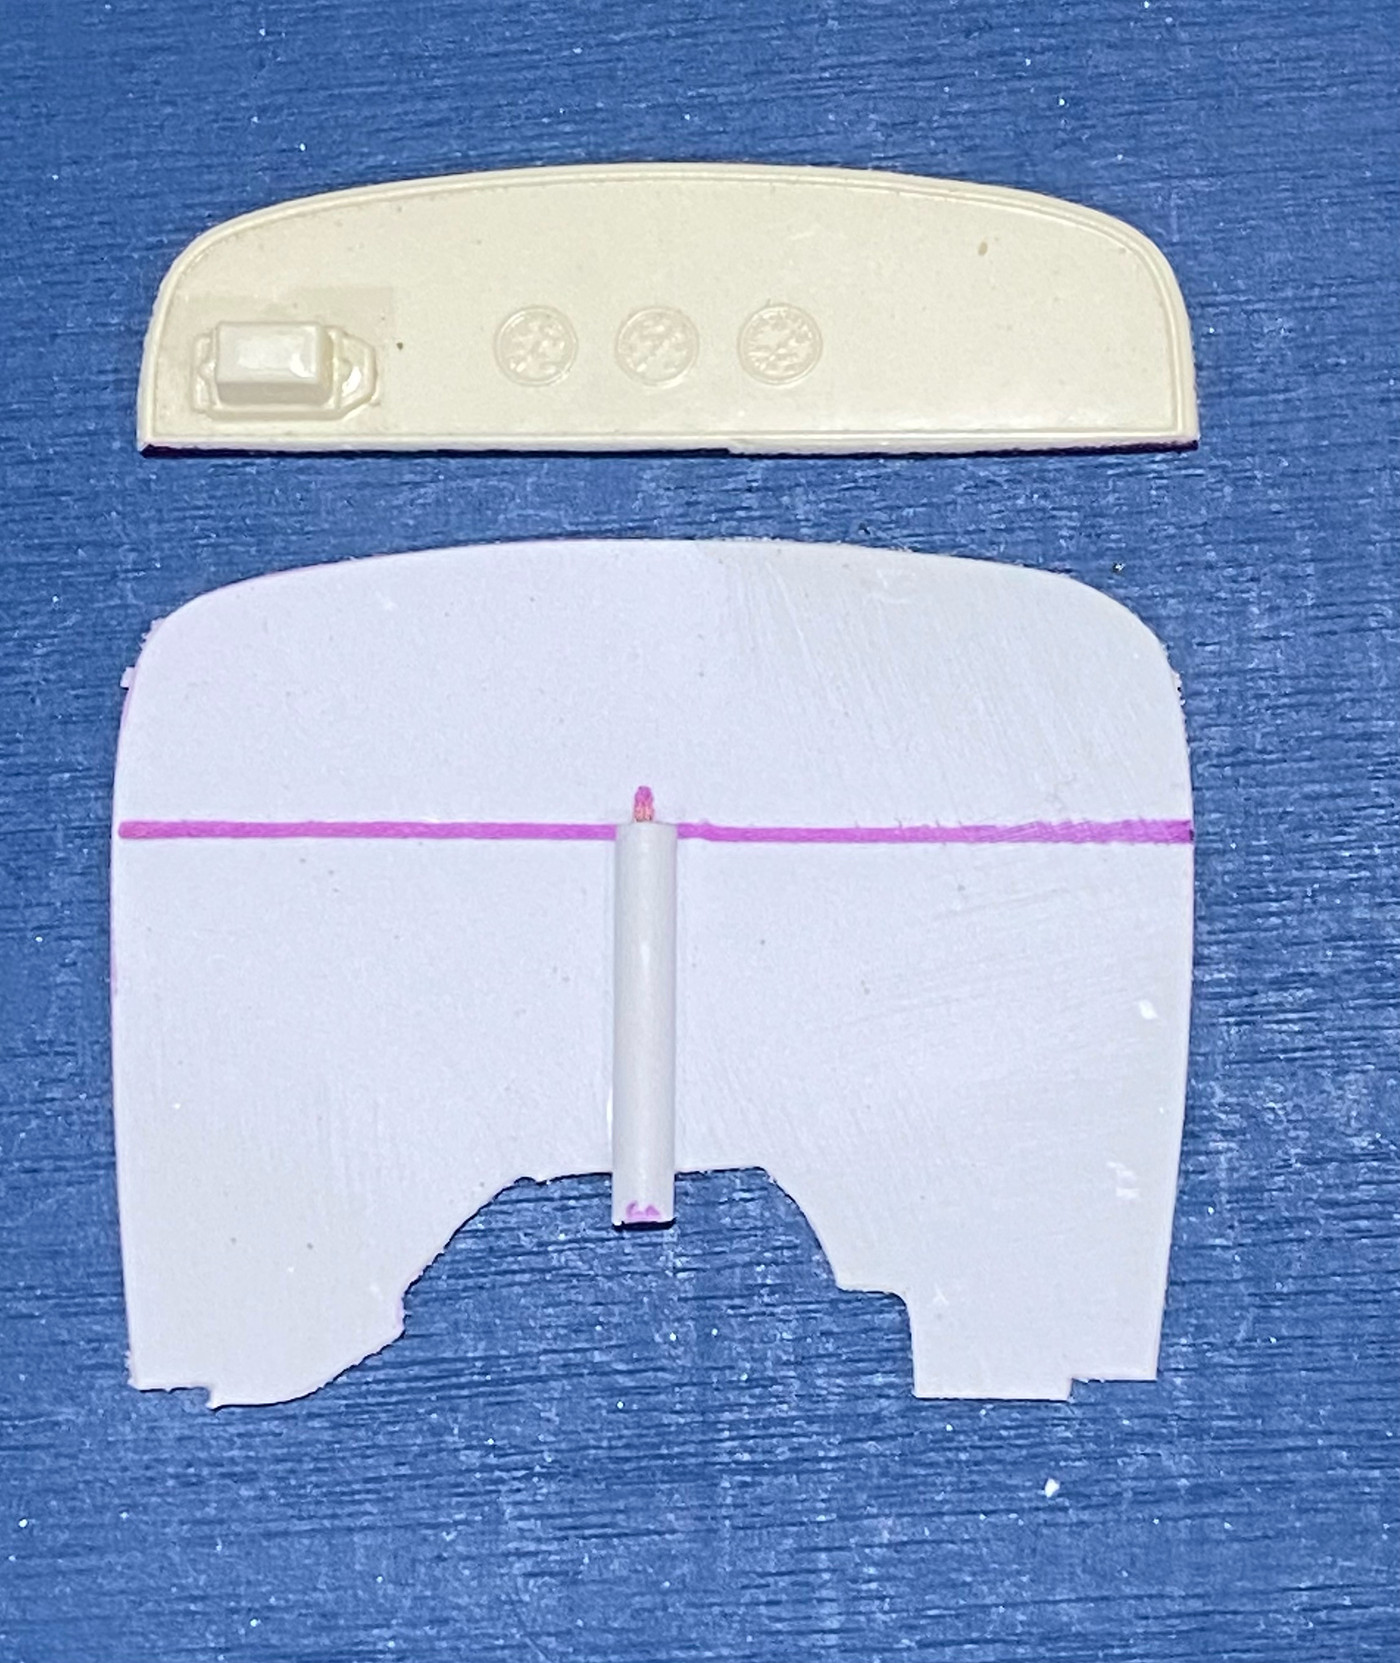 In order to positively locate the firewall in the body I added short strips of plastic. I also drilled an access hole which allows me to remove the upper portion easily by pushing a pin through the hole. 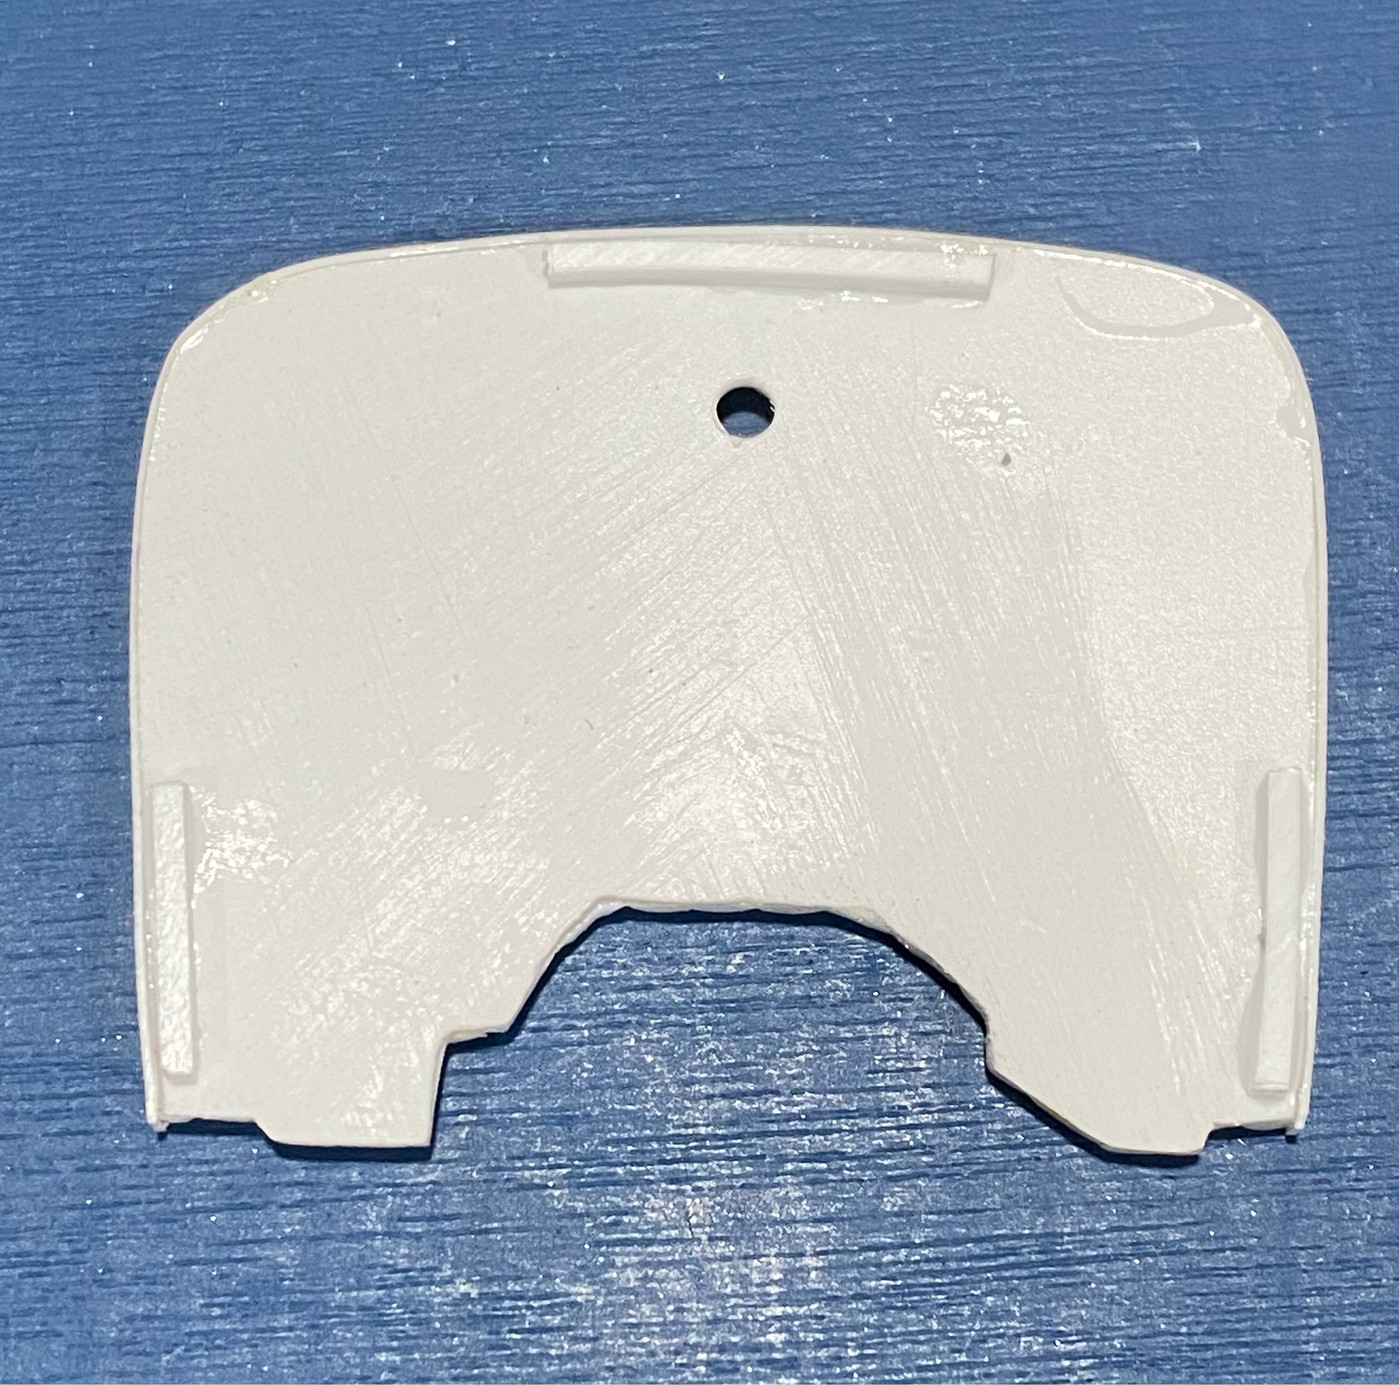 And here is the nearly finished assembly. I wrapped the outside of the whole thing with .010 x .100 Evergreen to finish of the edge and it adds a detail more prototypical to the real 1:1 firewall. Note how the upper section is removable for easy chrome and paint detailing. 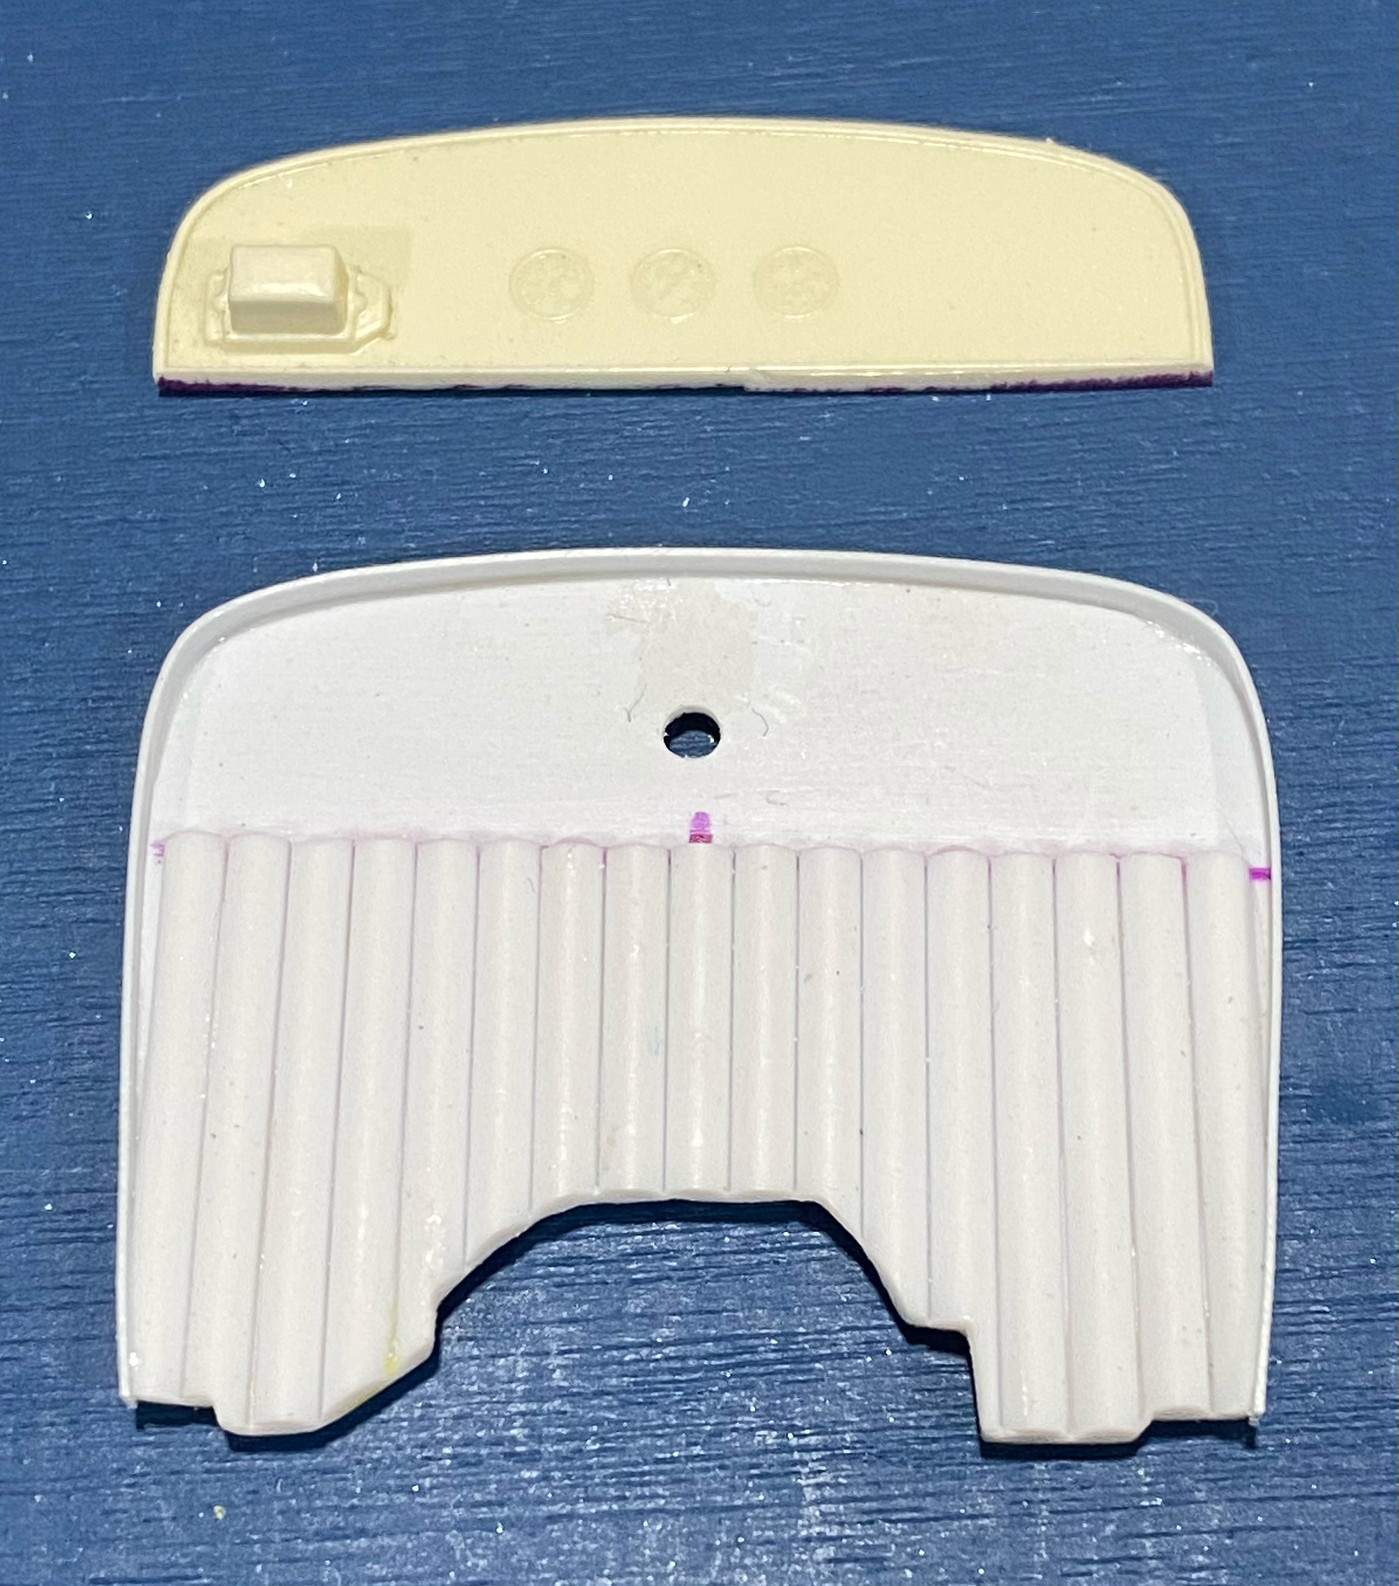 And here it is mocked up in place. Once the upper section is chromed I think only the most discerning eye will realize it's not the kit part. 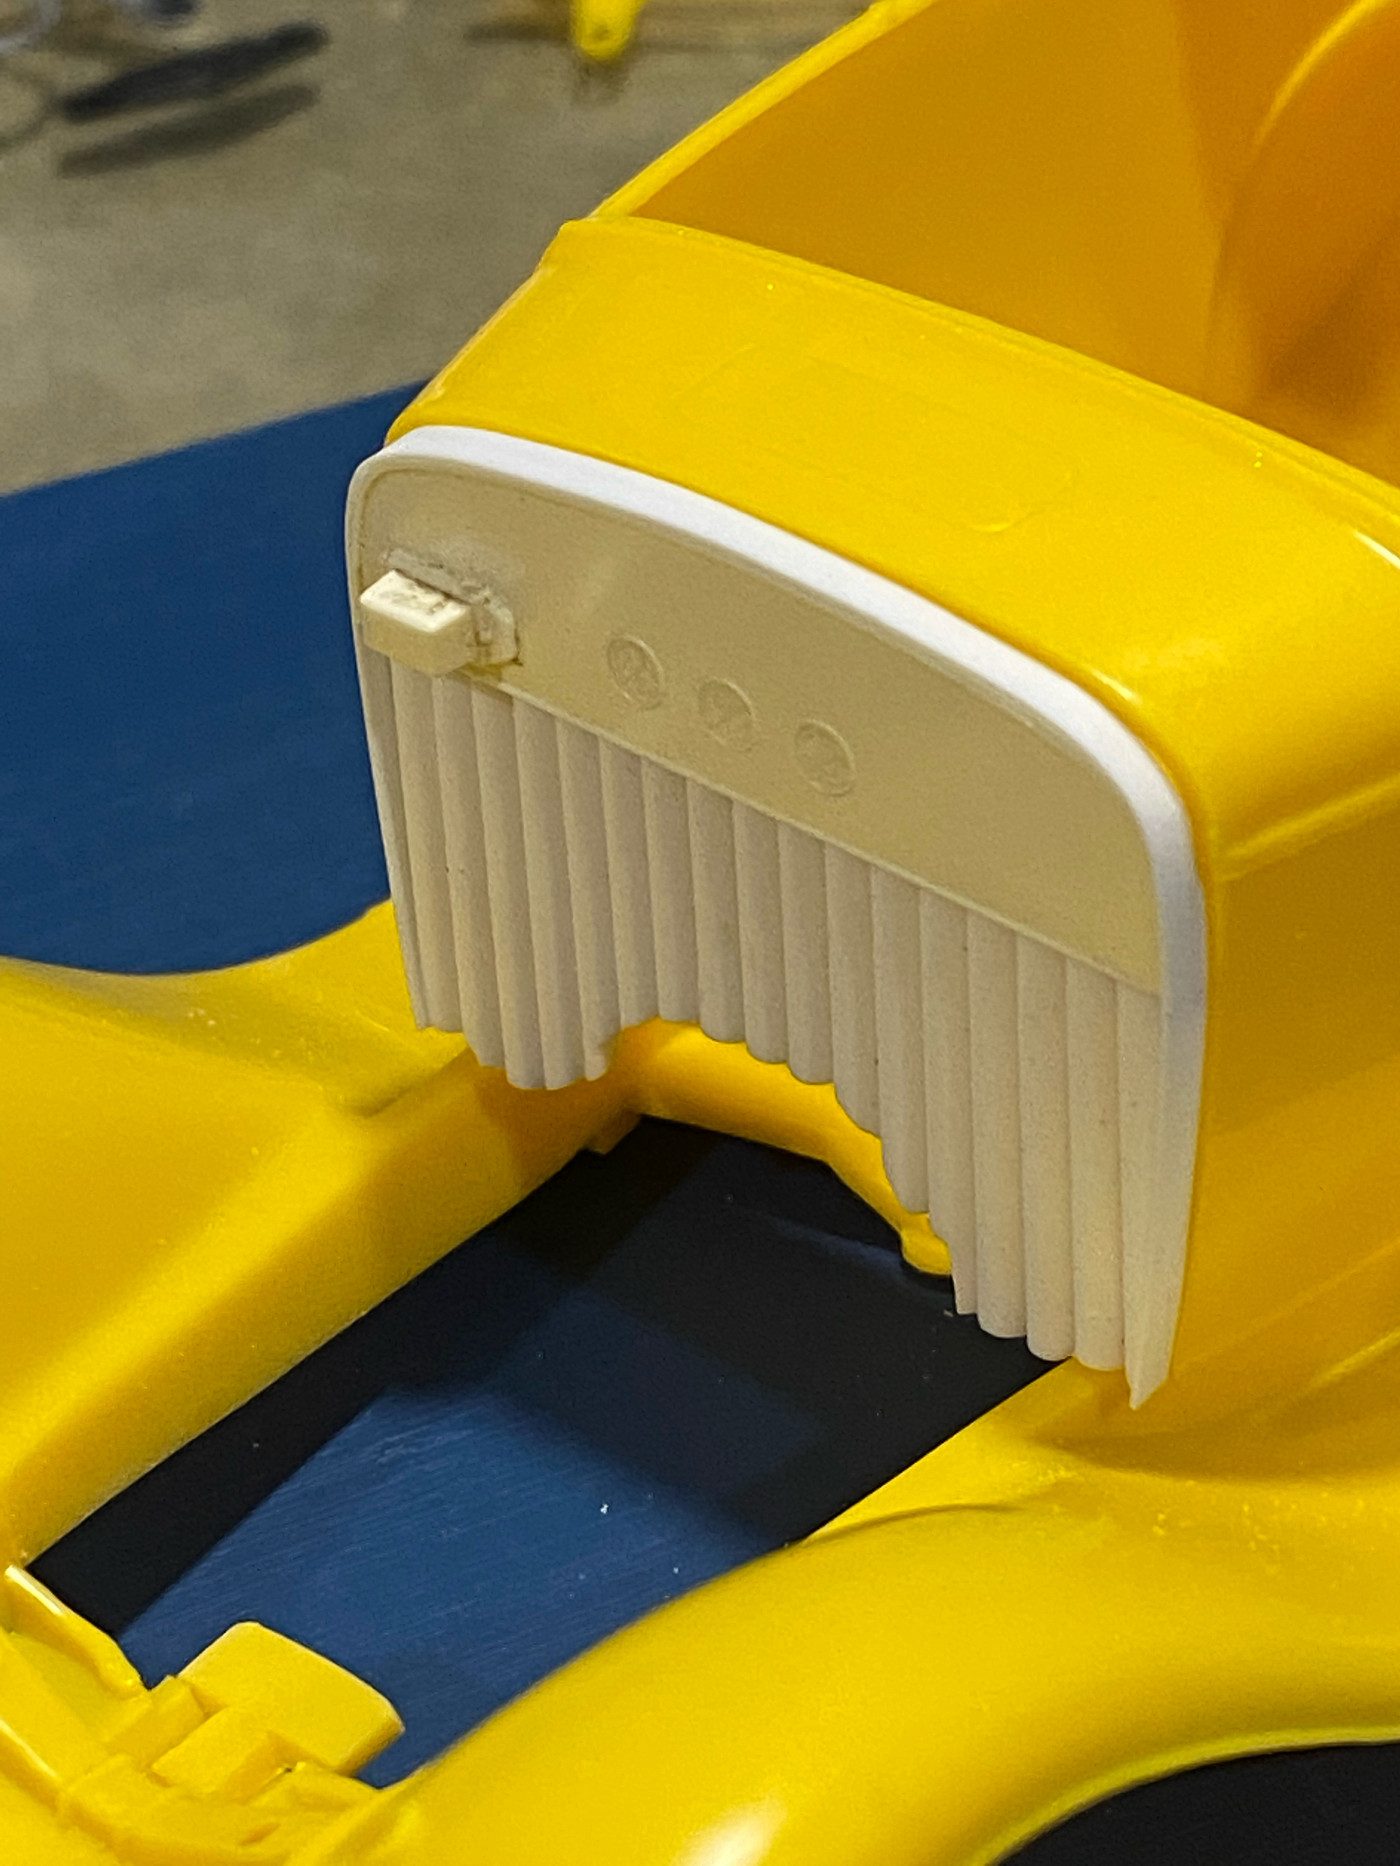 |
|
|
|
Post by robtrat on Jun 6, 2022 10:07:13 GMT -5
Beautiful! looks better than the original part. love what you are doing with this much overlooked old kit, craig. Thanks for the ride.
|
|