Deleted
Deleted Member
Posts: 0
|
Post by Deleted on Dec 28, 2010 23:45:15 GMT -5
well farg, looks like Im gonna shelf my project now  , cant wait to see this one finished. |
|
|
|
Post by Bernard Kron on Dec 29, 2010 10:35:23 GMT -5
well farg, looks like Im gonna shelf my project now , cant wait to see this one finished. As I mentioned on the MCM forum, you should build it anyway. It's more about the "vibe" of the car than accuracy. It's the kind of car that allows for a good deal of interpretation. Go for it! |
|
|
|
Post by Bernard Kron on Dec 29, 2010 10:38:42 GMT -5
This build is definitely taking some interesting twists and turns. As we all know, there are no secrets on the Internet. So, last night, a new member showed up on the MCM forum, “ Challenger 29” and posted on my build thread there. The red car in Deuce of Spades was always referred to by the filmmaker, cast and crew as “The Challenger”. Here are some excerpts of what Challenger 29 posted on my thread: Let me introduce myself. My name is Jerry Mull and I'm the owner of Challenger, the '29 Ford Hot Rod driven by "Fresno" in the film. I'm also the Production Assistant on DEUCE OF SPADES and a long list of other credits on the film. … You posted a few photos of the car I had never seen. The photos of the car in front of the barn-like garage were taken in the yard of the car's previous owner, Dave Cox. Dave had bought the car just a few months before he put a fresh red paint job on the car and threw on some rims and tires he had on another chassis. He did this and then turned the keys over to us to use on the film.
One of my many tasks on the film was to keep Challenger (and The Deuce) running during production. The first day I saw the car Faith complained that the brakes were locking up. They sure were, three wheels were set-up tight with one completely backed off. The alternator was held on by one bolt and the fan belt squealed like a pig. Every time Frank O'Leary (Fresno) would punch the gas, it would stall. So I had a few issues to handle, but the car survived the filming process.
After filming was done, the car was stuffed in the back of a 40 foot semi-trailer located adjacent to El Mirage Dry Lakebed and forgotten... but not by me! With Faith's help I was able to convince Dave to sell the car to me. I bought the car March 1, 2009 and since then have invested some time and $$$ to make it safe and reliable. The engine is a 1968 Chevy 283 V8 with a two speed Aluminum Powerglide. … BTW, my other two cars are also in the film: the black '55 Chevy and the red '55 Chevy Nomad. …
The sound used for my car in the film is that of a '40 Ford Coupe with a built FLATHEAD V8. Faith and I have had several discussions about this and it is assumed that Fresno had a Flathead powered car, and Johnny had a Chevy V8 powered car. So it was a race that symbolized the real battle of powerplants that was going on in 1955, as the new Chevy V8 came on the scene and pushed aside the Ford Flatheads that had dominated racing for decades. The end of an era so to speak. So a Tri-Powered Flathead would be OK to put in the model if you wish. In one shot you see two of the three aircleaners, and nothing else.
…
In regards to the wheels, I'm baffled too. Dave told me that he got them from another chassis he had laying around. The wheels are NOT Ford rims. They required 1" thick adapters to mate to the vintage Ford drums. The bolt pattern is not Ford. I think from their design they are Chrysler wheels. The front wheels/tires are 6.70x15" and the rears are 7.50x16". However the adapters did make it possible to have a set of very low profile smoothie hubcaps (hubcap clears the protruding axle & hubs). These adapters do make the track width of the car wider and maybe more stable. If I weren't so concerned about keeping the car looking like it did in the film, I'd remove the adapters and I would put '53-'56 Ford pickup wheels (15") up front, and '46-'48 Ford wheels (16") out back. And I'd probably use 1940 Ford Deluxe hubcaps or 1948 Ford hubcaps all around. I new about the dubbed flathead audio, which I think Faith Granger mentioned on one of her posts on the H.A.M.B, but I forgot about it. As a result of Jerry’s input I’m back to running the flattie after all, this time with three 97's. I have some very nice Evans heads and Fenton style headers and a Mallory mag to complete the package. I’ll go with proper Ford steelies, trying for 16’s at the rear and 15’s in front, but most likely I’ll stick with the smooth caps since they are so much a part of the look of the car. Regarding accuracy, my inevitable "drift" from a meticulous replica is already "in play" with the discussion about the wheels. Another area will most likely be the rear deck louvers. The Archer decal louvers are not very tall and tend to get buried under paint. While they work well under thin metallic paint as I used on the hood, under layers of primer, color and gloss they tend to get lost. So I'm considering using the louvered rear deck from the Drag City Casting. It’s the reverse of the louvers on the 1:1 which run their V pattern bottom to top. So we now have a direct line to the facts and particulars on The Challenger. Jerry has offered to provide any further info that might be needed. He’s also encouraging anyone who wants to model his car or the Deuce of Spades to get on with it! The more the merrier. He’s aware of a group of Canadian modelers who are building accurate replicas of the three major cars in the movie, the DOS, The Challenger, and a ’34 Ford Pickup, in 1/8 scale which they will donate to the movie to be used to promote it. I’ll keep you all posted as things progress. Curiouser and curiouser…  |
|
|
|
Post by Bernard Kron on Jan 7, 2011 8:33:17 GMT -5
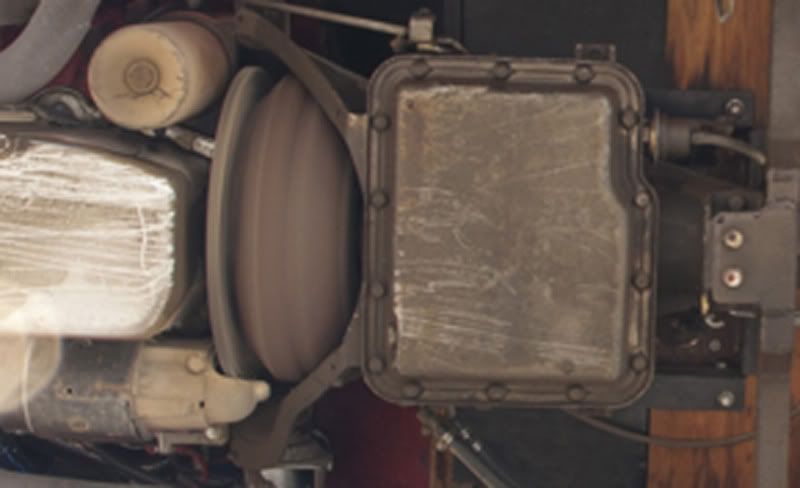
I've kinda been jumping around from one part to another on this build, the nresult being that I;ve gotten a little bit done in several areas. I've gotten the interior to the point where it's starting to resemble the original. The bolsters along the top of the seat and along the front of the bottom are cut from the Revell '32 Ford Roadster seat. All the rest except the floor, which is from the AMT '29 Ford Roadster kit, is styrene stock. This is a rough mockup held together with rubber cement. The seams will be filled in with quarter round styrene. I'll paint all the panels separately and then assemble them to get as clean a separation between panels as I can. I still have to figure out how to model the contour of the seat back bolster where it meets the tops of the doors. 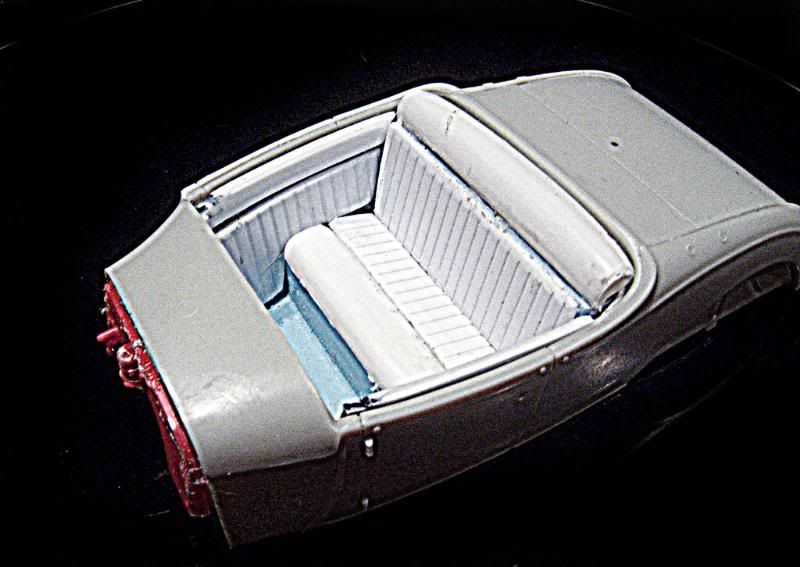 Jerry Mull, the owner of the 1:1, has been sending me additional pictures including this view of the underside taken when they strapped the car to a forklift to take a series of 700 (!) still shots of the car from various angles for computerized graphics work. Why, you may ask, did they need shots of the underside of the car? That would be giving away the plot… 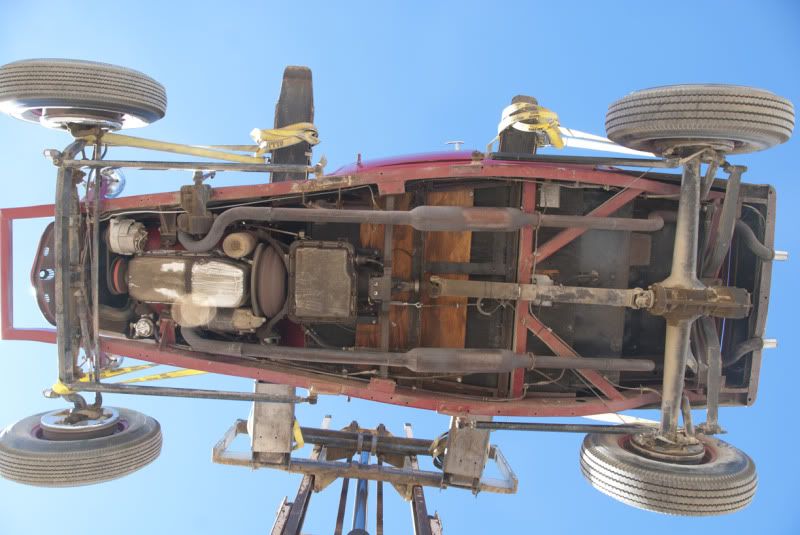 I did the rear crossmember before Jerry sent me the undercarriage picture. As mentioned above, it's based on a screen grab from the DVD. I guessed pretty well as to the shape and location but the 1:1 has a square tube crossmember so I'll remove this and substitute the square stock when I buy some this weekend. I'll probably keep the Revell floor pan instead of making up one like the one shown in the Jerry's picture because it's an integral part of the frame structure and cutting it up at this point would be a major nightmare. I will, however, fill in the slot down the middle. 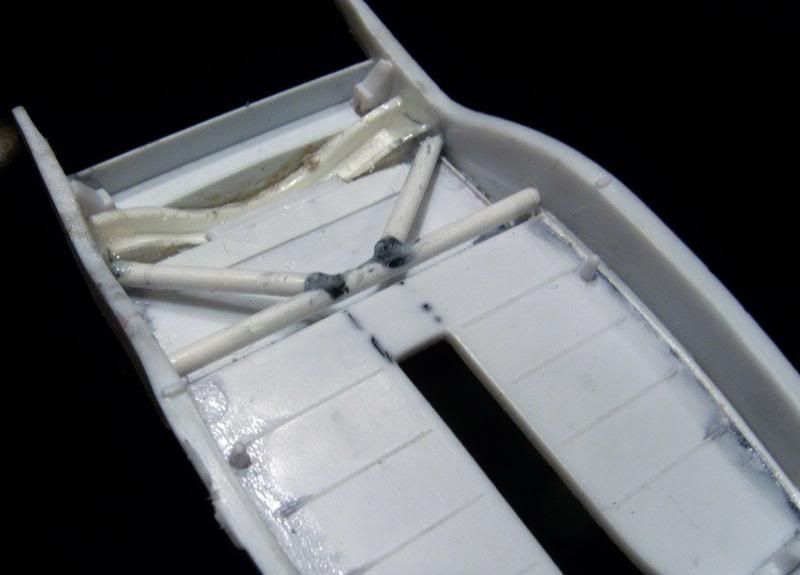 This is the motor which is about half done. The block and transmission are from the Revell '40 Ford coupe. The heads are beautiful renderings of Evans high compression heads from Model Car Garage. They also make Sharp, Offenhauser, and Edelbrock versions, all in both front and center port variants! They are drop dead gorgeous. Unfortunately they're a little tall for the Revell block, even though they're the proper width, so I had to add some material to the deck of the block to bring the intake manifold in alignment. The intake manifold and the offset fanbelt are from Early Years Resin while the carbs, air cleaners and Mallory "crab" style distributor are all from Replicas & Miniatures Co. of Maryland. Yeah, I know, the carbs are all cockeyed. I've already removed them. They go on straight the next time! 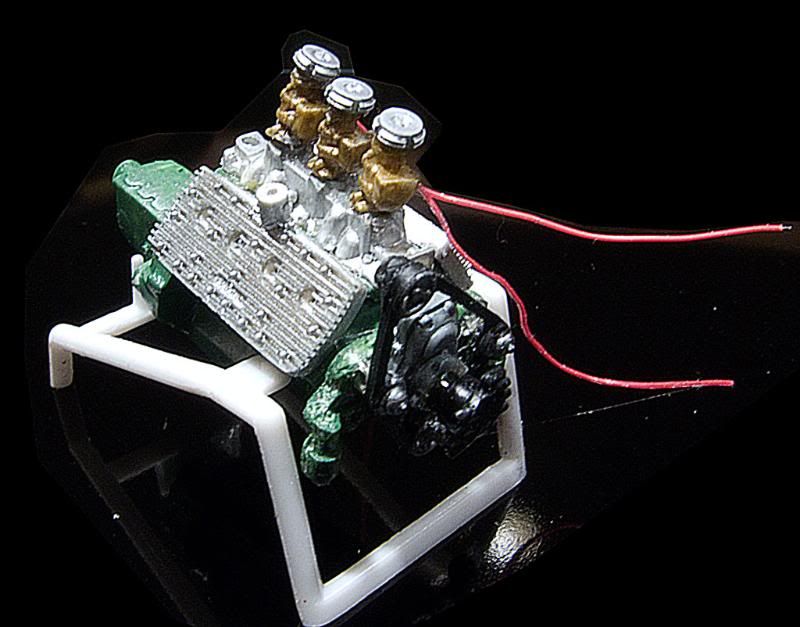 These are the rear tires and wheels. The tires actually off of the Monogram 1/24th'57 Corvette but they measure out almost perfectly for 16" wheels in 1/25th. The red color was painted in using Photoshop to get an idea what they might look like. The 16" Ford style wheels are from ThePartsBox.com. The baby Moons are from the AMT '40 Ford Sedan Delivery kit. The front tires are planned to be Modelhaus T-120C's, but delivery from them will take several weeks so either I find an alternate source for them or a proper substitute. Since the tires and wheels are so much a part of the signature look of the car this is important stuff. You'll note that the rears aren't dished as on the 1:1. This is in keeping with the "idealized" version along the lines of the flathead power (that's my story and I'm stickin' to it). 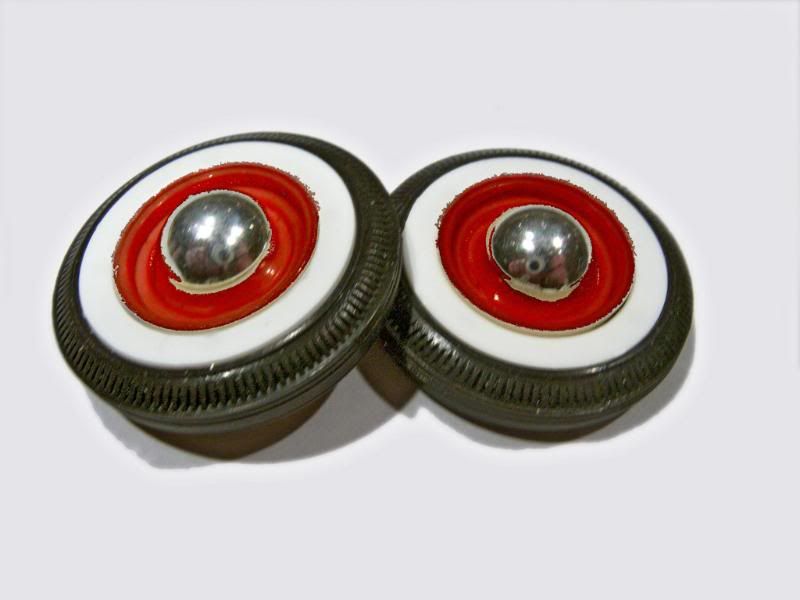 Finally, here's a picture of the front axle I'm using, courtesy of ThePartsBox.com. A very nice resin casting of a genuine I-Beam dropped axle that fits the Revell front crossmember perfectly. It comes with finned front drums which I've sanded off to represent the plain items on the 1:1.  That's it for now. Massive thanks to Jerry Mull for all the great pics and background info. Thanx for lookin' B. |
|
|
|
Post by ddlova on Jan 8, 2011 13:24:35 GMT -5
anyone notice that the car is running in the wicked cool shot Bernard posted above? look at the flexplate and torque converter!
|
|
|
|
Post by Bernard Kron on Jan 8, 2011 14:17:23 GMT -5
|
|
|
|
Post by ddlova on Jan 8, 2011 21:21:25 GMT -5
it could have been really scary had it been running AND in gear!
not sure why i noticed that it was running right away but when i was 16 i was under my Chevelle looking up at it the same way. it wasn't hung from a forklift thought thankfully, just parked over an old school "pit" in a bus garage.
|
|
|
|
Post by Bernard Kron on Jan 8, 2011 22:52:45 GMT -5
it could have been really scary had it been running AND in gear!... Funny you should mention that. I kept looking at the u-joints and the rear wheels. The image of the old school pit brings back the memories... |
|
|
|
Post by challenger29 on Jan 11, 2011 2:21:05 GMT -5
Hi guys, it's me Jerry, the owner of Challenger. About the wheels they are not Ford, as I would have preferred. The previous owner of the car, Dave Cox, put those wheels on from another chassis he had "laying around". After putting the quick repaint on the car and wheels he turned the keys over to us for FREE use of the car. Pretty awesome! Judging by the look and the adapters required, I think they are Chrysler wheels. They are not reversed, but they do have an offset look. The 1" thick adapters no doubt add to this look and so do the low profile smoothie caps. As I mentioned at the MCM site, I would have preferred that the car have Ford wheels with '40 Ford Deluxe caps or '48 Ford caps. Sorry, but I do love the whitewalls. Really sets the car apart from others you'll see, as does the unpainted Aluminum hood. And no I won't be painting the hood. I get asked that frequently. My goal is to keep the car as close to the look it had in the movie. Afterall you'd never repaint the American Graffitti Coupe red, would you? Movie cars hold their value and appeal if they stay true to the film. Besides I promised Faith I would keep it the same. She absolutely loves Challenger!
|
|
|
|
Post by Bernard Kron on Jan 14, 2011 0:43:32 GMT -5
Thanx to everyone who’s following along. I hope you’re having as much fun as I am! Jerry’s been feeding me lotsa pictures and stories and generally keeping me honest. I generally don’t build full-on replicas and I’m not sure how successful I’ll be at this one, but I’m trying my best. The “upholstery” is now completed. I did a fairly extensive red, notably dramatically extending the large bolster on the seat back downwards and adding curved pieces on the sides as well as a small bead of half-round styrene along the edge to simulate the stitching on the 1:1. I used Testors Insignia Red acrylic for the seating surfaces. The carpeting and seat base are Testors British Crimson. The differences don’t photograph well but are fairly obvious in real life. The large seat back bolster remains separate from the rest of the interior and will be glued in place from above once the interior bucket is inserted in the finished body. I’ll also add door handles during the final assembly process. In the pictures below I included shots of the basic seat bucket that comes in the AMT kit for contrast. Now back to the mechanical bits and bodywork… Thanx for lookin’, B. 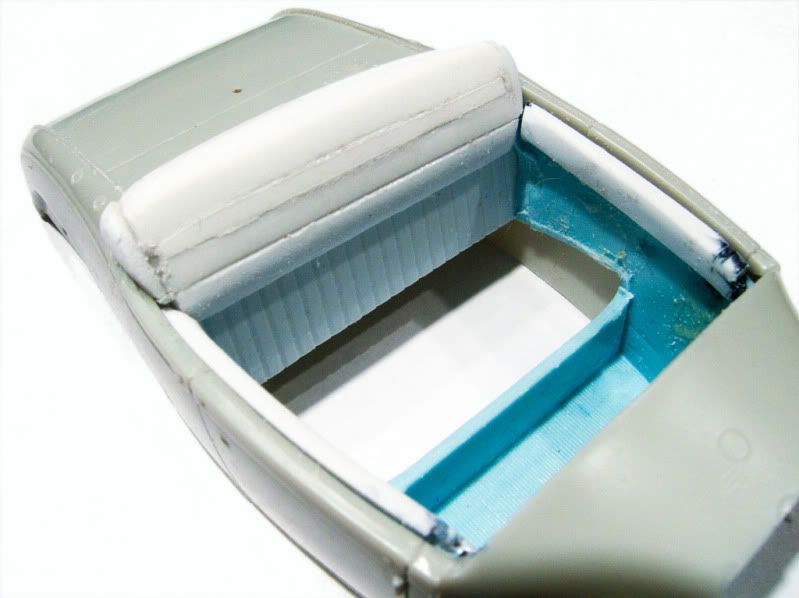 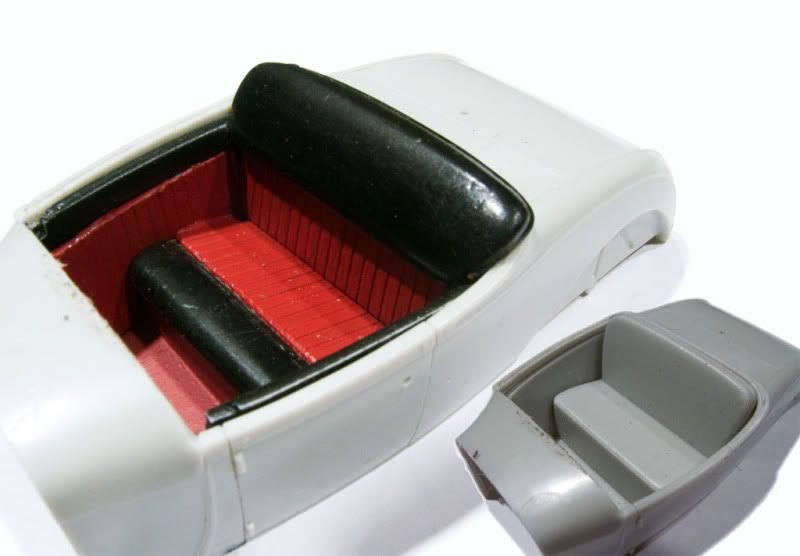 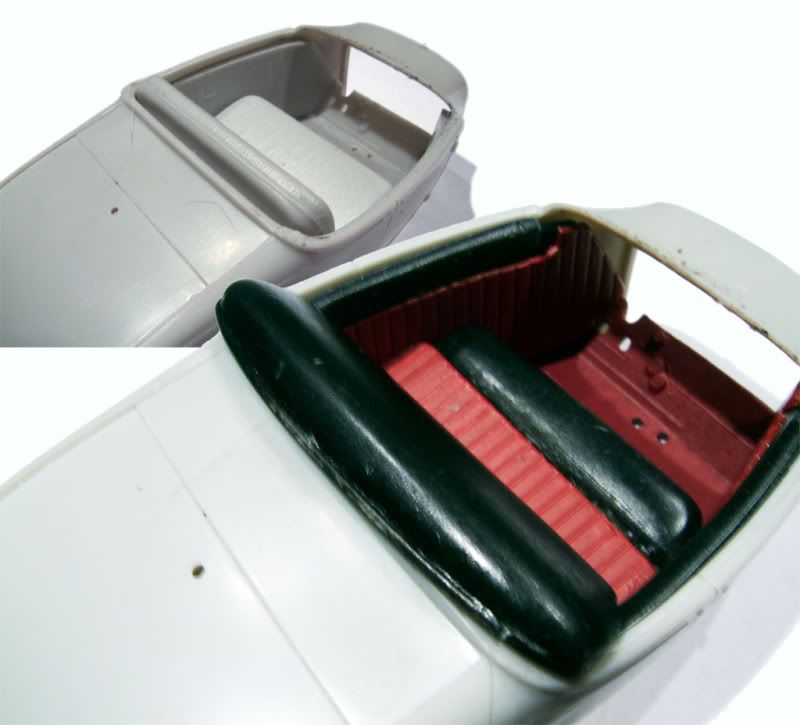 |
|
olds
Rebel

Posts: 69
|
Post by olds on Jan 18, 2011 9:39:15 GMT -5
cool!! you see it and you do it...Incredible...
|
|
|
|
Post by rbartrop on Jan 21, 2011 14:45:52 GMT -5
The R&C Dream truck had a small block by the fall of '54, I think, so having one in a roadster in 1955 wouldn't be too far fetched.
|
|
|
|
Post by Duane on Jan 21, 2011 16:42:20 GMT -5
build it B !!!!!!
Richard,
you're correct !!!! got
the article right here.
|
|
|
|
Post by Bernard Kron on Jan 24, 2011 8:56:20 GMT -5
This is taking me a bit longer than I thought, but progress is being made. Doing a replica build has its own peculiarities including proper scale and placement of details. As mentioned earlier I’m leaving the Revell floor pan in place since removing it would require me to totally disassemble the chassis. Instead I’ve finished the floorpan in Testors Metalizer Gunmetal applied with a brush in multiple layers, which I’ve found creates a fairly realistic worn undercoat effect. The white parts of the chassis in the pictures below will be finished in body color. The tabs on the bottom of the frame rails are brackets for the suspension control arms. 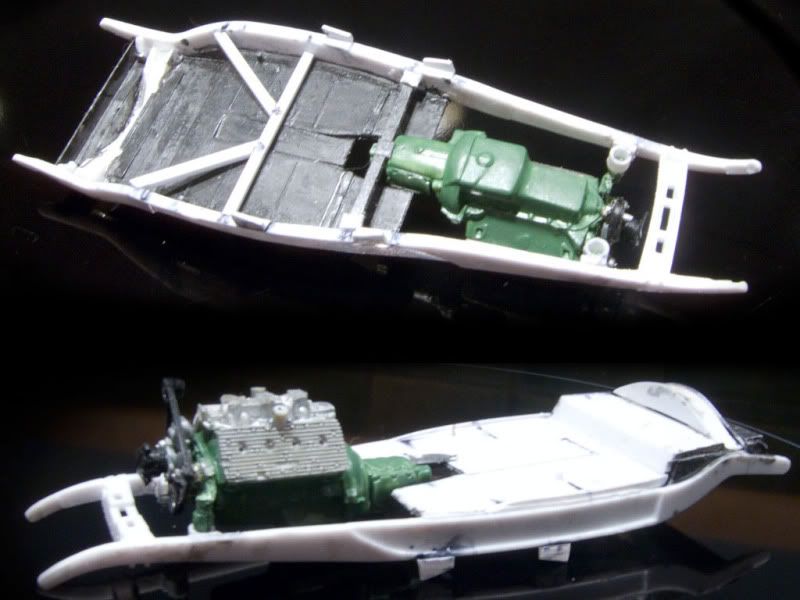  Also completed are the front and rear suspension subassemblies. The front axle and spring, as well as the rear spring and backing plates, are finished in Testors Metalizer Gunmetal and the brake drums in Testors Metalizer Exhaust with the backing plates foiled in Bare Metal Foil Chrome. The rear axle housing are finished in Tamiya Semi-gloss Black with the Halibrand center section done in Testors Metalizer Aluminum Plate. The rear suspension is from Replicas and Miniatures Co. of Maryland  Time to break out the red paint! Thanx for lookin’, B. |
|
Deleted
Deleted Member
Posts: 0
|
Post by Deleted on Jan 24, 2011 13:06:54 GMT -5
Looking good Bernard. What wheels and tires are you using?
|
|