|
|
Post by Bernard Kron on Jan 24, 2011 13:58:30 GMT -5
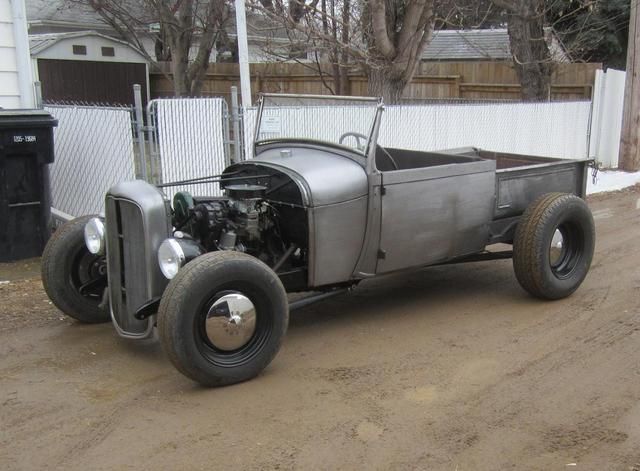
...What wheels and tires are you using? Thanx Donnie. The 1:1 has 15" front wheels and 16" rears. On the rear I'm using 16" Ford style wheels from ThePartsBox.com. The rear tires are actually off of the Monogram 1/24th '57 Corvette but they measure out almost perfectly for 16" wheels in 1/25th. The front tires are planned to be Modelhaus T-120C's which are on order (I hope they make it to me in time for the NNL West where I aiming to show it). The front wheels will be Modelhaus Ford style wheels. The baby Moons are from the AMT '40 Ford Sedan Delivery kit. The tires and wheels are so much a part of the signature look of the car this is important stuff. As I pointed out in reply #18 above, the wheels aren't dished as on the 1:1, in keeping with the "idealized" version along the lines of the flathead power the filmmakers imagined the car actually had. |
|
Deleted
Deleted Member
Posts: 0
|
Post by Deleted on Jan 24, 2011 14:03:56 GMT -5
I hope to see it at the nnl, seeing is how you and I are riding in the same car to get there ;D thanks for the info.
|
|
|
|
Post by Bernard Kron on Jan 24, 2011 14:25:19 GMT -5
...seeing as how you and I are riding in the same car to get there.. You're kidding! Really? |
|
Deleted
Deleted Member
Posts: 0
|
Post by Deleted on Jan 24, 2011 14:29:35 GMT -5
you mean Raul didn't tell you that part lol, yeah, Im gonna meet up with you guys at his house, seeing he only lives 20 mins from me.
|
|
|
|
Post by Bernard Kron on Jan 24, 2011 15:26:01 GMT -5
you mean Raul didn't tell you that part lol, yeah, Im gonna meet up with you guys at his house, seeing he only lives 20 mins from me. No he didn't... Very cool. What a small world. Amazing! ;D |
|
|
|
Post by Dennis on Jan 24, 2011 22:40:04 GMT -5
Good work, B! The frame members look really close to the real car. Although, I think in real life I would want something more substancial to mount the transmission to! The front and rear axles look great in those colors. Man, the detail is so crisp on that resin 'changer.
Looks like you have some major masking in your future to keep the red off of the floor sections.
|
|
|
|
Post by Bernard Kron on Jan 24, 2011 23:01:06 GMT -5
...The frame members look really close to the real car. Although, I think in real life I would want something more substantial to mount the transmission to! ...Man, the detail is so crisp on that resin 'changer. Looks like you have some major masking in your future to keep the red off of the floor sections. Thanx Dennis. The masking is done and it was major!  The transmission mount on the 1:1 is awfully flimsy, just look at the picture Jerry sent. If I did an accurate replica of the underside in styrene, without the floorpan, I'm not sure it would hold together. That Halibrand QC from RMCM is amazing, like so much of his stuff. Sometimes Norm knocks off a piece from a kit, but he almost always improves it when he makes the master, usually adding detail and sharpening up the edges, etc. But if his casting wasn't so incredible it wouldn't matter. I've had this in my stash for almost two years waiting to get used as I gradually worked my way through my kit pieces. Now if the rest of the build was up to the standard Norm sets... |
|
|
|
Post by Bernard Kron on Jan 25, 2011 8:15:38 GMT -5
...Looks like you have some major masking in your future to keep the red off of the floor sections. Thanx Dennis. The masking is done and it was major! ... Actually, it occurred to me that the masking was really not as complicated as all that. The rear crossmember and the two diagonal braces were just tacked in for the photograph. They were removed and will be painted seperately and glued in during final assembly. |
|
|
|
Post by Bernard Kron on Feb 5, 2011 21:32:36 GMT -5
The paint is complete. Duplicolor Torch Red over Duplicolor white primer with two coats of Krylon clear over the top. This color is no longer available in rattle cans from either Duplicolor or PlastiKote. A real bummer for us non-airbrush types. This was my last can and I just made it with a tiny bit left over for touch ups if I need it. The rear deck louvers came out better than on my last build using Archer louver decals, much crisper with better definition. I changed my technique, applying the louvers over the main color coat and then applying a thin final color coat over them. The photograph emphasizes the black of the louvers a bit more than in real life. They actually look more red than it shows with just enough dark bleed through to simulate the slits in the louvers. Because there are just three light coats of paint over the louvers they also sit on top of the surface a lot more. I redid some of the louvers and the paint on the hood and in these pictures the Metalizer hasn’t been buffed out. Obviously, there is no kit for this model, and, because it’s a replica build, almost everything has to be fabricated or modified. I had to make a new firewall from scratch to accommodate the flathead motor. I used the upper portion of the AMT kit firewall and some styrene sheet. I’ve also fabricated the steering arm on the front axle from .035” styrene rod and styrene sheet, along with a tie rod. I still have to find a steering box for it and haven’t quite decided what to use for a steering wheel. Rear shocks will have to be fabricated and mounted, too. But the wheels are painted, the chassis largely complete and most of the interior done except for the dashboard and that unusual combined hand fuel pump and gauge panel. I think I have a shot at getting it done in time for NNL West on February 27th. The long pole in the tent is the front tires coming from Modelhaus. They should just get here in time… Hopefully next week I’ll be able to show pictures of the car up on it wheels (I’ve got blackwall front tires for fitting work). In the meantime… Thanx for lookin’ B. 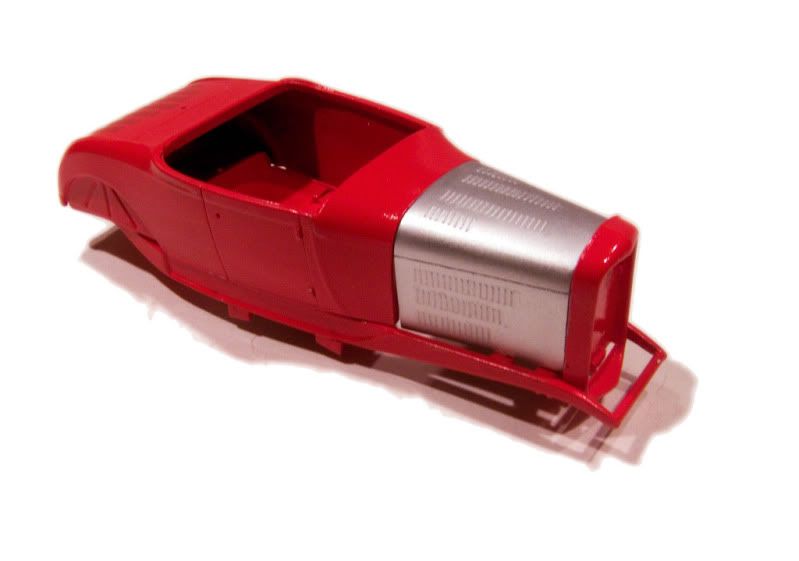 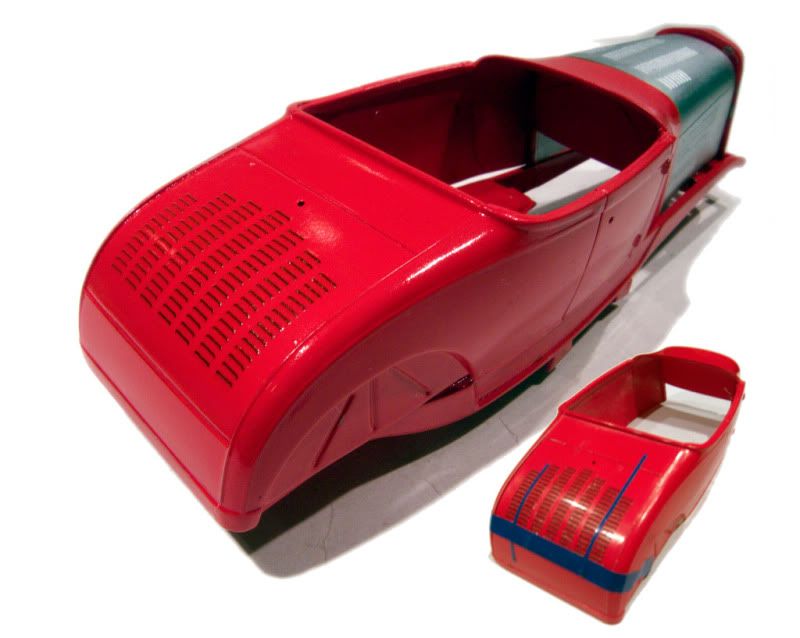 |
|
|
|
Post by gmckid on Feb 5, 2011 21:43:34 GMT -5
Wow thats an eye catching colour, i like the way the aluminum hood looks on there.
The deck lid louvers are very realistic.
|
|
|
|
Post by el_loco on Feb 5, 2011 21:48:23 GMT -5
Great project and you are making excellent progress, looking forward to seeing it finished!!!
|
|
|
|
Post by Dennis on Feb 6, 2011 0:44:59 GMT -5
Looking pretty damn nice, Bernard! That paint is RED! Looks like the louvers turned out great, better than the Lobeck car I must say. Can't wait to see it up on some wheels so we can really get a feel for the "look".
How did it go with the masked floor pan?
|
|
|
|
Post by rbartrop on Feb 6, 2011 0:49:53 GMT -5
That is going to look sharp.
|
|
|
|
Post by Bernard Kron on Feb 6, 2011 6:04:39 GMT -5
Thanx guys! ;D Looking pretty damn nice, Bernard! That paint is RED! Looks like the louvers turned out great, better than the Lobeck car I must say. Can't wait to see it up on some wheels so we can really get a feel for the "look". How did it go with the masked floor pan? Yeah I'm starting to get excited about getting it done. I'm tackling this replica build because of the "look" of the 1:1. When I mocked up the painted frame and body with the aluminum hood I knew I was getting there. I wish those damn Modelhaus T120C's would get here. The rear tires and wheels with the baby moons look awesome against the red frame and rear body. The masking came off just fine. Almost no touch up required. I'll try and post some undercarriage shots in the next few days. My biggest concern right now is maintaining the discipline and focus to get it done right. There's still quite a bit of fabricating to be done... |
|
|
|
Post by cycolacfan on Feb 10, 2011 12:01:49 GMT -5
Man this is great, keep it up.
Loving the details you're putting in and the amount of help you're getting from the lucky owner of the 1:1 car is really nice to see.
Wish all replica building was that straightforward (was gonna say 'easy' but what your doing isn't easy!) keep 'em coming.
|
|