|
|
Post by spex84 on May 8, 2018 13:18:08 GMT -5
I might have to do that. I just mocked up the spindle-mounts and well, they look damn good. I'll have to think about it a little more--this T is in a state of flux. I'm continuing to swap engines in and out, trying to find something that feels right. There are 3 different cars that this build wants to be.
|
|
|
|
Post by krassandbernie on May 8, 2018 15:03:58 GMT -5
You're doomed like me then! You'll probably find yourself canceling out one of the three; and planning on building the second version at a later date just so that you can move forward building this one! LOL!
|
|
|
|
Post by spex84 on Jun 17, 2018 1:43:25 GMT -5
I keep trying to light a fire under this one, and it keeps giving me trouble! In the last few days: -started another project that will get the front axle and steelies from this project -ditched the spindle mounts, back to Outlaw wires -Outlaw axle and 4-bars replace the old one, added little batwing extensions and pinned a narrowed Revell '30 Tudor spring behind the axle. -sectioned the super-deep sump on the SOHC oilpan for clearance; fixed a bad blemish/lump on the finned area
-New interior bucket inspired by Don Kendall's super-low T. The seats are almost recliners, and the driver's feet kinda go uphill (numb legs much??). Rather than trying to make a perfectly-formed perimeter roll on the new interior bucket, I glued a half-round strip to the body to form a rolled edge. Not sure if I'll paint it body color, or mask it off and paint it to look like upholstery.
Still trying to decide if it will get a conventional steering wheel position (it would have to be on a quick-release) or a small vertically-mounted unit. I prefer the normal style...don't want this to be a clown car.
It will get a quickchange hung from quarter-elliptical springs. If I can pull it off, the gas tank will be under the floor as in Kendall's T. If not, a cylindrical gas tank will perch on the back. Either way, there will not be a distracting rear crossmember. It appears that the AMT double T windshields are clunky as hell. I'm a fan of the more delicate style that has rounded upper corners. This will either mean scratchbuilding a windshield frame from brass (gaaaah!) or maybe I can get away with inverting the nicely detailed Outlaw windshield as seen in the photo below. 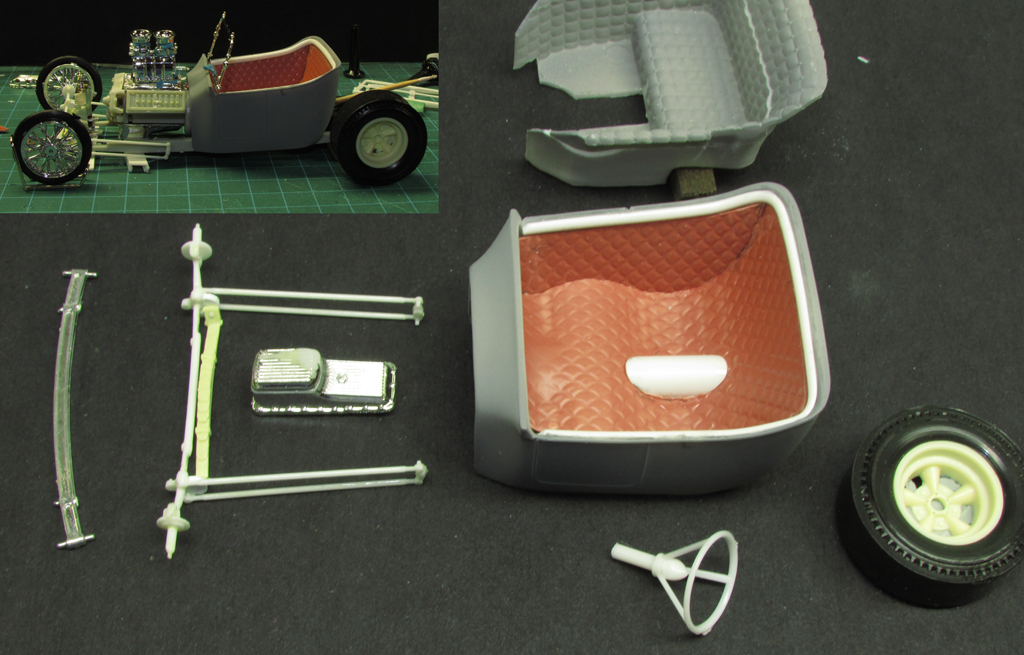 |
|
|
|
Post by Dennis on Jun 17, 2018 8:57:56 GMT -5
That interior looks really good! The mock up looks awesome, too. I think you're on the right path.
The Ed Roth Tweedy Pie also has a nice delicate chrome windshield posts and frame.
|
|
|
|
Post by krassandbernie on Jun 17, 2018 10:37:52 GMT -5
Yeah, I'm digging the interior too.....nice and whacky for this contest! It's the first thing I noticed when I started to scroll down here! You need to mail me some of that waffle sheet we talked about! LOL! I was thinking it could be molded; and then I could cast a section to work with whenever I needed to; and the castings could be heated up over the desk lamp to conform to a seat or something along those lines......then cut/sanded to shape of course. I can't wait to see more Chris!
Btw, I would make that 'bolster' around the perimeter of the tub (holding the panels in place) part of the interior upholstery when you paint it.
|
|
|
|
Post by spex84 on Jun 17, 2018 11:27:46 GMT -5
Thanks guys.
Ed, I'm leaning towards making the bolster upholstery...it just wouldn't look right for a T to have fat door caps.
The waffle-pattern plastic is actually a scenic item, Plastruct maybe? It's actually a fish-scale pattern, but from most angles it looks like diamond-stitched leather. Bernard Kron used the same stuff on his gold 60s-style deuce a few years back and I decided I could live with it not being a perfect diamond pattern.
A picky builder would want to cut two strips and butt them together to make the pattern properly symmetrical, but I was in a hurry and not even sure it was going to work!
One thing that was a surprise...in heating the trans tunnel area so I could give it a little "hump" to clear the bellhousing, the diamond pattern started to disappear as the plastic relaxed. Oops.
Dennis--thanks for the Tweedy Pie tip. I have one of those kits, but I was saving it for another project. I might pilfer the windshield frame, we'll see.
|
|
|
|
Post by Bernard Kron on Jun 17, 2018 12:05:39 GMT -5
Ditto on the interior. Let that set the vibe for the entire build. Late 60's is what you said and late 60's is where it's at. By then these things were often quite radical and not yet overwhelmed by the Fad-T mill. Besides, I've always considered you the leading proponent of Late 60's Radical style on TRaK. Show us how it's done! Speaking of radical 60's T's, you probably know about Danny Eichstedt's Leg Show T. Unfortunately not finished until late 1969 and not really shown until 1970, it lies outside the TRaK time frame, even if it was started in 1965 but delayed by Eichstedt's service in the military and picked up again in '69. To my eyes it still sets the Gold Standard for the radical show-style T-Bucket.May this serve as inspiration for this often neglected style when done in scale - glad to see you tackling it: Danny Eichstedt's Leg Show T |
|
|
|
Post by spex84 on Jun 17, 2018 13:21:22 GMT -5
Haha, Leg Show was a big inspiration. It's ridiculous, but also has gnarly cool proportions. It does, however, lie just outside of Trakability; the rear tires in particular. I'm going for something that could have been built in '65-67. Can't say I'll be showing anyone "how it's done" but I'll muddle along and hopefully something cool will result  |
|
|
|
Post by jbailey on Jun 19, 2018 8:41:17 GMT -5
In my opinion this was the hay day for T buckets and your build is coming along very well and doing a fine job of capturing that feel.
|
|
|
|
Post by mod3llover on Jun 22, 2018 10:41:52 GMT -5
I think that T-bucket is Krazy Kool!! The interior
looks really great. That is some very fine forming!!
|
|
|
|
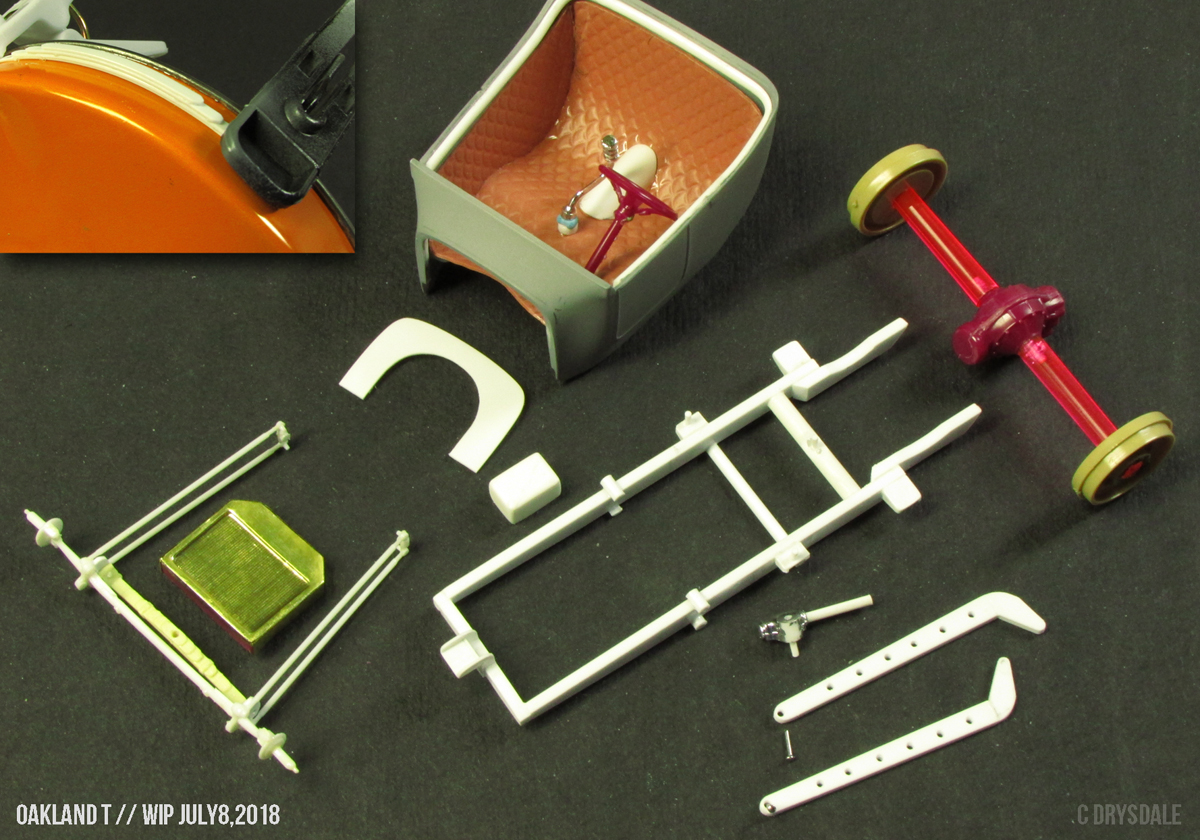
Post by spex84 on Jul 8, 2018 15:39:20 GMT -5
Since the last update things have been slooowly progressing. -steering wheel changed to the small-diameter Pie Wagon unit (it will get a bullet in the center I think) -shifter sourced from '49 Merc kit (I think?) -firewall fabbed -rear axle tubes are paintbrush handle segments
-rear ladder bars run parallel to the frame, outboard of quarter-elliptical springs (currently being fabricated). -scratchbuilt frame with suicide perch. Still need to remove the bar between the rear ladder bar mounts and build the rear kick-up/body mount, also attach the spring mounts. Front 4-bar mounts will be trimmed down too.
-Outlaw steering box located to side of frame in front of firewall. I was so focused on getting it to clear the bellhousing, I think I might have shot myself in the foot with the header clearance, might have to scratchbuild headers to fit.
-Revell '29 PU battery box will hopefully tuck in the back somewhere.
Also pictured is a semi-failed attempt to cover the Pie Wagon radiator shell with real brass sheet. The kit plating wasn't very good, and I had no way of touching up the sprue attachment points, so I sanded the sides square (they were tapered with a draft angle so the parts would exit the mold correctly) and used superglue to attach some very thin K&S sheet. Problem is, the stuff didn't stick very well, and was so thin that when buffing it down against the glue, the rough texture of the glue spots telegraphed through the brass. Damn. Looks OK in this blurry photo, but it doesn't hold up in person, let alone in close-up shots.
Now that the original kit part is pretty much ruined, I might try again, this time with thicker brass sheet. If Cliff Read can do it, so can I....right? *snort*
Thinking of calling this car the "Five Lb Bag". It's all a tiiight fit.
 |
|
|
|
Post by krassandbernie on Jul 13, 2018 11:00:59 GMT -5
I love it all Chris! We all destroy that 'last' part we had to work with. Just yesterday I chucked up a vintage Revell parts pack wheel in my Dremel to attempt to bevel a lip into the outside edge of it with an X-Acto knife (so it would fit a tire like most AMT wheels do!); and I proceeded to melt the every living crap out of it! It looked like I was doing a fine job until the Dremel stopped spinning! LOL! I ignored that voice in my head that said, 'don't do this......to this wheel! Grab a junk wheel that you don't care about and try your idea out on that one first!!!!!' If only I would have cuffed myself up the side of the head before chucking that vintage wheel up! LOL!
The kicker is that I was going to mold the darn thing; and out of the ONLY two wheels I had; this one was obviously the nicer one! The 'back-up' wheel has some tiny 'slag' marks on the outer rim that are impossible to polish out let alone sand off to begin with. So, you live an learn.......if you're smart you'll learn anyway! LOL!
|
|
|
|
Post by spex84 on Jul 13, 2018 14:32:44 GMT -5
I know how that feels for sure.
|
|
|
|
Post by Joker on Jul 15, 2018 23:54:24 GMT -5
Dude !
Killer parts options going into the T-Bucket build.
I'm gonna have to send my cash in and join in the fun.
Keep us posted.
|
|
|
|
Post by mod3llover on Jul 18, 2018 13:12:51 GMT -5
Chris, I think I have an extra "Pie Wagon" grill
if you are interested in it!?!
Also, I love this build, so . . . . .
David S.
|
|