|
|
Post by chepp on Nov 18, 2019 14:35:38 GMT -5
The fender extension will really complete the pod-like design! Have you considered adding small subtle peaks to the forward top of the rear fender assemblies to "bridge" the front and rear end styling?
I should have responded to this sooner. That's a good idea. I want the front and rear fender styling to look "together."
I'll also revise the lower/front area of the rear fenders so they won't look so Firebird TransAm-ish.
|
|
|
|
Post by chepp on Dec 10, 2019 0:53:51 GMT -5
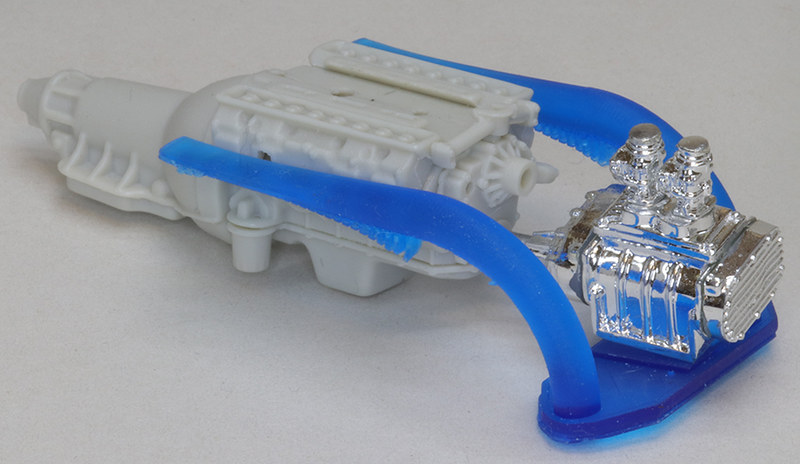
Well, it's a start. This is my first attempt at making a model car part using a 3D drawing program (errr, "app") and "printing" it on a resin printer. It's only my second time doing this (the first was an HO scale model railroad street lamp post). I'm teaching myself Fusion 360 to draw the part. The printer is a Peopoly Moai at a maker space that I belong to. The engine is from the AMT '66 Riviera and the blower is from the drag version of the Revell Roth Beatnik Bandit.
Here are few of my problems to be fixed:
The blower should sit squarely on the manifold but I drew the slots for the blower's alignment tabs 180˚ off.
The pipes near the engine should be straight, horizontal and round but got distorted. Only a vestige of temporary supports (those rough-looking things on the underside) got printed so there wasn't enough support. The plenum under the blower needs to be thicker and have more detail (I'll have to make it up since the photo of the dragster engine in an earlier post doesn't show it).
|
|
|
|
Post by chepp on Dec 24, 2019 21:07:55 GMT -5
Here's what the revised "print" of my 3D drawing looks like right out of the machine. Those supports are necessary to keep it from sagging during printing but they are easily snipped off.
The plenum has a "T" shaped cut-out that matches up to the bottom of the blower from the Roth Beatnik Bandit. Tabs on the big pipes help them align to the holes in the engine heads.
I shortened the pipes where they join the plenum. This is still a preliminary mock-up so I'll be correcting the 3D drawing. The kit's alternator and power steering pump (and belts) have been revised to mount the equipment 180 degrees forward of where Buick had 'em. These, too, are just a mock-up. Maybe I'll be able to make them as a 3D print, too, with realistically sized belts. The big pipes will be reduced in diameter so they don't interfere with the A-arms.
|
|
|
|
Post by spex84 on Dec 24, 2019 21:38:55 GMT -5
Cool! I love how 3D printed stuff is beginning to be a little more common in car modeling. I need to learn Fusion 360 too. I have it installed, but have not managed to commit enough time to learn the techniques I need to achieve results I'm happy with. Does that Makerspace have a monthly membership fee? Yearly? What kind of other equipment do you have access to there? I ask because I work in a library that has recently added a Makerspace (no 3D printer sadly) and I'm keen to pick up ideas from other examples. *edit* Oh yeah, and the reverse-flow blown nailhead with custom intake plenum is a rad idea; intake looks good so far!  |
|
|
|
Post by chepp on Dec 25, 2019 0:18:52 GMT -5
Thanks, Chris. The maker space I belong to charges $75/month ($40/month for students). It's intended for people to start/run businesses but there are a few artists, too. And then there's me: making a few scale model things for my own amusement. Here's a list of the tools: www.umakers.org/tools-and-equipment .
Fusion 360 is maddening for me to learn. It is not intuitive. I'm used to 2D drawing with Adobe Illustrator and just want to click on a point and manipulate it but Fusion 360 usually doesn't let me. So, I spend 10 seconds figuring out what I want to do and 10+ minutes trying to achieve it. I guess it's the sort of thing where once you figure it out you'll have to keep doing it fairly often in order to retain it. Also available free from Autodesk is a "slicer" app called Asura that translates the 3D drawings stl format into gcode that the printer can understand. Asura is easy and fast. Best of all, it creates the supports automatically at your command then lets you change them around if you want.
The print above is made with the lowest resolution setting. If you look closely you'll see unpleasant layers, especially where each pipe curves. I did that so it would print quickly -- about 1-3/4 hours. At the highest resolution setting the surface will be nearly smooth but it will take a long time to print -- maybe 8 to 10 hours?
|
|
|
|
Post by spex84 on Dec 25, 2019 12:39:26 GMT -5
Gotcha! Thanks for the link.
Regarding Fusion 360, I feel ya. I found it very frustrating. I've used Rhino, AutoCAD, 3Ds Max, Illustrator, and wasn't able to get my head around Fusion. Things that I thought should work...didn't. I thought the whole point of parametric modeling was that I could go back and modify the drawings, and the model would change, but it seems it doesn't quite work that way. I know there's a workflow where everything will make sense and flow...but I have to spend the time to learn all the idiosyncrasies.
For slicing models, I plan to use ChituBox. Apparently Prusa slicer works well too. I use NetFabb, 3Dtool, and Meshlab to modify and patch damaged meshes. As far as I know, they're all free except for NetFabb (and it used to be free too).
|
|
|
|
Post by falconwagon on Dec 25, 2019 12:44:29 GMT -5
Lots of work but should look cool when done.
|
|
|
|
Post by chepp on Jan 13, 2020 19:53:25 GMT -5
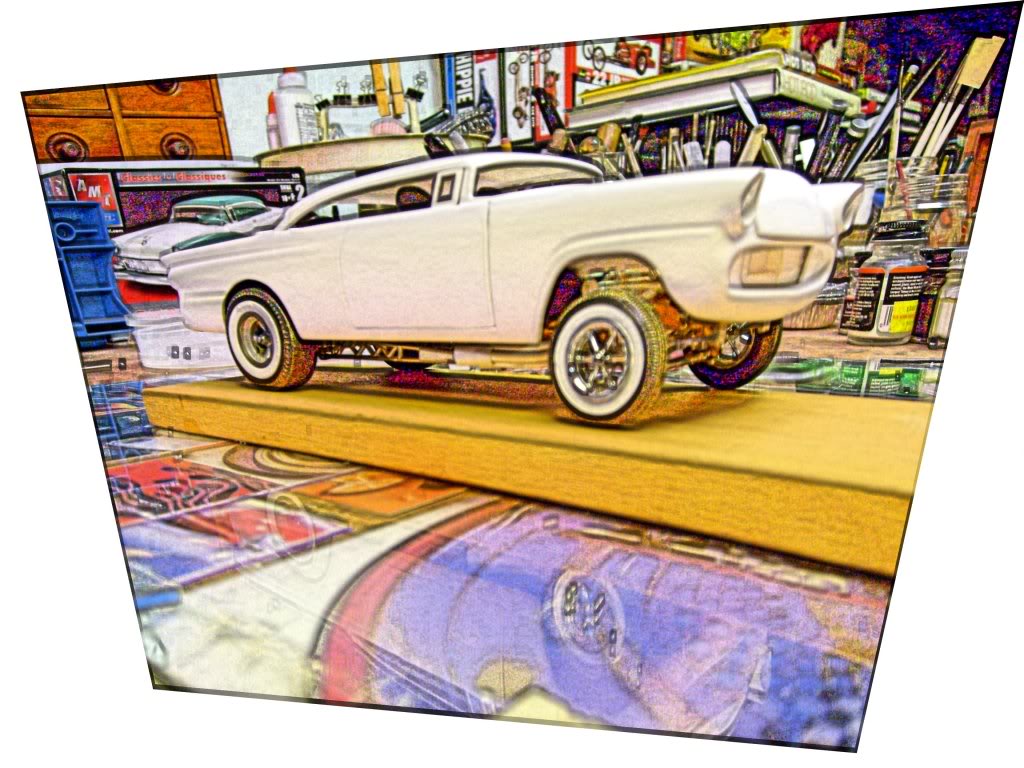
The hood is now 3/4" longer than before. About 5/8" of the earlier hood was retained with cut-up parts from a second kit forming the front part. The second kit also provided the parts for the upper grille trim and the grille/bumper. All were cut into three pieces to narrow them then were glued in place. Layers of 0.060" styrene were built up to fill in the hood sides to accommodate the added length. I left the grille divider and the windsplit trim in place but I might remove one or both later.
To help balance the appearance I pie-cut and narrowed the trunk lid from a second kit to add a pointed rear end. This makes the car look longer without having to extend the frame. It also helps to repeat the "pointy" styling elsewhere on the car. The bumper (to later represent a rolled pan) was re-jiggered to match it. This change also moves the bumper/pan away from the gas tank on the floorpan.
Not shown are the front fender extensions, yet to be made, on the doors.
To go with the glacier-like pace of this project I'm thinking about making the fenders a medium blue and the body a silvery or pearl blue color. Of course, it would have some sort of custom candy, flake, fade appearance.
|
|
|
|
Post by Murphy on Jan 14, 2020 7:43:12 GMT -5
I really like watching your progress on this, it's purely inspirational-
|
|
|
|
Post by spex84 on Jan 14, 2020 22:08:18 GMT -5
Insane! It looks much more proportionate with the extended hood. Will the front fender pods be lengthened to match?
|
|
|
|
Post by chepp on Jan 14, 2020 22:23:31 GMT -5
Insane! It looks much more proportionate with the extended hood. Will the front fender pods be lengthened to match? I hope not! That would create a lot of dead space on the front fenders ahead of the wheels. An alternative would be to move the front wheels and the fenders forward together. I won't really know how it will look until I get things smoothed out and filled in then have a coat of primer on it. I think if the extended front (as it is now) looks goofy I'll just leave it -- it will fit right in with some of the questionable customizing from the '60s. |
|
|
|
Post by spex84 on Jan 16, 2020 13:25:53 GMT -5
I'd be inclined to move the front wheel pods forward. This won't add overhang on the front, but then you could extend the trailing edge to give the car more of that "speeding while sitting still" appearance. It's fun to sit back and watch this car take shape |
|
|
|
Post by chepp on Jan 17, 2020 22:57:26 GMT -5
I'd be inclined to move the front wheel pods forward. This won't add overhang on the front, but then you could extend the trailing edge to give the car more of that "speeding while sitting still" appearance. It's fun to sit back and watch this car take shape  Hmmmm....
Here's a quick-n-crude photo retouch. With the front axle moved forward I could ditch the front-blower idea and have two Nailhead engines -- a "modern" V-16!
If built 1:1 wouldn't this be a heckuva personal car for Tommy Ivo to drive?
|
|
|
|
Post by robtrat on Jan 18, 2020 10:47:40 GMT -5
Now you're thinking BIG! Charley.
|
|
|
|
Post by chepp on Jan 18, 2020 17:40:01 GMT -5
Now look at what you made me do.
|
|