|
|
Post by lo51merc on Dec 7, 2010 16:41:51 GMT -5
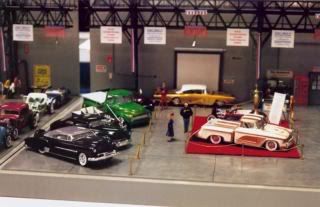
It looked to me that both of the 1:1's above have had the rear fenders raised at the rear to make a continuous line from the rear of the "B" pillar to the end of the fenders. I made a saw cut through the windsplit, forward to straight below where the fender breaks to a downward line, which if I rember was about 1 7/16" from the door line. Then I made another saw cut vertically from the front of the previous cut, to just where the small peak is at the top of the fender but not separating the top of the fender from the body. Then it was just a matter of lifting (bending) the rear fender top upward until it looked like a straight line all the way back. An eighth of an inch was just about close enough so I glued a piece of 1/8" X 3/16" styrene strip into the back end of the fender, then made tapered pieces of styrene to fill in the gaps. After the glue set I sanded the inside of the fender smooth and glued a curved strip of .020 sheet styrene to reinforce where the cuts were made. In this picture the left fender has been just about finished as far as raising and smoothing the joints. For comparison, the right fender hasn't been done yet. The stock windsplits are being removed and I'll make new, higher ones, later on. Gary 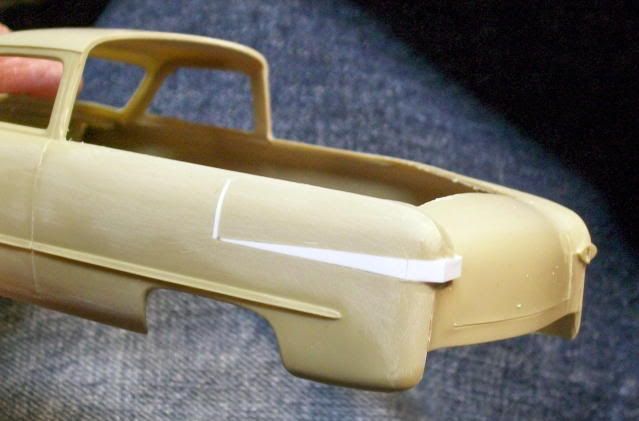 |
|
|
|
Post by Duane on Dec 7, 2010 18:46:09 GMT -5
comin right along Gary !!!!!!
i'm still watchin cause
you got me hooked !!!!!
|
|
|
|
Post by jondutch46 on Dec 10, 2010 13:27:07 GMT -5
Raising the fender line was a good idea, something the factory would probably never have thought of had Ford built a Ranchero in '49. It will make everything flow alot better when you start building a bed rail around the back end. Next time you do something like this, don't be so anxious to lop off the top in line with your door posts... leave some overhang so you have something to slide forward when you cut the windshield posts.
|
|
|
|
Post by lo51merc on Dec 10, 2010 16:02:22 GMT -5
John, I still have the roof section I cut away and I'll cut a piece of that to fill the gap. I figured it should be near perfect. Gary
|
|
|
|
Post by stevegt738 on Dec 11, 2010 14:42:58 GMT -5
I like the fender mod, neat idea. Here is a `49 ute made by Ford Australia, aprt from the radial tyres & a slight lowering it is stock.  Ford Aus have been making utes since `34. Ford US were a bit slow to catch on. |
|
|
|
Post by Koolkat on Dec 11, 2010 15:12:05 GMT -5
I like the fender mod, neat idea. Here is a `49 ute made by Ford Australia, aprt from the radial tyres & a slight lowering it is stock. Ford Aus have been making utes since `34. Ford US were a bit slow to catch on. I got a fiberglass casting like that from Colin Farnham of Victoria, Australia about 20-25 years ago. They are kool as a Ute! ;D |
|
|
|
Post by lo51merc on Dec 11, 2010 15:52:38 GMT -5
That's a cute Ute! (I can't believe I just said THAT!) I like that flowing rear fender line and the upper bed reveal which flow nearly straight to the rear of the truck. The doors look like 4 door front doors. I like Gregg's version the best. It took a lot of bodywork to convert his car to a pickup, but the final result is very well styled. Gary
|
|
|
|
Post by lo51merc on Dec 22, 2010 13:18:56 GMT -5
My camera has been giving me a lot of grief but I've got these three update pictures to show. The taillight housings are made from a combination of sheet, strip, and styrene tubing. I found a pair of taillight lenses that look very close to the 1:1's. I've gotten the rear end to a point that I could concentrate on the front. I pancaked the hood but I think I've somewhat missed the radius that Gregg had on his hood. I had previously filled in the notch at the lower front of the hood and added some strip plastic to fit the front of the hood to the Merc style grille shell. I glued the former front of the hood above the grille shell. I cut the headlight housings off of a scrap AMT 57 Chevy, and I'm working on blending the first one onto the Ford fender. 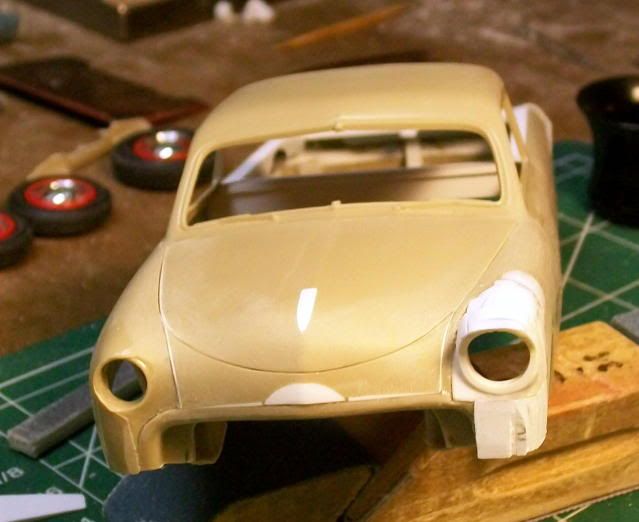 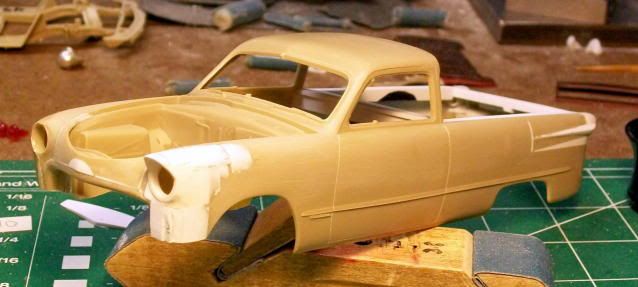 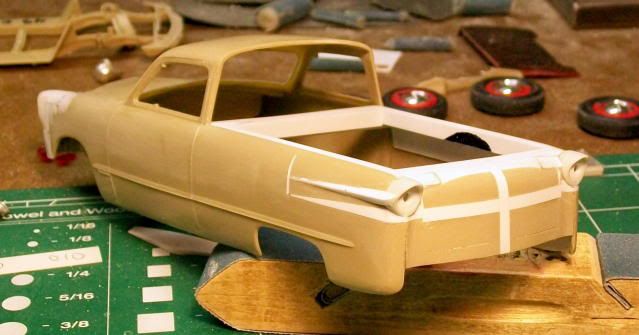 I've got a long way to go, not the least of which are the chop and the section job. Merry Christmas and a Happy New Year to all! Gary |
|
|
|
Post by Dirk on Dec 22, 2010 13:21:35 GMT -5
fantastic work! ;D
|
|
|
|
Post by jamminjason49 on Dec 22, 2010 13:58:47 GMT -5
Amazing work, I look at your stuff and I cant believe you can do that to a model, Im a bodyman and I just cant get that metal ability to go to plastic, some day I hope!!!!
Anyways, awesome work and cant wait to see more of it...........
|
|
|
|
Post by cycolacfan on Dec 22, 2010 14:07:14 GMT -5
Very nice work. Love the new curve on the pancaked hood.
|
|
|
|
Post by goodguy56 on Dec 22, 2010 14:12:58 GMT -5
This is a cool project. Your work is making this a very viable build!!  |
|
|
|
Post by Duane on Dec 22, 2010 15:44:38 GMT -5
Gary,
to be honest with you,
your '49 makes the 1.1
look like hell !!!!!
the lines of your '49
are so smooth, and
the over-all look is...
just SUWWEEEET !!!!!
BEAUTIFUL WORK !!!!!!!
|
|
|
|
Post by lo51merc on Dec 30, 2010 15:37:38 GMT -5
So here's my final update for the year of 2010. The filling in of the gaps of the drivers side 57 Chevy headlight housing is just about complete. The grille opening on the drivers side has been narrowed because the 1:1 looks like that was done on it. After I section the body I may have to raise the top of the opening some as well. Also, I added 3/16" lowering blocks between the rear springs and the rear end housing after seperating the springs from the housing. this drops the rear axle to the point that I had to "C" the frame rail above the housing. The front axle is in the upper holes. And that's it for the year. I hope I can finish this one next year along with the dozen or so I started this year. Happy New Year everybody! Gary 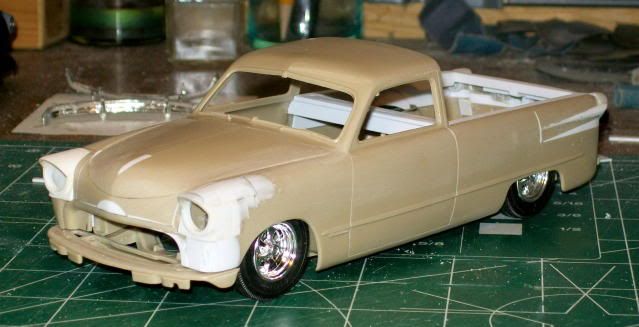 |
|
|
|
Post by chromecop on Dec 30, 2010 15:42:09 GMT -5
Looks great so far! Keep up the god work!
|
|