|
|
Post by chepp on Mar 31, 2022 0:43:11 GMT -5
Well that sux! Why not just shoot the localized area that is thinned out first, with heavy enough coats to color sand out the topcoat then worry about any blending after that. Skip, I did what you suggested. That worked...but some re-sprayed areas had a nice smooth finish and others were orange peeled because I was trying to not spray on too much. Polishing out the orange peel with 1000 and 2400 worked well.
There were still boo-boos so I brush painted the low spots and carefully sanded them with 1000. More burn throughs appeared but I slowly worked through more brush painting and wet sanding with 2400 and 3200 as shown in the photo below.
I'll leave the frame, wheels and dash in the as-sprayed gloss finish. I'll move up through 4000, 6000, 8000 and 12000 grits on the body to bring back the shine.
On the tires, I used an abrasive blaster* to dull the tread AND the low areas between the front tread.
*Badger 260 with the standard aluminum oxide that comes in the starter set. It's messy but it is easy and the results look great.
|
|
|
|
Post by Dave from Pleasanton on Mar 31, 2022 14:21:15 GMT -5
Charley, sure looks good to me. Is it possible to show what the tread looks like head on? I always sand the tire tread, but somehow what you're doing seems more elegant.
|
|
|
|
Post by chepp on Apr 1, 2022 20:10:47 GMT -5
Charley, sure looks good to me. Is it possible to show what the tread looks like head on? I always sand the tire tread, but somehow what you're doing seems more elegant. Thanks. Instead of responding here about the tires I've just posted a little "how to" here: trakinscale.proboards.com/thread/19721/tire-prep . |
|
|
|
Post by Dave from Pleasanton on Apr 1, 2022 21:17:42 GMT -5
Thanks Charley.
|
|
|
|
Post by chepp on Apr 26, 2022 21:34:28 GMT -5
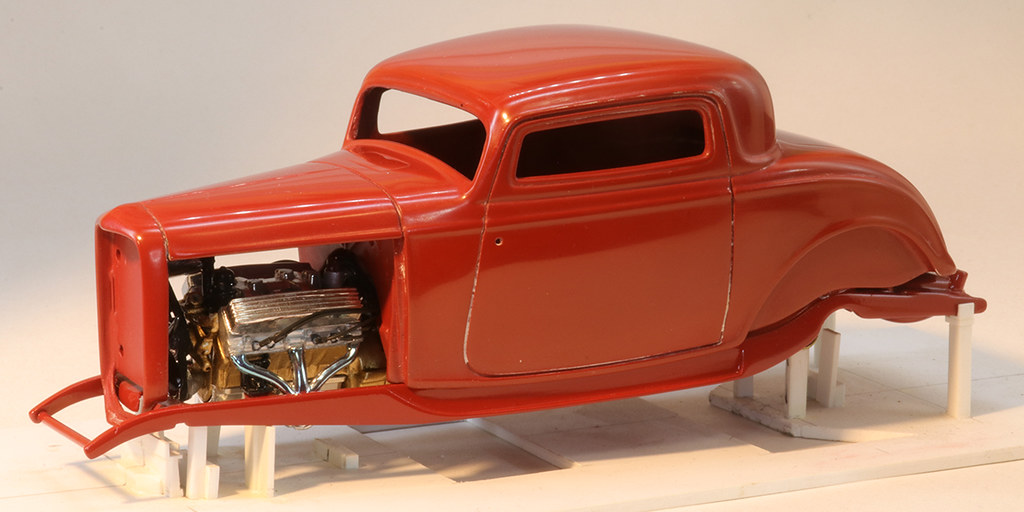
Here's the same thing, only different. I'm close to having "saved" the body paint but there are places where it is probably only a molecule thick. Unfortunately I don't know where those places are so it's been a repeated cycle of brush painting the last drops of the special mix of paint on burn-throughs, baking it and/or letting it sit for days and gingerly polishing to blend it in. Following Yost's recommendation in his video I've used The Treatment Model Buffing Cream after 12000 polishing. Once I get the polish finished I'll clean the goop out of the panel gaps and call that part done. I'm not going to follow it with wax like Yost recommends. The less I touch it, the better.
I've held off assembling the chassis and interior since they have body-color parts -- if the body paint couldn't have been saved I'd have to repaint everything so I had to leave them alone.
|
|
|
|
Post by Dave from Pleasanton on Apr 26, 2022 23:12:58 GMT -5
Charley, certainly feel for all your pains and struggles on the build, but it sure is looking good.
|
|
|
|
Post by chepp on May 20, 2022 22:22:53 GMT -5
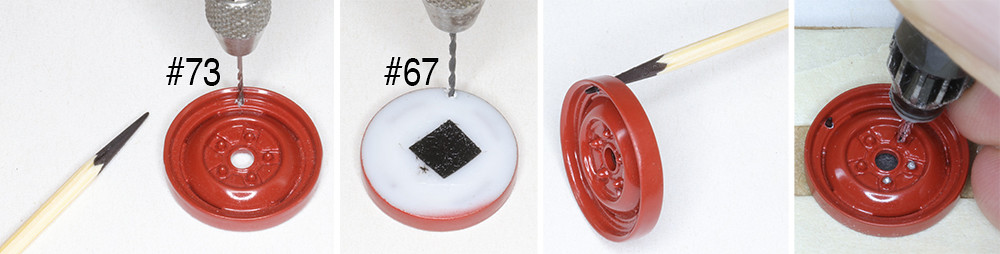
Here's a tire valve idea that I swiped and improved on from Tim on his THROTTLE POWER channel on youtube.com: 1. Blacken a wooden toothpick with a marker then drill a #73 hole into the rim. Be sure the hole is placed in line with center of the welded part of the wheel center. 2. On the backside, enlarge the #73 hole with a #67 bit partway to accomodate the tapered toothpick. If it's a rear wheel and there is no hub cap, glue on a piece of black paper to simulate the axle. 3. Jam in the toothpick then flush cut it and put a little CA on the backside. 4. Touch the acorn nuts with a Molotow or other brand of chrome paint pen.
This photo shows the rear end upside down.
The emergency brake cable is simulated with a stretchy plastic "thread" made for simulating model railroad utility wire*. Glue one end in a hole drilled in the backing plate, run it through a tiny sleeve CA glued to the bone then do it again for the other side. Glue a little pin near the engine end of the torque tube and stretch the thread over it. Next, make a little equalizer bracket (not shown) from thin plastic and glue it on top of the pin. Paint the sleeves and equalizer to match the bones.
* Fine (size) EZ Line by Berkshire Junction. Rusty brown color.
|
|
|
|
Post by Dave from Pleasanton on May 21, 2022 10:17:24 GMT -5
Very nice Charley. Thanks for the tips. Really appreciate it.
|
|
|
|
Post by chepp on May 31, 2022 19:00:50 GMT -5
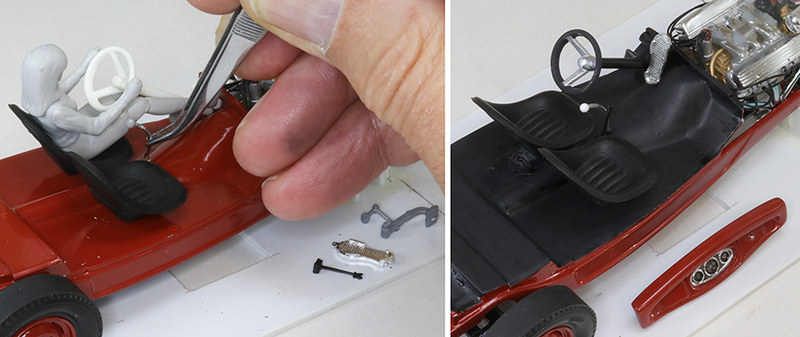
A Fujimi 1/24 female figure was used to locate the driver's controls. She was sculpted with excessively long legs, though, so I put the go and whoa pedals about where her ankles were. The interior will be essentially a "black hole" when the body is put on, though, so not much will be visible through the chopped windows.
|
|
|
|
Post by skip on Jun 2, 2022 6:55:32 GMT -5
Charley - This looks like it's right on TRAK! The paint rework looks like it came out pretty nice. I've been known to slather on some color coat into offending areas, it's easier to control where it goes that way. Then once its polished out it becomes almost indetectable. The interior is shaping up nicely, those seats totally look the part.
Your Fujimi Female Figure looks great! It's getting really hard to find appropriate figures to go with models, especially female type figures that don't have "Hollywood Boob Jobs" which are so wrong for TRAK era builds. (Then again, I personally think they don't look good with any era build that's just me though). What I really don't like is the either too skimpy for public or simi-nude or nude female figures either, kind of a matter of taste. Somebody must be buying them, or they wouldn't be all over eVilbay! I'd just rather see totally "G" rated figures with models of any type, you really never know who's going to be viewing them. An additional figure should enhance the model, not distract the viewer away from it.
|
|
|
|
Post by chepp on Jun 3, 2022 17:42:09 GMT -5
This is it for engine detailing. The hood top is permanently part of the body/grille shell so nothing above the carbs will be visible from the side. Once the body goes on the four fuel lines will be cut to length and attached to a fuel log on the firewall.
|
|
|
|
Post by Dave from Pleasanton on Jun 4, 2022 22:01:23 GMT -5
Engine looks great Charley. Super job.
|
|
|
|
Post by chepp on Jul 17, 2022 12:35:12 GMT -5
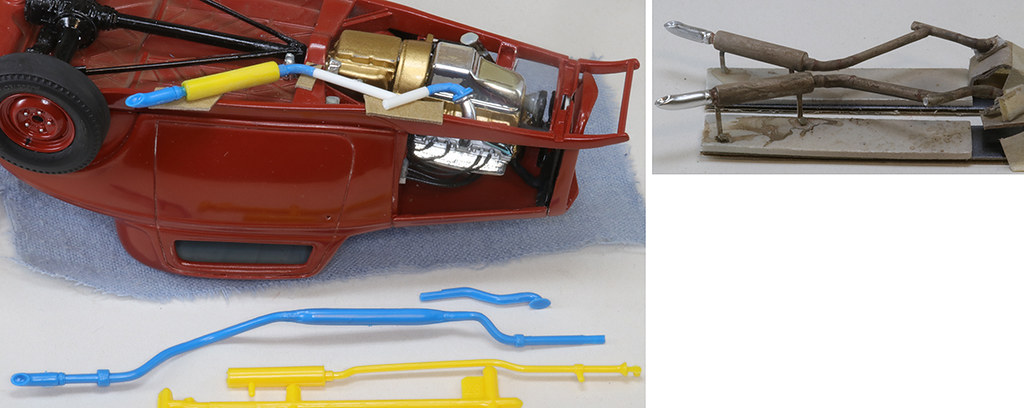
The street/strip exhaust system was pieced together from the custom '37 Ford (blue) and, I think, a Monogram 1/24 '32 or A? (yellow) with Evergreen .080" polystyrene (white). Not shown is the underside that I've grunged up to look like a driver with a couple of years of grime so I matched the pipe colors to look a little worse since they would be unpainted steel pipe subject to high heat and baked-on grime. I'm building it to look like a street-driven rod that, with some parts changes/removals, was ready for a day at the drags.
Before painting, I added "welds" using a toothpick and white glue to simulate what a guy might have come up with using some U-Weld-It pipe bend sections. Normally, a pro would attach pipe hangers to the pipes, not the mufflers, but because of space limitations and my 1/25 guy's limited experience these are welded to the mufflers. The hangers are thin brass strips cut to length with a Meng bolt head. I might paint on a simulated old-style flexible joint on each mount.
|
|
|
|
Post by Mr. Metallic on Jul 18, 2022 6:50:01 GMT -5
The exhaust looks very authentic. Well done.
The yellow parts are definitely from the old Monogram (former Little Deuce) 32 roadster tool
|
|
|
|
Post by chepp on Aug 1, 2022 14:52:37 GMT -5
The large headlights in the Revell '32 Ford Five-Window Coupe kit look good on the outside but the buckets are so deep that they don't look realistic when seen through the clear lens. Here's how I made some reflectors to go inside by punching out a disc of BMF (leave the backing paper on) and gently shaping it. I made sure to align the fluting on the lenses so the clear areas will be at the center top and bottom with the vertical lines at the right and left.
Here's my "jewelry box" of stuff to attach after I do a little more paint polishing and touch-up on the body. I'm almost afraid to touch it because of the risk of burning through (again) but it still has some boo-boos that need attention and some dried-on polishing cream to be removed from panel lines.
I'm in the process of converting the Revell kit's center steer tie rod to a traditional drag link using one from the Tony Nancy 22 Jr. drag roadster.
This will probably be my final "on the daggum bench" post before it appears in the "on the freakin' shelf" area.
|
|