|
|
Post by Bernard Kron on Nov 19, 2021 13:50:44 GMT -5
Six years ago I built a curbside model of an early 50’s Bonneville streamliner, similar to the famous SoCal streamliner which was the first car to go over 200 mph (209+) at Bonneville in 1950. Considering it was powered by a single flathead Mercury V8 this is remarkable. It’ a testament to its small size and excellent aerodynamics. That model was based on the Hawk Bonneville Streamliner 1/32 scale rubber band wind-up toys which were later purchased and re-released by Testors under the Easy Builder name. There were four “different” versions depending on where the driver was positioned and the size and shape of the engine cover. This was accomplished by varying a single plastic piece, the strip running down the center of the car, the 4 kits being otherwise identical. 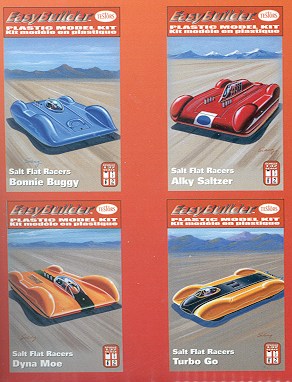 The 4 Testors EasyBuilder Kits  The instructions for the Bonnie Buggy version with the driver in the center of the body and single rear engine. Obviously these models were simple to the extreme but they can actually look quite realistic once you switch them to 1/25th scale tires and add some historically correct details and graphics. Here is the model I built in 2015:  For Version number 2 I’ve decided to build front engine version inspired by the Hills-Davis City of Burbank streamliner which broke the pre-war Class C land speed record set by Auto Union on September 13th, 1952 with a speed of 229.77 MPH. It was powered by a single unsupercharged flathead Mercury motor with C-T Automotive OHV heads.  September 13th, 1952 – World Record!
For this version I plan to add engine and cockpit detail which were missing from the 2015 version. I haven’t decided whether to run twin small-block injected Chevys or a sing small-block Chevy with a Potvin blower. Here is the work I’ve done so far. I started with the Turbo Go version of the Hawk toy cars, a version based on LSR cars run before and after WWII by Donald Campbell. The canopy is set all the way forward leaving room for the huge aero engine in the back. I reversed the center strip to place the driver at the back and reshaped the headrest area and the rear bodywork. At the front I extended the bodywork downward to eliminate the lift that the shape of the original Hawk body would have certainly created. I also have built a belly pan which will support the engine, chassis and cockpit detail. Thanx for lookin’, B. Comparison of the original Hawk Turbo GO with front mounted cockpit and revised bodywork with rear cockpit and re-profiled aerodynamics:   Various views of the initial conversion. The white plastic is the modified area, the yellow from the Hawk toy car.:      |
|
|
|
Post by Dave from Pleasanton on Nov 20, 2021 20:25:19 GMT -5
Way cool. Really looking forward to this one.
|
|
|
|
Post by sharp on Nov 20, 2021 21:33:00 GMT -5
Looks great so far Bernard. Very nice work on all the modifications.
|
|
|
|
Post by chepp on Nov 21, 2021 11:01:26 GMT -5
Neato! Those 1:1 B-ville race car builders had a huge amount of talent and innovative ideas. It's great to see you keeping it alive through models. This is the first that I've learned of those 1/32 kits.
|
|
|
|
Post by skip on Nov 22, 2021 8:15:46 GMT -5
B. That's totally cool, I liked the So Cal liner when you did that one. This one looks like it will turn out pretty cool too. Mind showing us the bottom side up, I'm interested in how you are tackling the axle, wheel and tire fitment. I have a somewhat started Bonnie Buggy on the shelf of doom, which is why I'm asking.
I've already moved around the cockpit and such, it looks like they made all of these cars with that "modular" mindset from the start. I might have to dig out my old vacuum former to suck down some new green house parts. I've never have liked the original cockpits glasswork. (The "Vacuum Former" is another exercise in bodging, I think I got the idea from Fine Scale Modeler way back in the 80's time frame, ugly but it works.)
My vision for the wheel and tire fitment is probably to go the curbside route with an axle then fairing the bottom side in so that the bodging of the axles is not so apparent. The tall tires being used on the lakes and Bonneville lend to the use of 1/25 scale steel wheels and tires without any real glaring scale issues; they just hold the thing off the ground anyway.
Being that these were supposedly based on 1/32 Scale it would probably be somewhat difficult installing anything other than a 1/32 scale engine, if at all that is. There are a few decent 1/32 scale V8's out there most from the Pyro and Lindberg Line Model T type Hot Rod kits. No real believable flatheads, most of them are loosely based on small block Chevrolet or other GM engines.
I was figuring on just having a bit of fun with mine anyway, if it gets off the shelf of doom any time soon I will post what I've got going on.
|
|
|
|
Post by Bernard Kron on Nov 24, 2021 20:59:10 GMT -5
Thanks everyone! Glad you're diggin' it! ...Mind showing us the bottom side up, I'm interested in how you are tackling the axle, wheel and tire fitment. I have a somewhat started Bonnie Buggy on the shelf of doom, which is why I'm asking. ... Being that these were supposedly based on 1/32 Scale it would probably be somewhat difficult installing anything other than a 1/32 scale engine, if at all that is. ...if it gets off the shelf of doom any time soon I will post what I've got going on. I'd love to see your take on this! Actually the 1/24-1/25th motors fit and scale out just fine. I've decide yo go with a full detail approach and have already laid out some plans for the chassis. I've made a fake SBC using one of the dozens of small-block Fords from Revell Deuces I've got. I figure with GM Engine Orange paint, the Parts Pak Potvin setup, and buried inside the body no one will be the wiser. I'm starting to run low on Parts Pak SBCs and want to save them for builds with open hood sides. The chassis is based on the motor dimensions, a "Little Man" from the Revell Slingster kit (like I used on the first Streamliner) and, of course the internal realities of the body and AMT tires. I'll supply the details with my first formal update. In the meantime vellow is a photo of the belly pan, I'm using it as my guide for the chassis build-up and in the completed model the body will drop on the belly pan with the chassis, interior details and motor glued to the pan.  |
|
|
|
Post by skip on Nov 24, 2021 21:35:58 GMT -5
B. That's exactly what I was thinking. Keep all the eye candy stuff where it can be seen and don't sweat the stuff nobody's gonna see unless you show it to them!
|
|
|
|
Post by Mr409 on Nov 26, 2021 4:33:30 GMT -5
This is a very interesting project, I've wanted to build a bit similar Streamliner for a long time but have not found the right starting point. I will definitely keep a close eye on this. The start is already looking very promising.
|
|
|
|
Post by mack2856 on Nov 26, 2021 16:45:36 GMT -5
Bernard this is so cool, I've got a couple of these in my stash but with sports like roofs, I'll be keeping a close eye on this for mine. Giver.
|
|
|
|
Post by Dave from Pleasanton on Nov 26, 2021 22:30:56 GMT -5
Bernard, the Atlantis Mooneyes kit has the parts pak SBC along with a number of the other parts pak trees. I'm hoping Hobby Lobby will start carrying them so I can get several on sale.
|
|
|
|
Post by Bernard Kron on Dec 3, 2021 20:42:00 GMT -5
Thanks for all the interest, guys. I made simple scale drawings for the chassis. The plans are actual size for the model so all I have to do is cut the styrene rod to match the drawing and begin construction. I received a shipment of .100 inch and .080 inch rod for the main frame tubes and cross braces. I’ll probably improvise the suspension mounts. Below are the plans with an overlay of the body, motor mockup and wheels. Thanx for lookin’, B.  |
|
|
|
Post by chepp on Dec 4, 2021 10:13:21 GMT -5
I made simple scale drawings for the chassis... Your drawings look professional. Keep up the good work. Although they may not apply here, it reminds me of the old adages, "Those who fail to plan, plan to fail" and, "Plan your work then work your plan." |
|
|
|
Post by Bernard Kron on Dec 7, 2021 20:05:11 GMT -5
Thanks Charley! This is rapidly turning into one of the more ambitious projects I’ve taken on. Going full-detail and trying to maintain some semblance of historic accuracy is presenting me with some pretty big challenges. I’ve gotten the basic chassis completed, but in building it some very basic problems needed to be addressed. The first is to keep the original hood line intact. This will mean I’ll have to fabricate a front mounted accessory drive between the engine block and supercharger. This is because I’ll want to mount both the distributor and the fuel pump in that area. There’s just barely enough length to fit the supercharger behind the front suspension and the usual top mount distributor would stick up above the bodywork. The other major issue was, in order to keep the driving position low within the bodywork and maintain the central location of the seat I will need to offset the driveshaft to one side of the driver. The original Hill-Davis streamliner that inspired this project placed the driver to the left of the drive shaft. For my streamliner I fabricated a transfer case to run the driveshaft to the driver’s left. When the model is completed my plan is to mount the chassis to the belly pan with a lift-off body in order to display the chassis and motor. The photos below show the completed chassis, the transfer case for the offset drive shaft and a mock-up showing the final position of the driver and motor. The next major challenge will be designing and fabricating the suspension. Thanx for lookin’, B. Cutaway of Hill-Davis Streamliner showing left hand drive position:  Front mounted ignition as used on the small-bock Chevy in the 1958 Reventlow Scarab Mk. I. I intend to make a similar setup but with the supercharger drive included.       |
|
|
|
Post by skip on Dec 8, 2021 1:32:00 GMT -5
So are you then going to run a second transfer case to move the engines out put to somewhat center of the liner to set up with more or less equal length axles in your rear end. One thing that stands out in my memory from mechanical engineering is that unequal axles set up a wicked torque steer condition, which on a salt car where traction is a premium at times would make for a rather exciting ride!
The reason that circle track cars can get away with unequal axle lengths is they set it up so the torque steer works to their advantage, even the Legends cars which is only a matter of 6 inches or so between inside and outside axle are set up with that torque steer so the rear of the car wants to come around to meet the front. The driver steers into the power slide both on asphalt and dirt tracks, because of the power to weight ratio it’s not quite to the extent a sprinter would where they are using tire stagger to further set it up.
Back to straight line cars, I think Tommy Ivo once said something similar was going on with his 4 Nailhead Buick powered dragster, only they ran the short axle sides opposite of each other in the front and rear axles. He said something like the front wanted to pull one way while the rear pulled the opposite direction and just kinda straightened itself out, especially when he had all four tires smoking down the drag strip!
I’m watching here with great interest, pretty much why I’ll be doing mine curby side like a quicker get back into the swing of things build versus full on kit bash! You’re doing great though thinking out the things that need to be worked through to solve some pretty complex issues. Going with a second transfer case could work in the cars advantage by setting up the gear ratios of the output shaft to spin at a higher rate than the input running a higher shaft speed to the rear end!! More speed!
|
|
|
|
Post by Dave from Pleasanton on Dec 11, 2021 1:23:47 GMT -5
I know I've seen fuel pumps running off the front of a Potvin mount supercharger. I have a vague memory of a magneto off the front of the blower but no memory of both. You could have a right angle mount for the magneto on the back of the engine. The AMT Double T kit has one with a "kind of" Vertex magneto or Grant Flamethrower (I don't remember which).
Are you going to shift the cockpit bubble to the side or leave it in the center? Great work by the way.
|
|


