|
|
Post by randfink on Jun 12, 2022 11:47:44 GMT -5
Craig and I challenged each other to build the reissued Atlantis "Fireball" dragster. If you're not familiar with the kit, it was originally one of the Monogram "49er" series of 49 cent kits back in the day. It has a ton of nostalgic "cool factor," but it is super-simplified and toylike. So, our idea was to use the kit as a "blank canvas," and swap in anything we felt like. So, here's mine. Keeping the kit's body and basic chassis, I swapped in all of this stuff: From the Revell Tony Nancy double kit: blown nailhead, QC rearend, steering linkage and parachute. From the Revell Slingster: front wheels and tires, pushbar, and butterfly steering wheel. From the Moebius Nova gasser: rear wheels and slicks, blower scoop, and the tach. From the AMT Double Dragster: the seat, which I modified slightly. In addition, I scratchbuilt the rollbar and fuel lines. The heat staining on the headers was done with Alclad "Hot Metals" colors. Blue, violet, and sepia. 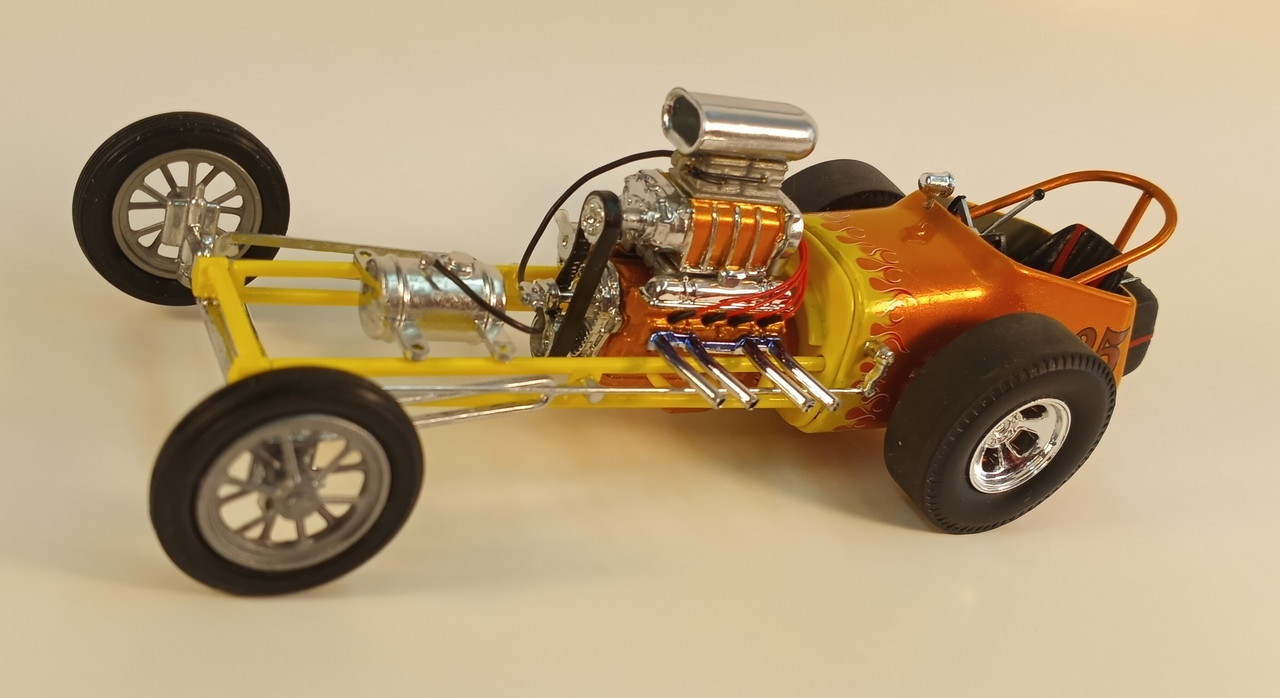  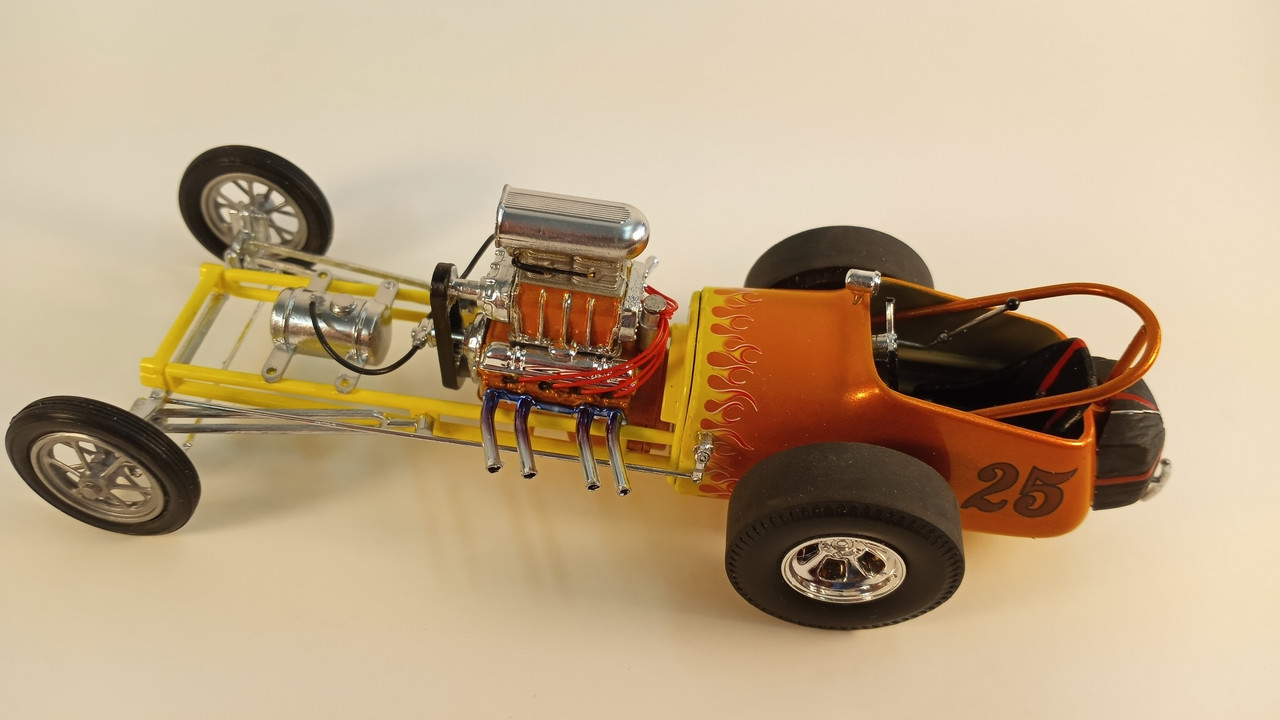 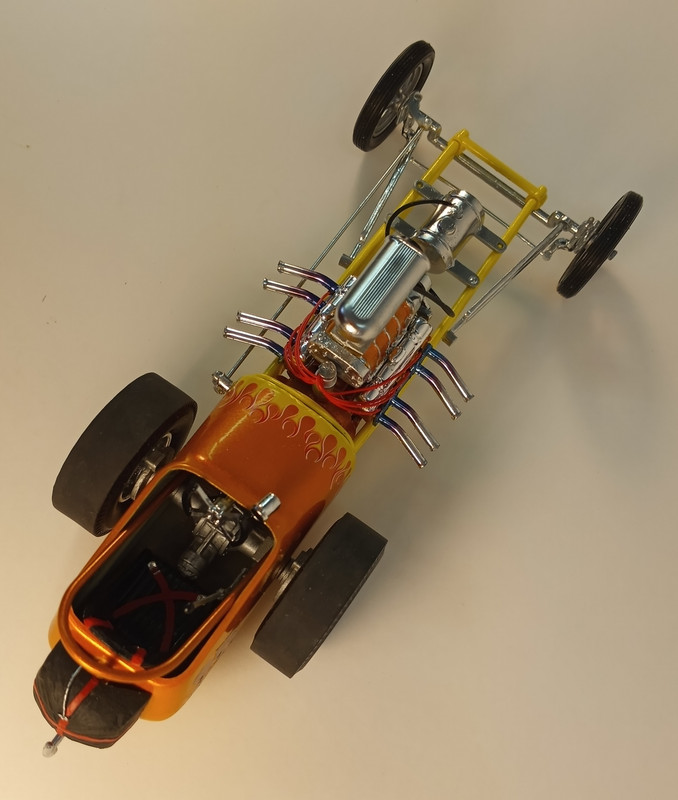 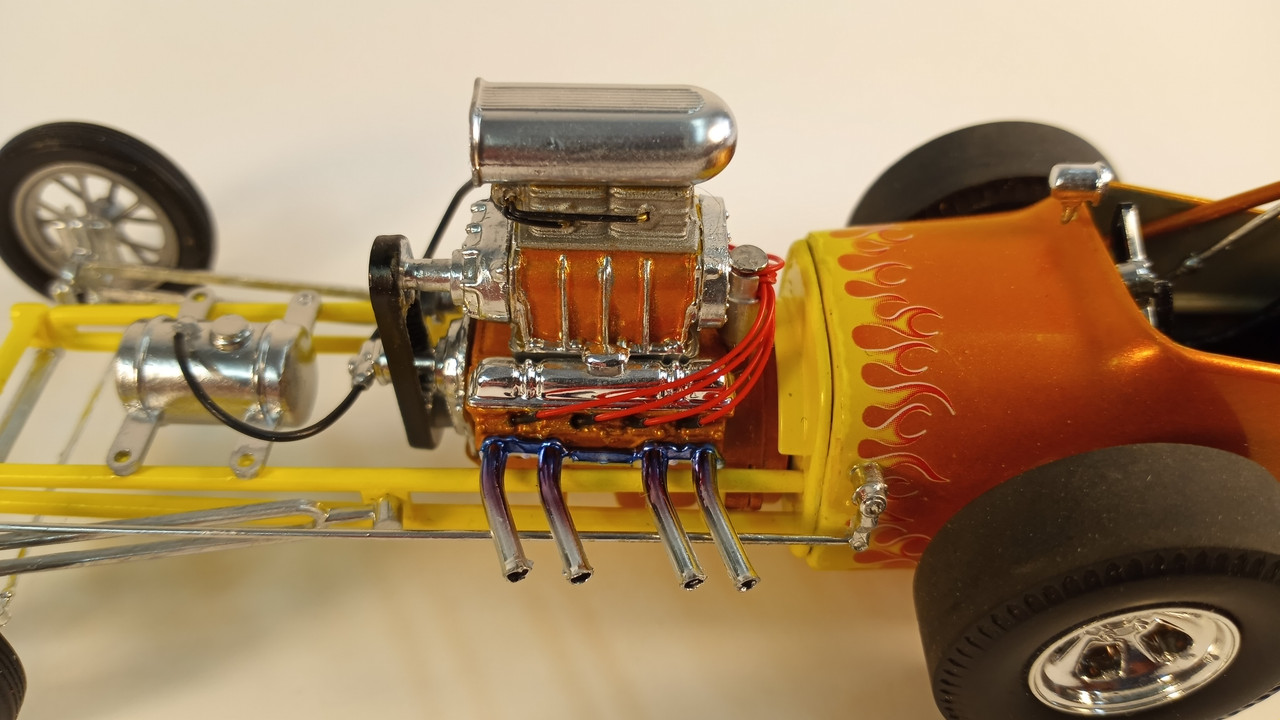 And here is Craig's version: Craigs kit was a short shot in the frame area, so he shortened one set of the frame rails to match the short shot side. He also hard mounted the front axle to the frame to hide the other short shot portion. Atlantis is aware of the issue and will provide you a new set of parts if you contact them, but he decided to just work with it instead. Engine is from the Revell Orange Crate with a Morgan Automotive Details magneto Front wheel/tire combo is 3D printed The wheels and slicks in the Fireball are molded together, so Craig cut the wheel portion away and fitted it to a set of Round2 parts pack slicks The interior portion of the roll cage is non existent, so parts of a Revell Mooneyes frame were adapted to fit. The seat came from a Revell Challenger one, and other bit and pieces came from the revell Tony Nancy dragsters 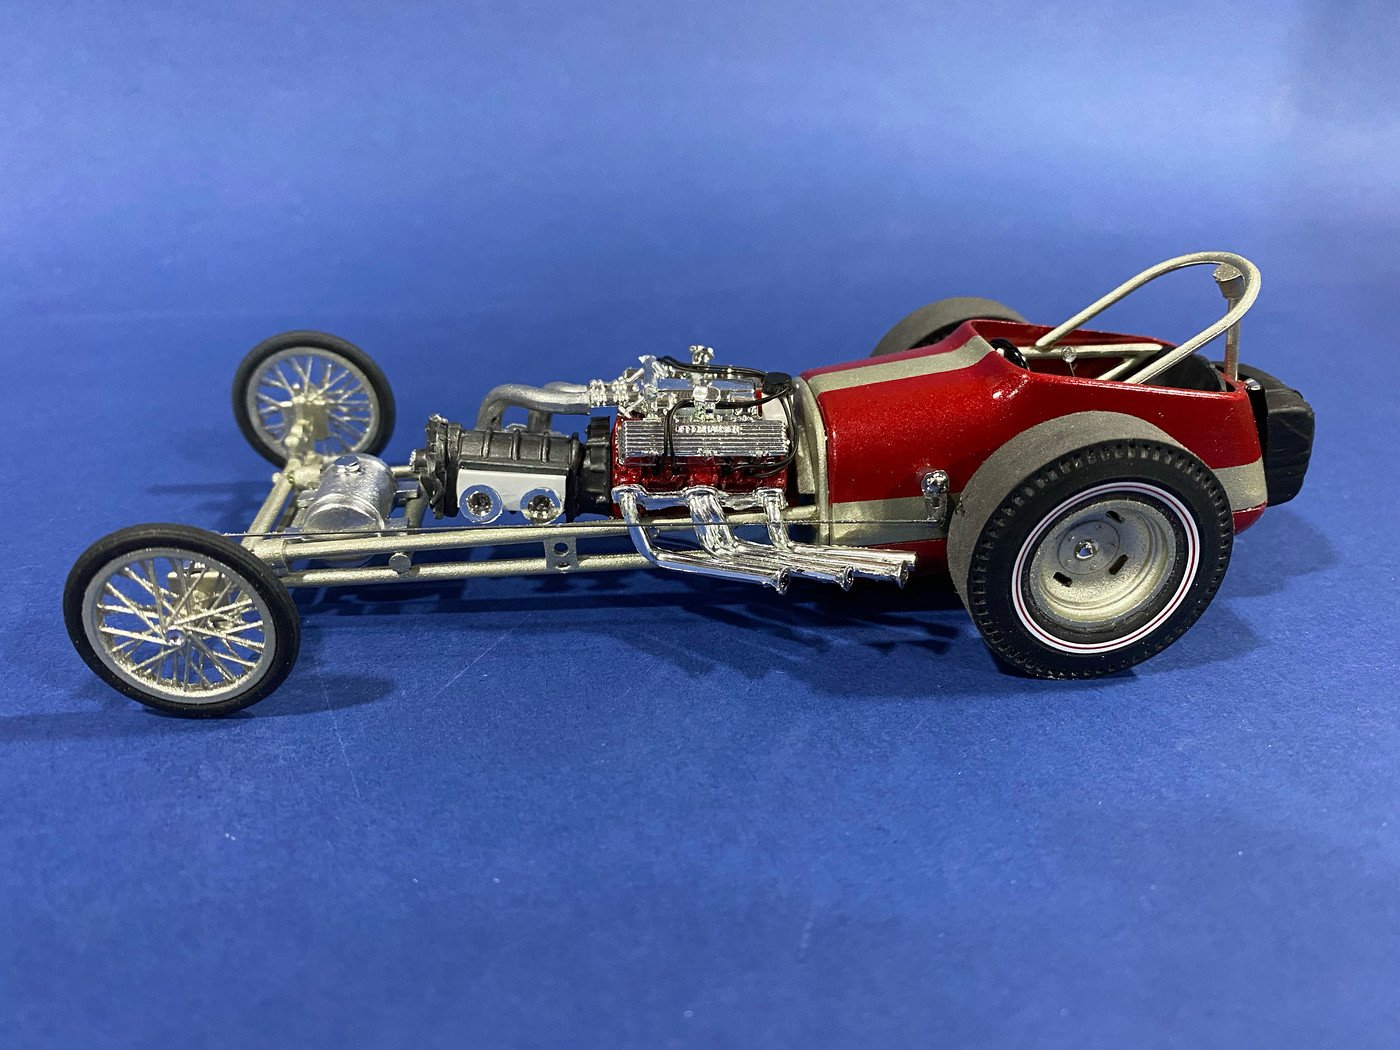 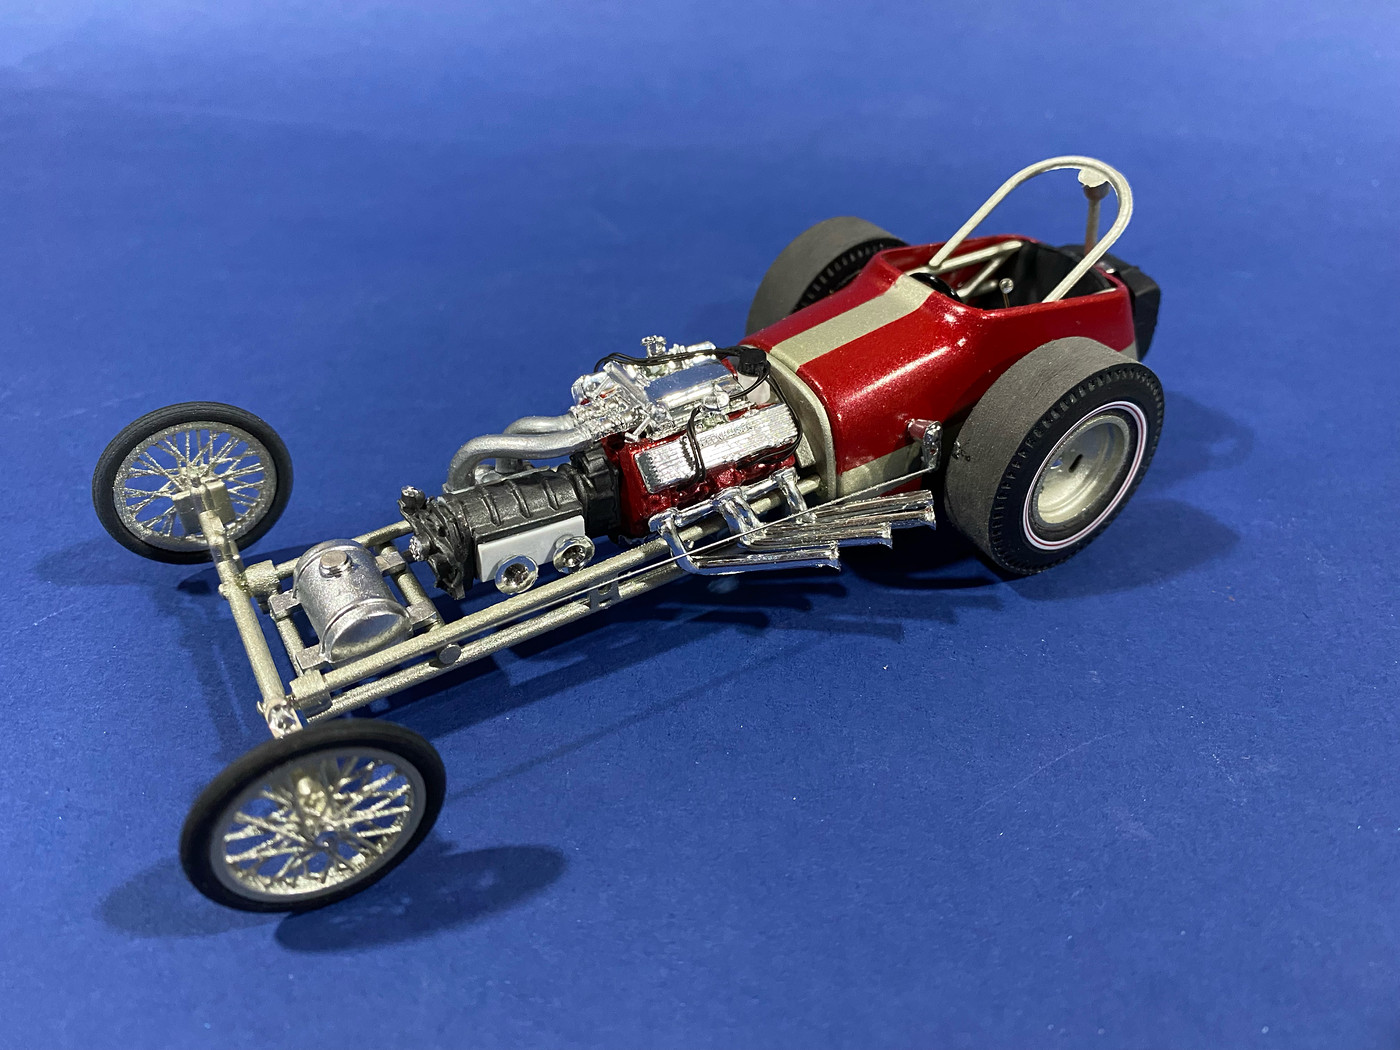 |
|
|
|
Post by chepp on Jun 12, 2022 16:22:56 GMT -5
Those are nice updates and improvements to the venerable kit. The older I get the more I like the early rails like these.
|
|
|
|
Post by Dave from Pleasanton on Jun 12, 2022 20:18:10 GMT -5
Randy, you certainly made a silk purse out of a sow's ear. Well done.
|
|
|
|
Post by skip on Jun 12, 2022 20:43:55 GMT -5
Randy, That looks absolutely great, that little kit just goes a long way with very little work! I like what you've done with swapping in the Tony Nancy 22 JR Roadster Engine and Rear end..., just those additions take this little kit into another realm altogether! It really goes to show this kit has great bones for as old as the original kit really is. (I think that's why I like this kit a lot).
Just so happens, I have one on my work bench right now. It's being built as a "Tribute Build" for my Aunt, she remembers my late Uncle (her brother) building this one as a kid. So far right now I have only swapped out a couple of parts from the Tony Nancy 22 JR Roadster kit, Wire Wheels the kit's front tires fit right on the wire wheels when you remove the existing "wagon wheel" rim by sanding, (and probably now the Rear End), A set of Chrome Chevrolet script Valve Covers from the Revell '57 Nomad kit and that's it. I had already decided to Remove and replace the Roll Bar with Evergreen tubing as I didn't like the way Monogram mounted the roll cage assy. to the body either. It worked for that time, but its a pretty glaring detail to leave now. I may try to figure out something with replacing or enhancing the seat, such as framing the pad with a simple Bomber seat frame, which could have been a period correct modification.
I want to keep the "modifications" as plausibly period correct as possible. The type which would have been done by an advanced modeler when the kit first came out. I also plan on wiring and detailing the kits small block Chevrolet with wiring and detailing. Using paint detailing as much as possible like the rear wheels and tires, going "Hog Wild" on the engine with correct type paint hues like magnesium, aluminum,,, all will be brush painted, (acrylics versus the enamel paints a modeler would have used). I was going to use the original blue colored small block Chevy engine from my stash of my Uncle's parts, but its a little too beat up to be presentable. So far I've opened up the odd looking scoop and have everything drilled for linkage, wiring and fuel lines, likely will build some sort of injector pump between fuel tank and injectors. I try to incorporate some little piece from my uncle's stash into these family Tribute builds, kind of ties in the two builders and its received really well when pointed out.
Side Note: I even worked some of those stash parts into a highly detailed version of the Ed Roth Mr. Gasser kit that I did for my other Uncle! He absolutely loved it. I have since heard from even a few non-family members how he carefully and excitedly brough Mr. Gasser out of his curio cabinet to show it off! That makes my day, that's why I take all the time I do to create something special for the recipient of one of my models I'm building for them. Believe you me they are hard to give away when they are finished! He had been looking at my Danbury Mint Mr. Gasser I picked up super cheap off of eVilbay and expressed the desire to have me find one, well I couldn't find one for less than $200. So, I decided to build the "Best" Mr. Gasser I could; which he actually likes his better than my Danbury Mint Mr. Gasser!
Now if I were going "Hog Wild" on this kit I would swap out the small block for an early small block Chevy, use the two port injectors and probably blower from the AMT/SMP '40 Ford. Either a Hilborne scoop like the one you're using or a fabb'ed squarish scoop (along the lines of the one in the 22 JR Roadster). From the 22 JR Roadster kit - Halibrand rear end, Halibrand rear wheels and slicks, front wire wheels and tires. Headers, with corrected port spacing for the SBC. Fuel System setup less fuel tank (use the Fireball fuel tank, it's cool). Bellhousing, and in/out box. Brake system, handle, master cylinder, calipers. Front axle and torsion bar arms, with the axle made to steer. Plus, any other cool detail parts that could be raided from the 22 JR Roadster. Because of the kits age, I wouldn't use any photo etch parts. All non-kitted parts would be scratch built. In the end I would probably just use the body and framework from the Fireball Dragster kit, much the same as you've done. Crap-ola, this is making me want to get another one and just Go Hog Wild on it!! Lol! Alright you two are to blame if I do! LoL!
***Wasn't trying to hi-jack you and Craig's Thread sorry if you feel I did. Just trying to drum up some more excitement for this really Cool Old Dragster Kit!
|
|
|
|
Post by 41chevy on Jun 13, 2022 10:50:16 GMT -5
Both came out sweet! The mods and changes give me ideas for mine particularly the Orange Crate headers. Paul
|
|
|
|
Post by spex84 on Jun 13, 2022 23:47:13 GMT -5
Fantastic work guys!
I don't wanna play favorites, but the orange flamed version with the blown nailhead really does it for me.
Very cool to see the 3D printed front runners and creative decision-making (short shot corrections etc) on Craig's version too! Either are models I'd be proud to have on my shelf.
|
|
|
|
Post by skip on Jun 14, 2022 18:07:23 GMT -5
Randy & Craig - Those little Fireballs look great; I like how you both practiced restrained embellishment on both of the Dragsters. These little heaps got some great bones to begin with, they are simple and any detailing and or parts swapping goes a long way to making them look so much better. If I were judging this challenge, I might have to call it a tie!
Comments:
Randy - Your color choices are spot on, everything that's painted complements, including the highlighting on the engine and supercharger case. I like how you swapped out the rollbar hoop and brace for new tubing - the hoop looked pretty lame even for the time. Engine detailing takes kicks this up another notch, even for the 22 JR's Nailhead Buick, heat-stained headers add to the overall effect. Halibrand rear end and brakes are just the icing on the cake! Wheel and tire choice looks great. As does the paint job and flame graphics! Winner, Winner, Chicken Dinner!
Craig - Your color scheme works really well, like the silver stripes. Interior modifications are noticeable for this fairly empty "bucket", including its wimpy little seat! Replacing the seat is like the first priority to make this model look plausible, as is the added interior bars and structure. Orange Crate Olds looks right at home, along with your detailing make this engine look pretty racy! If Randy hadn't mentioned that you modified the front half of the frame, I don't think I would have noticed it, good work on that. Wheels & Tires - Wire wheels look great, especially like the fact that you used the stock kitted "Halibrand" wheels, (at first, I was scratching my head trying to figure out what you did to the kit tires to make them look so good! LoL!) - Two questions - Did you mean to omit the Radius Rods on the front end or are they coming later. The plate around the air horns on the supercharger, looks like it is bare white styrene sheet, detail painting coming soon? How about a shot of the interior from the top like Randy did?) - Another Chicken Dinner Winner, maybe even throw in the Waffles too!
**You Two really went and did it, I already ordered a second Fireball Dragster off of eVilbay! LoL! I was already thinking about it before Randy posted his pictures, he just convinced me! As I mentioned above about my Fireball (Tribute) you two gave me some great ideas to make it look better with very few parts substitutions, so a Thank You Two is in order.
|
|
|
|
Post by Mr. Metallic on Jun 15, 2022 7:16:48 GMT -5
Two questions - Did you mean to omit the Radius Rods on the front end or are they coming later. The plate around the air horns on the supercharger, looks like it is bare white styrene sheet, detail painting coming soon? thank you for the compliments question 1- the axle is hard mounted (welded) to the frame, so I don't believe any radius rods would be required. I wouldn't want to drive it in 1:1 with solid mounted axles front and rear question 2- the kit supplied injection intake disappeared during assembly and I had to improvise something that would allow the trumpets to not hit the frame rails. I am not disassembling the model to paint that part, so that how she will sit on my shelf. |
|
|
|
Post by cturner on Jun 15, 2022 9:40:45 GMT -5
ahhh..send it here..I'll paint it for ya...
|
|
|
|
Post by lo51merc on Jun 16, 2022 9:52:12 GMT -5
Both are very nice. Great work on both!!
Gary
|
|
|
|
Post by Mr. Metallic on Jun 17, 2022 6:26:13 GMT -5
ahhh..send it here..I'll paint it for ya... Nope, I'm perfectly happy with it where and how it is. |
|
|
|
Post by RodBurNeR on Jun 19, 2022 1:30:23 GMT -5
damn fine machine!
|
|
|
|
Post by sharp on Jun 20, 2022 11:04:04 GMT -5
Beautiful Dragsters Guys!! Very nice work!!
|
|
|
|
Post by skip on Jun 20, 2022 16:32:45 GMT -5
Another Craig Question.
Did you build two Fire Ball dragsters, I snuck over to your photo page and looked at your build up pics. In the background is what looks like a blue original Fireball dragster, then at the end of the pictures is a Sweet Looking Silver Fireball dragster. What's the story on it, looks as good as the two posted by you and Randy! How about posting it and a little background on another fine Fireball! (At least I'm interested, even if no one else is!)
Agree with your reasoning for not using the radius rods, although they might still be used to dial in the front-end alignment, just a thought. Plate under the airhorns, yeah, I get your point there comes a time in every model when it's done it's done! I get it! Thanks again for the honest answers.
|
|
|
|
Post by Mr. Metallic on Jun 21, 2022 7:31:39 GMT -5
Another Craig Question. Did you build two Fire Ball dragsters, I snuck over to your photo page and looked at your build up pics. In the background is what looks like a blue original Fireball dragster, then at the end of the pictures is a Sweet Looking Silver Fireball dragster. What's the story on it, looks as good as the two posted by you and Randy! How about posting it and a little background on another fine Fireball! (At least I'm interested, even if no one else is!) . The original issue blue 49er is one of two builtups I secured a few years ago, back when nobody ever imagined it would ever be reissued (Thank You Atlantis!) I was using it as reference for the length of the frame before I decided what to do about my short shot frame. The silver build was done by Frank Luque, a friend of ours and "celebrity" over on Spotlight. He saw how much fun Randy and I were having with our challenge that he decided to build his own (and as he usually does, finished it before Randy and I finished ours even though we started first  ) He's not a member here so Randy decided not to share it on TRaK, but here's a couple shots since you asked. 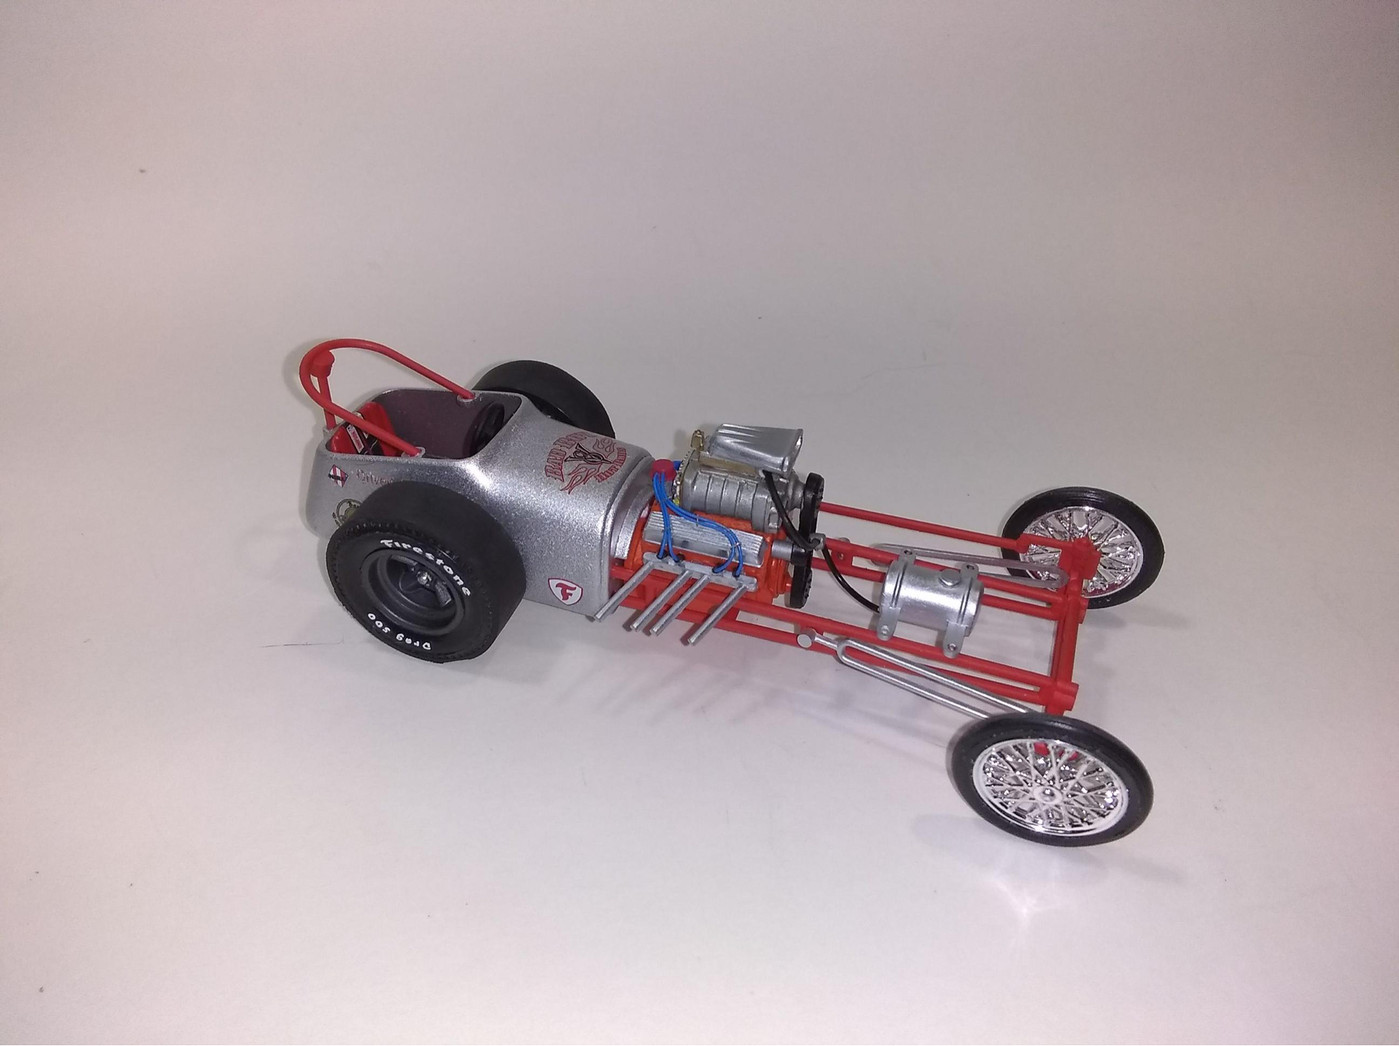 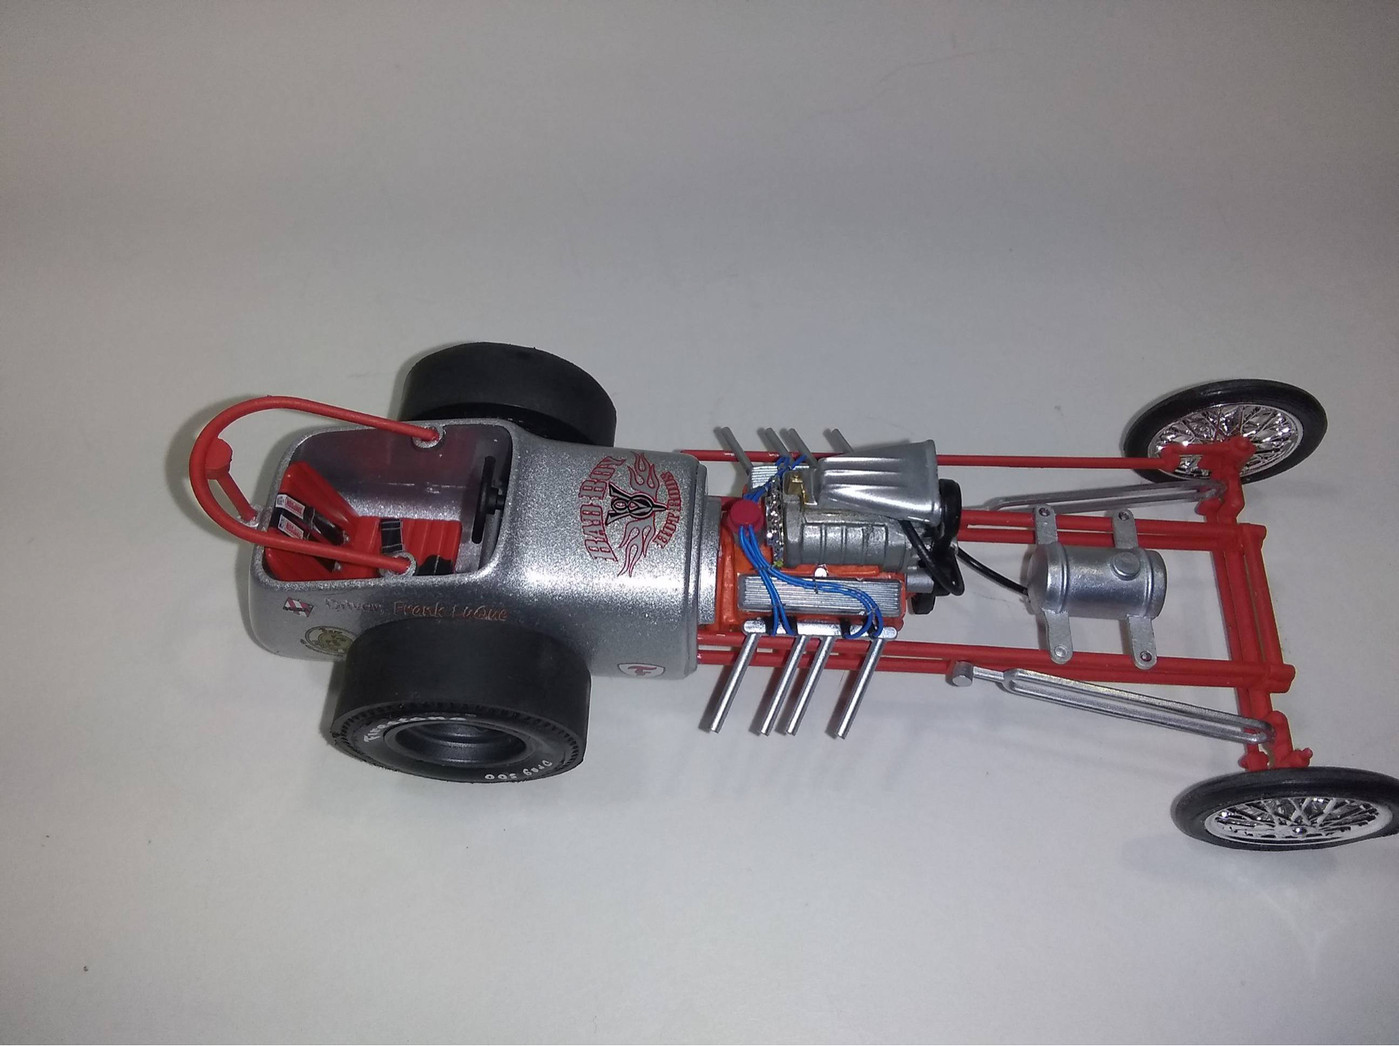 |
|