|
|
Post by Mr. Metallic on Sept 1, 2022 9:05:08 GMT -5
"No, not those mop-tops"- To quote a DJ in the film That Thing You Do This post is to bring together a few builds in my ongoing affinity for the early Monogram hot rod kits. If you recall, last year I built alternative molded in color versions of the big 4 kits. One of them was the Red Beetle, which was built by combining original Blue Beetle specific parts with the molded in red parts from a Boss-A-Bone builtup (the horror, I know  ) 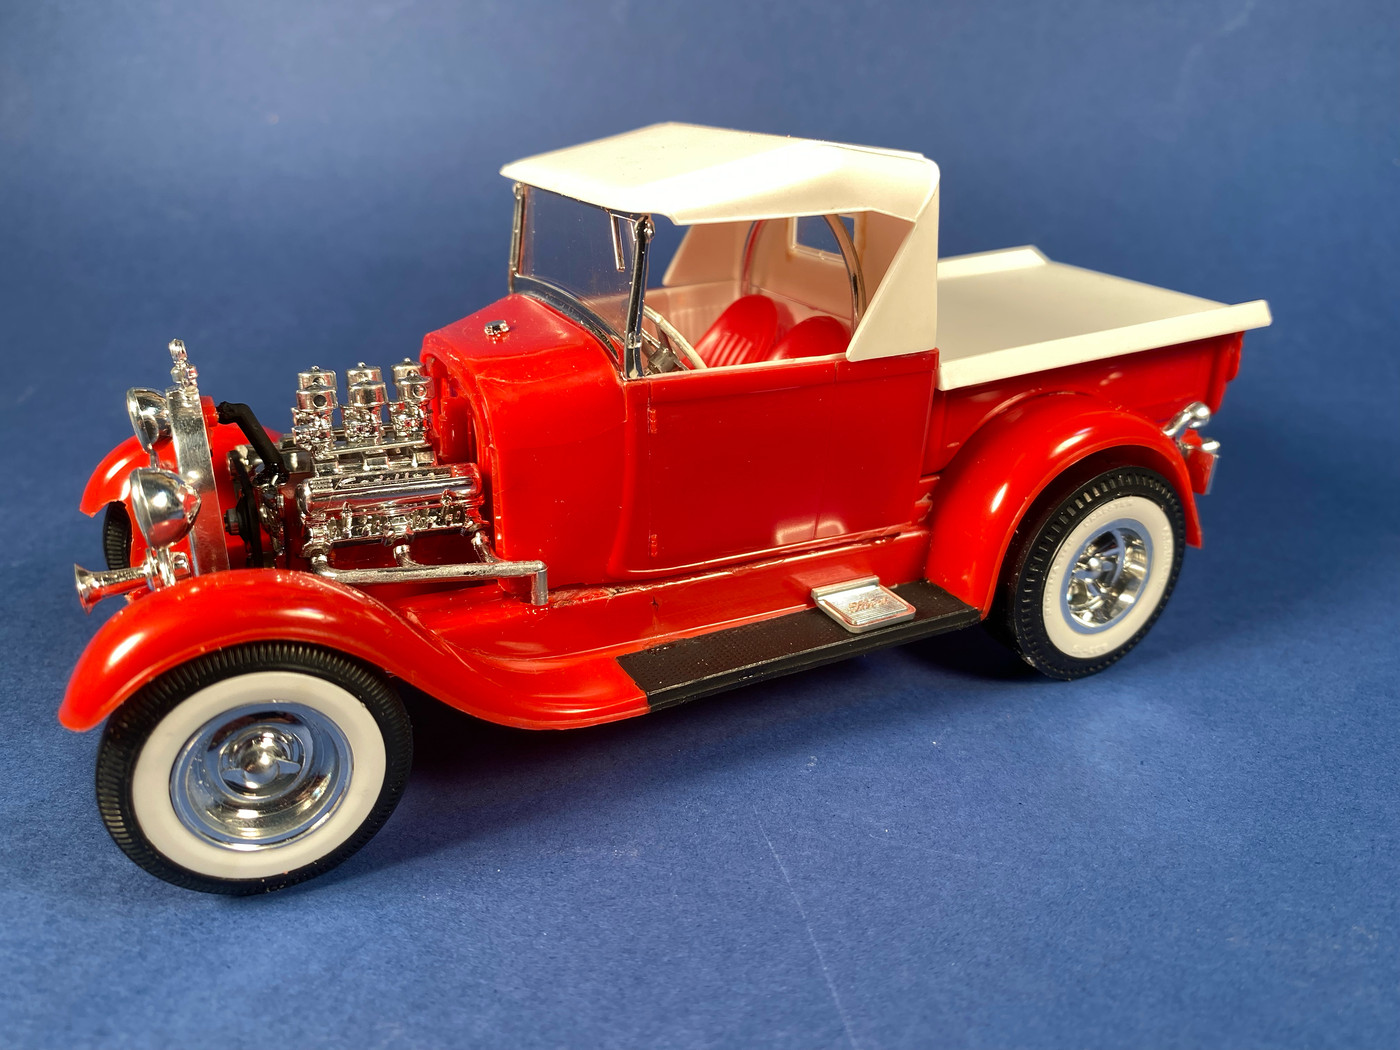 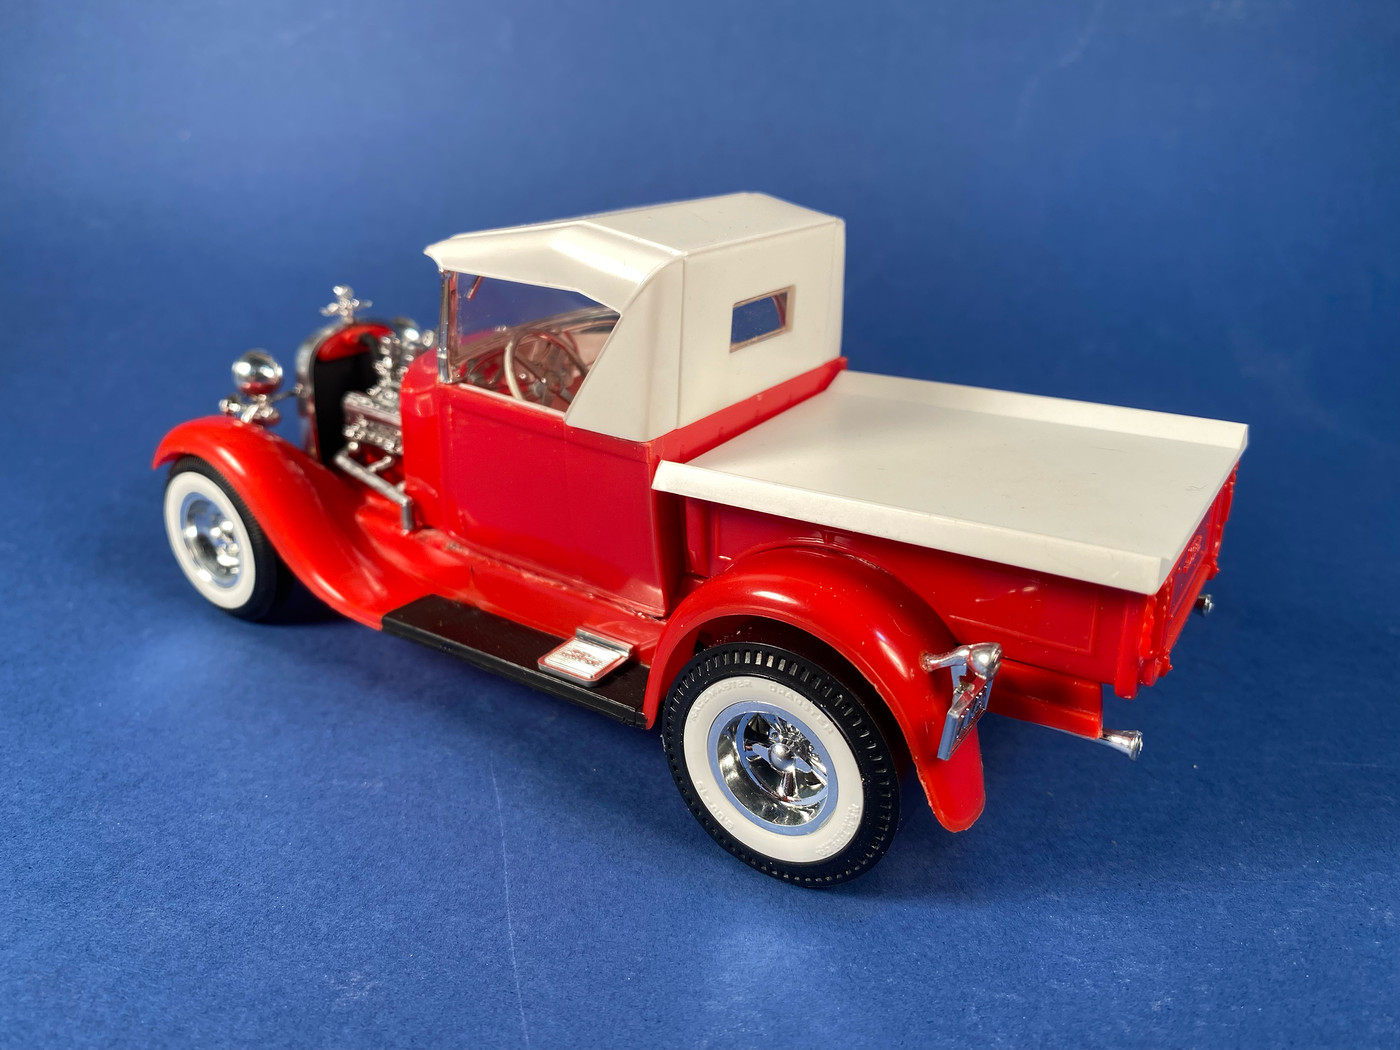 Since then I have been intending to build alternative versions of the Beetle, using every color Monogram (later Revell/Monogram) offered kits based on this tooling in. That list is as follow: 2 shades of blue the Blue Beetle came in, Red (done), yellow, silver, and lastly the light blue that they released a few years ago as the Blue Bandito. I also have the obscure Japanese motorized knock-off of the Blue Beetle that is molded in an almost purple color. Since these will be mostly "box stock" builds with the kitbashing necessary to backdate the kits to the Blue Beetle configuration I decided to combine them all in one thread rather than a separate thread for each color. For 2022 I challenged myself to try to put 12 completed builds on my shelf over the course of 12 months. that may seem aggressive, but I knew I wanted to sprinkle in a few on these Monogram hot rod based builds through the year, so it seemed fairly reasonable to me. The year started off well enough, but the summer has really put my behind on that goal. With 5 weeks until our Fall KKIM meeting I thought I would try to build as many of these Beetle variants as I can before then. Hopefully you'll come along with me for the ride. |
|
|
|
Post by Mr. Metallic on Sept 1, 2022 9:10:55 GMT -5
First up... The Yellow Beetle For those that don't know the history on this tooling the Blue Beetle was the first version and debuted in the mid-60's along with the Little T, Little Deuce and Woody Wagon. It was released twice, and then the tooling was modified in the late 60's into the Tom Daniel designed Boss A Bone. Then in the 70's the tooling was modified again for the Early Iron release. It received yet another freshening in the 80's, and then was released in the 90's in the 70's street rod configuration. A few years ago Revell decided to backdate the tooling to the Blue Beetle configuration by retooling some lost parts as the Blue Bandito (Blue Beetle is now a registered trademark for another product, hence the name change). Ok, now that I've set the scene here are the issues the tooling changes has presented me with the yellow version. Gone are the 6 carb intake and Cadillac script valve covers. Also gone are the great wheel/tire combo, and a few other BB specific parts. Most of this is easily rectified by stealing the parts from a Bandito kit (so the chrome brightness all matches), except the Cadillac valve covers. R/M didn't resurrect those for the Bandito. Fortunately I have a set from a BB to steal. The big issue is that the yellow version now comes with the interior and other formerly white parts now molded in tan plastic. Fortunately I have a decent molded-in-white interior bucket I can use, along with an up top. Once you take a look at the initial mockup photos you can see the problem with using all these different molded in white parts presents, they all have different opacity. Hopefully that can be rectified by painting them all white. A necessary concession to these mostly No-paint builds I have going. My rules, I can break them. 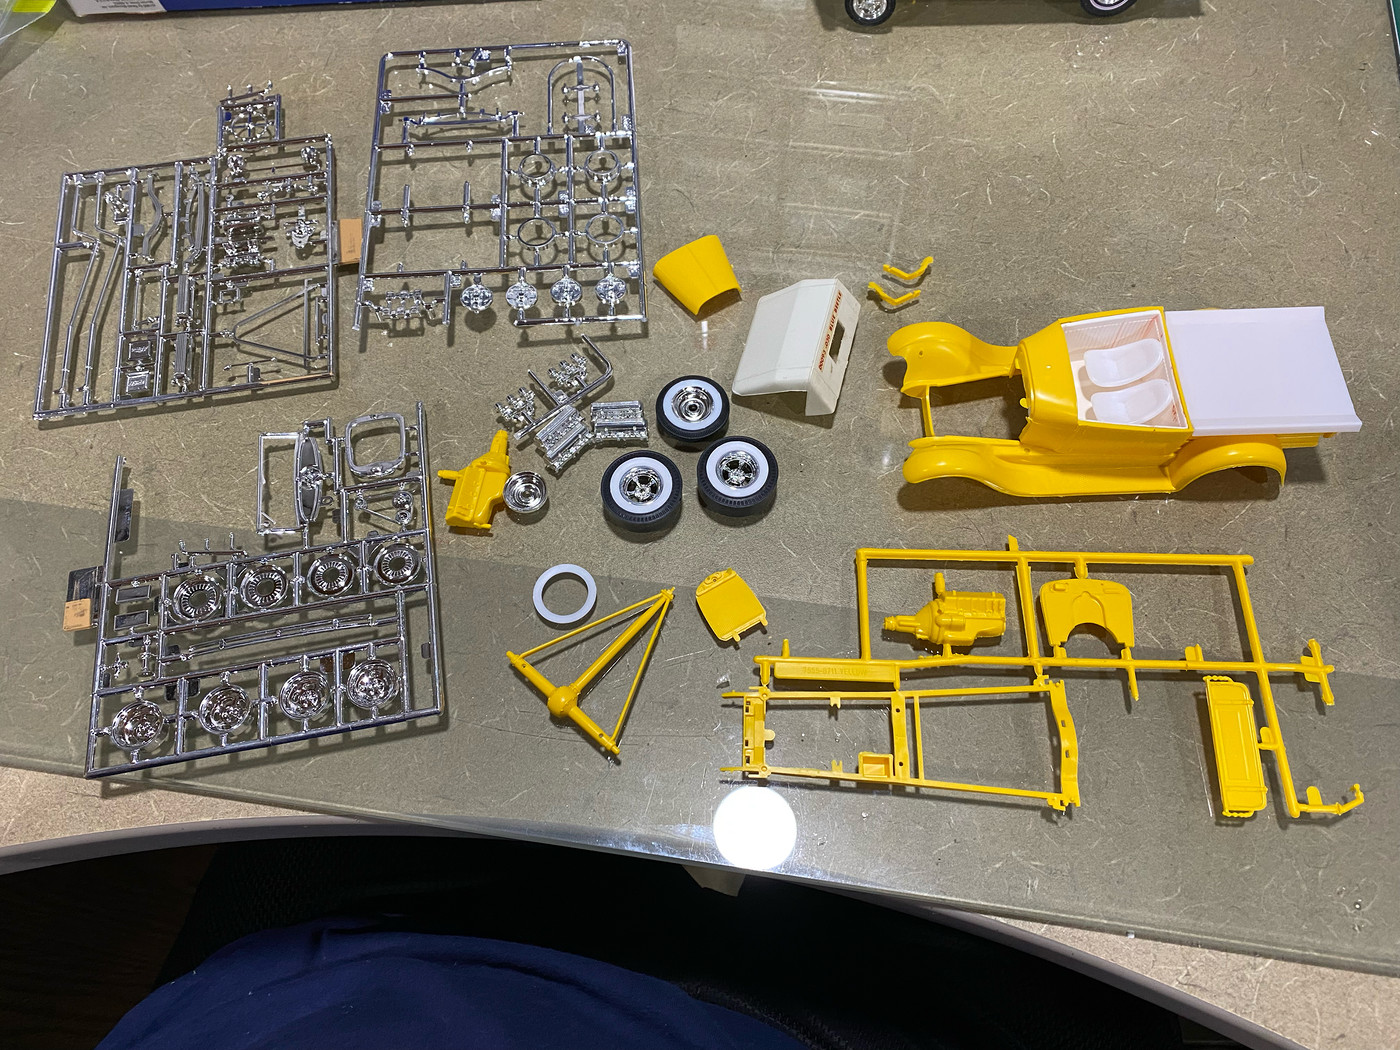 Anyway, enough talking, here's the first mockup 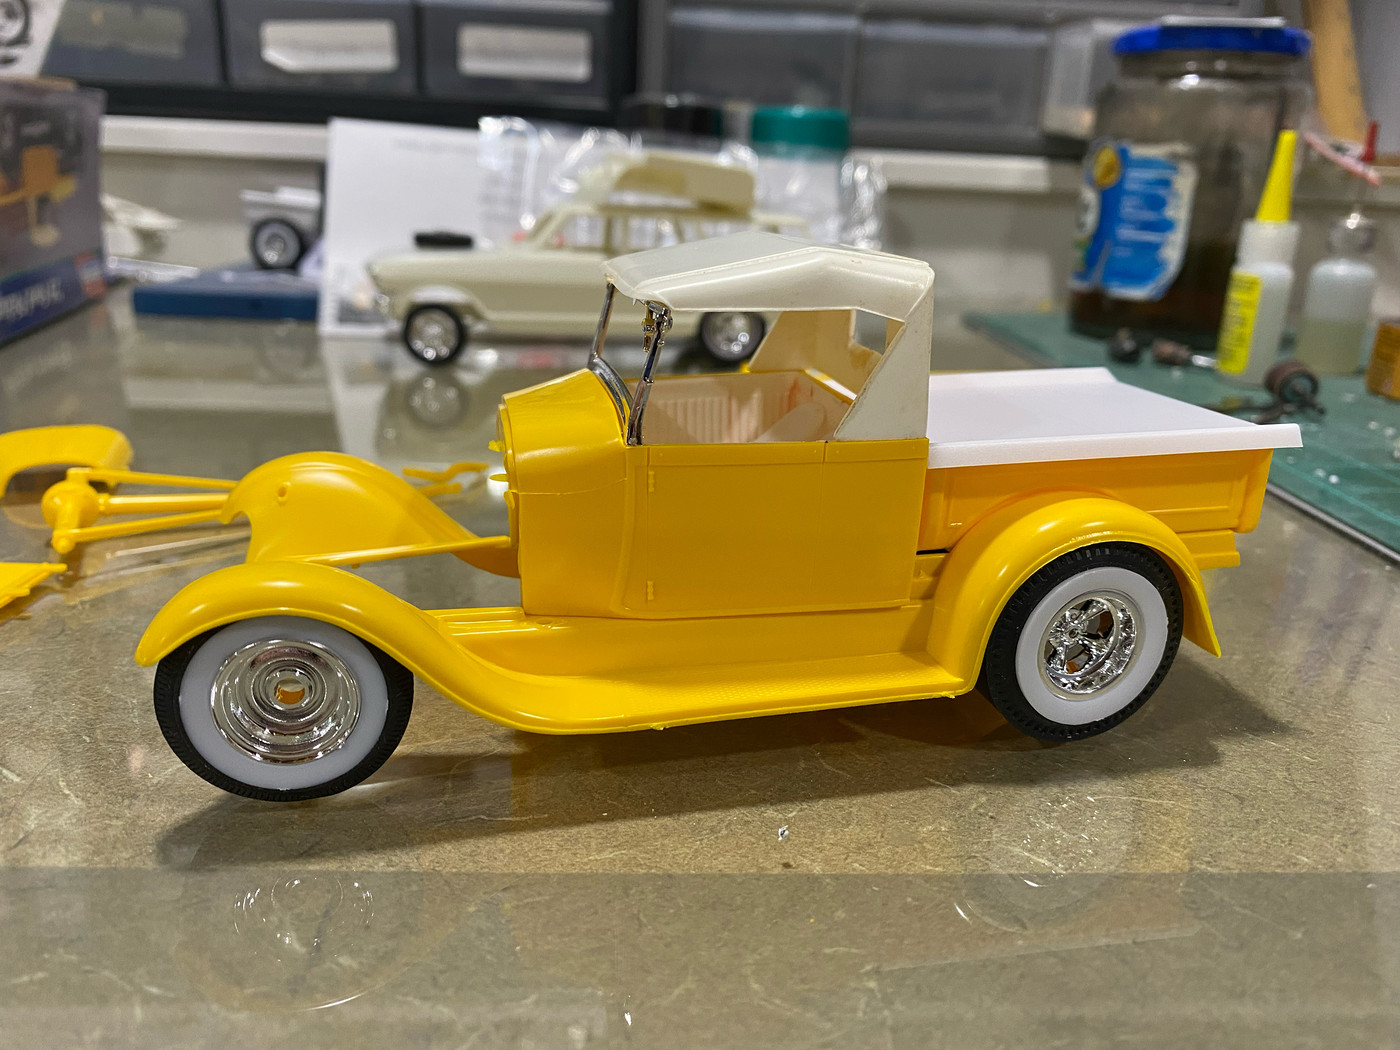 |
|
|
|
Post by skip on Sept 2, 2022 9:04:31 GMT -5
I like the "My Rules, I Can Break Them" clause. Sometimes there are situations which require a "Work-Around" or two to allow the project to be completed within budget and/or time restraints. If there were no budget, then it would get finished with only virgin materials and at whatever it cost to do so.
Your Beetle projects make me wonder about how the "new styrene" would polish out. Having encountered some soft styrene in some of the newer "Chinese Recycled Silly Putty" kits will the new stuff polish out only to haze up soon thereafter or stay polished...
|
|
|
|
Post by chepp on Sept 2, 2022 9:35:35 GMT -5
For whitening, I've read online of people having good results from soaking parts in a water diluted hydrogen peroxide solution in a clear glass jar in sunlight. It might be worth a try by searching for the details and testing it with a runner of the same plastic if you have it. This You Tube video of a guy testing a bunch of different products to brighten plastic computer parts looks interesting, too: .
|
|
|
|
Post by Mr. Metallic on Sept 2, 2022 10:30:26 GMT -5
I like the "My Rules, I Can Break Them" clause. Sometimes there are situations which require a "Work-Around" or two to allow the project to be completed within budget and/or time restraints. If there were no budget, then it would get finished with only virgin materials and at whatever it cost to do so. Your Beetle projects make me wonder about how the "new styrene" would polish out. Having encountered some soft styrene in some of the newer "Chinese Recycled Silly Putty" kits will the new stuff polish out only to haze up soon thereafter or stay polished... I know the newer white/off white/tan plastics that they have been using to mold the kits in the last decade or so (Round2, Revell, Moebius) sure seems more opaque, and seems slightly "softer". I guess I'll find out when I try to polish the Blue Bandito blue plastic. Maybe I'll try a sample when I polish the yellow one to see how it comes out before I actually build it? That way I can formulate an alternative plan of attack for that one (clearcoat?) when it comes time to build it. I will say that this molded in black Monogram T from the 90's sure held it's polish well. 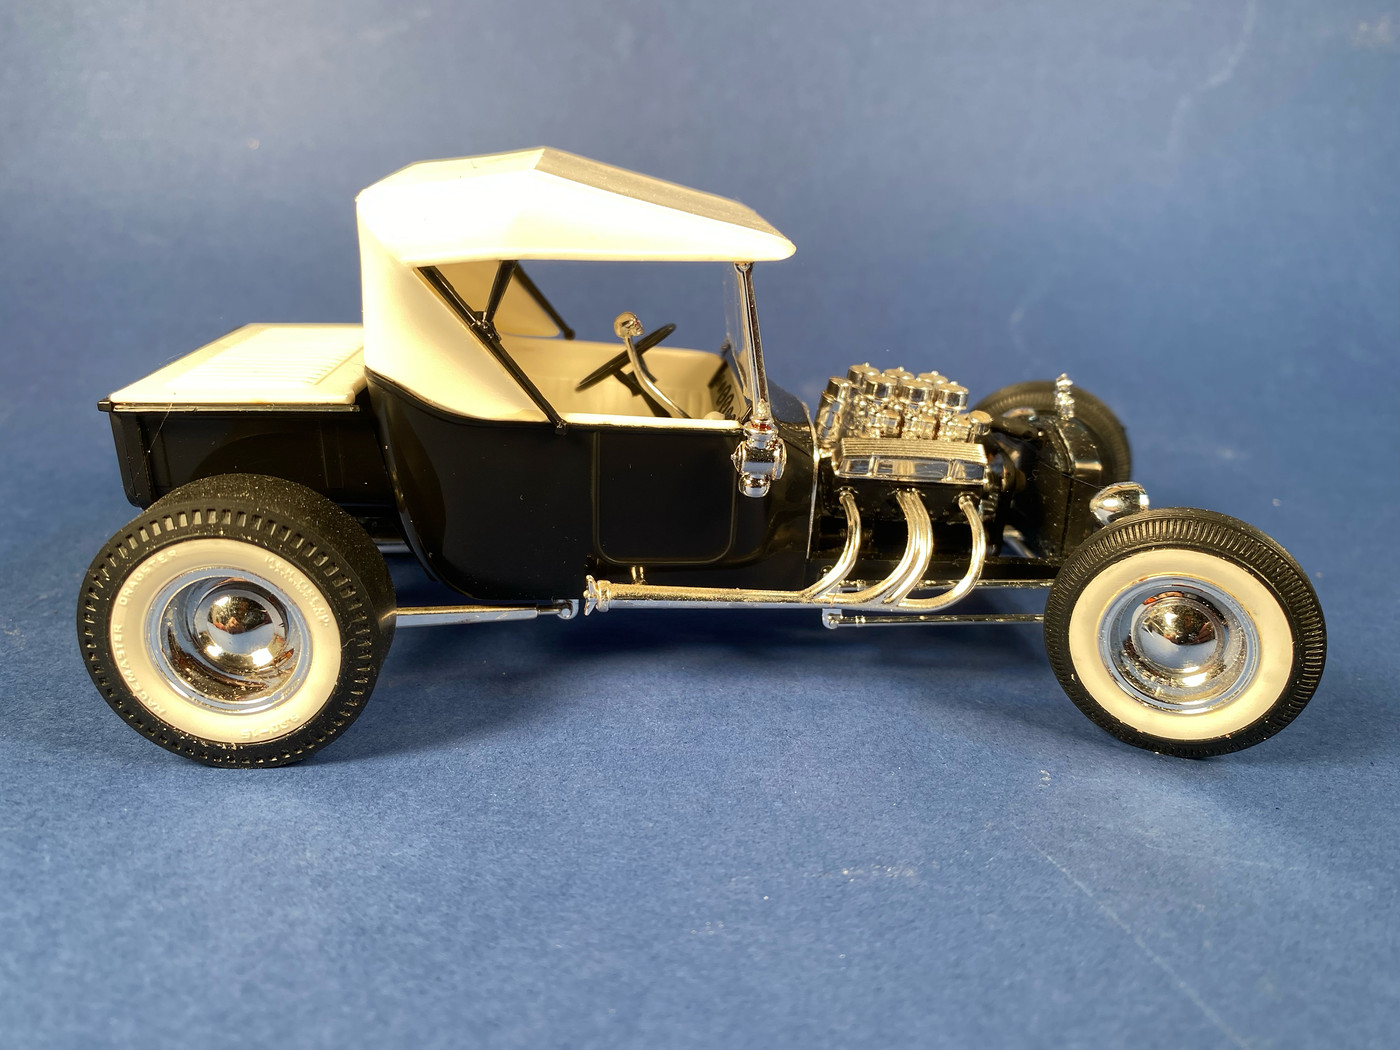 |
|
|
|
Post by Mr. Metallic on Sept 2, 2022 10:32:22 GMT -5
For whitening, I've read online of people having good results from soaking parts in a water diluted hydrogen peroxide solution in a clear glass jar in sunlight. Thanks chepp, I may give that a try. I've tried the old trick of taping the piece to a window and letting the sunlight bleach it, but have had zero success. Perhaps the chemical enhancement to the process will help? |
|
|
|
Post by Dave from Pleasanton on Sept 2, 2022 19:13:00 GMT -5
I'm following along on your journey Craig.
|
|
toner283
Hoodlum
 They can't make me grow up!
Posts: 139
|
Post by toner283 on Sept 4, 2022 10:18:41 GMT -5
I have not tried it myself yet, but I have also seen guys who use hydrogen peroxide in direct sunlight to clean dusty old neglected survivors and to whiten yellowed plastic.
One fellow on the book of faces dunked an old built up red chariot that looked like it had spent many years in a barn - the dust/dirt/crud was about 1/8 inch thick- and the top was extremely yellowed. He said it's sad indirect sunlight for 2 days and when he pulled it out and rinsed it off it looked as clean and bright as the day it was built. Did not appear to hurt the chrome or the decals either. Assuming it wasn't some sort of trick photography or substituting a clean car for the dirty one, the results were fairly impressive.
As I said, I have not personally tried it yet but it's on my list of things to attempt.
And, definitely looking forward to seeing the line of colored beetles all together.
|
|
|
|
Post by Mr. Metallic on Sept 6, 2022 6:10:37 GMT -5
As I said, I have not personally tried it yet but it's on my list of things to attempt. Thanks Chris, I have seen those same pics on Scale Survivors recently. His results are impressive, but I honestly never noticed the improvement in the brightness of his white parts, just that the whole thing came out squeaky clean. I'll have to see if I can find those posts again. But the technique is definitely worth investigating. |
|
|
|
Post by Mr. Metallic on Sept 6, 2022 6:17:44 GMT -5
There was some progress this weekend, but I took the opportunity of the long weekend to actually rest since I was under the weather all week last week. Lots of couch time. I know, I know, how hard is it to sit at the bench, right? Well, like most of us I'm stubborn and didn't rest when I first started feeling off early last week and probably prolonged the illness. So, I forced myself to rest this weekend and I'm actually feeling better finally. Anyway, I modified the front axle so that the front wheels are now poseable. And I glued the engine halves together I need to procure some hydrogen peroxide to clean up that up top, but I'm still going to paint everything so all the disparate white colors look more similar. Hopefully get this puppy whipped into shape by this weekend so I can move onto the next color. |
|
|
|
Post by Mr. Metallic on Sept 12, 2022 7:14:07 GMT -5
Work has been continuing. I had a small delay while I searched for materials to do a real wood bed floor. Once I got those secured and worked out a technique I was able to move forward. It may not be prototypical to 1:1, but it looks good, and replicates something a builder could have done in 1965. Here's the materials I ended up using. There are more prototypical materials (H or I channel strip, photoetch rails, etc), but these materials are what a builder in 1965 would have had reasonable access to, or at least be able to achieve similar results. 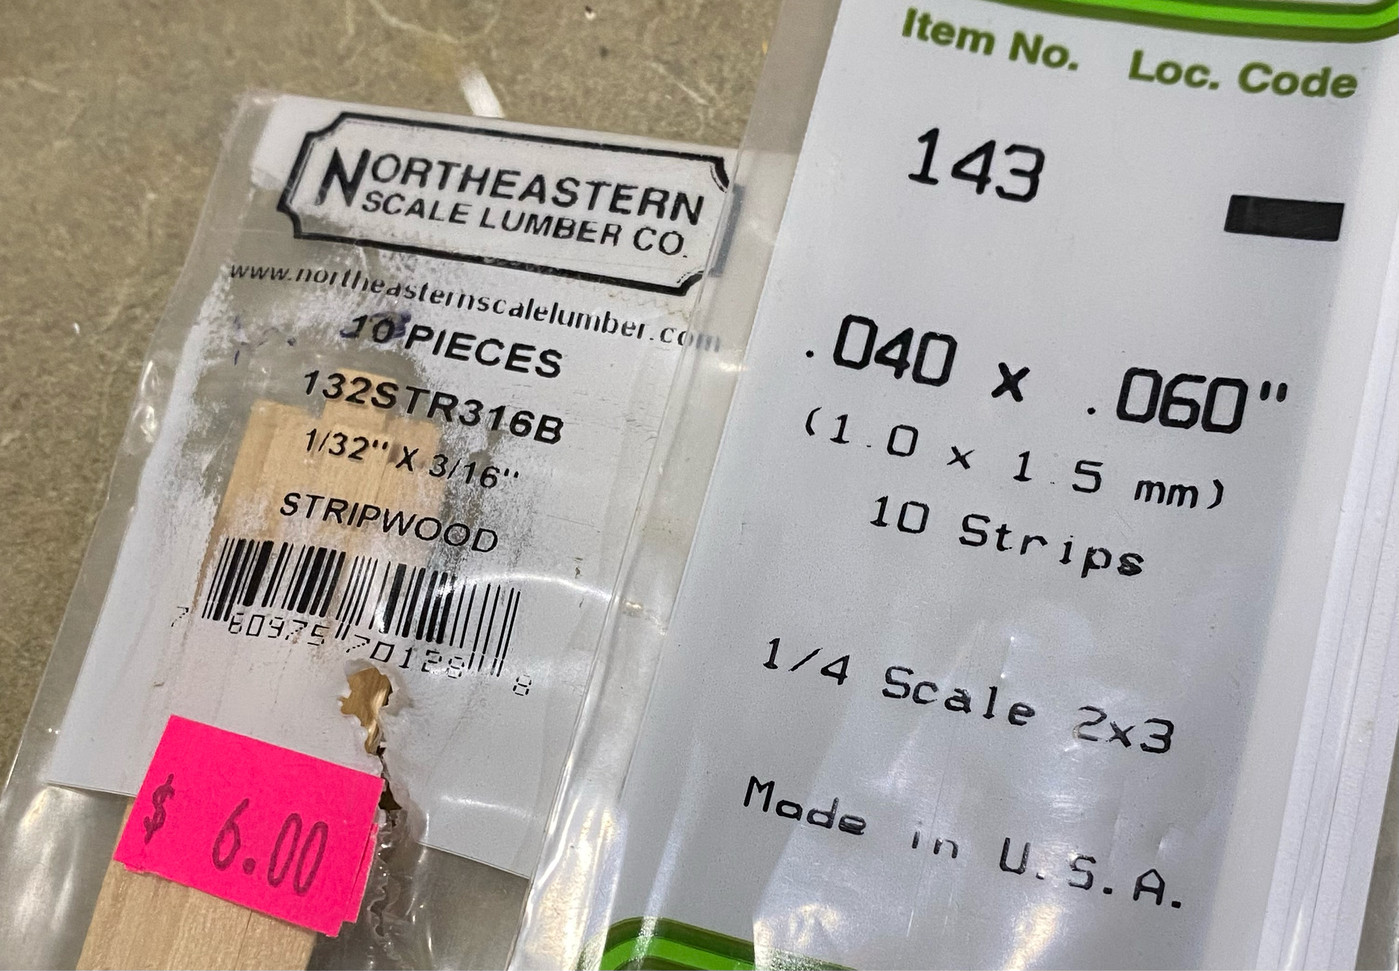 I cut 5 strips of wood and 6 strips of plastic all the same length using my handy dandy Chopper. This is a great tool for repeatable cuts over and over. 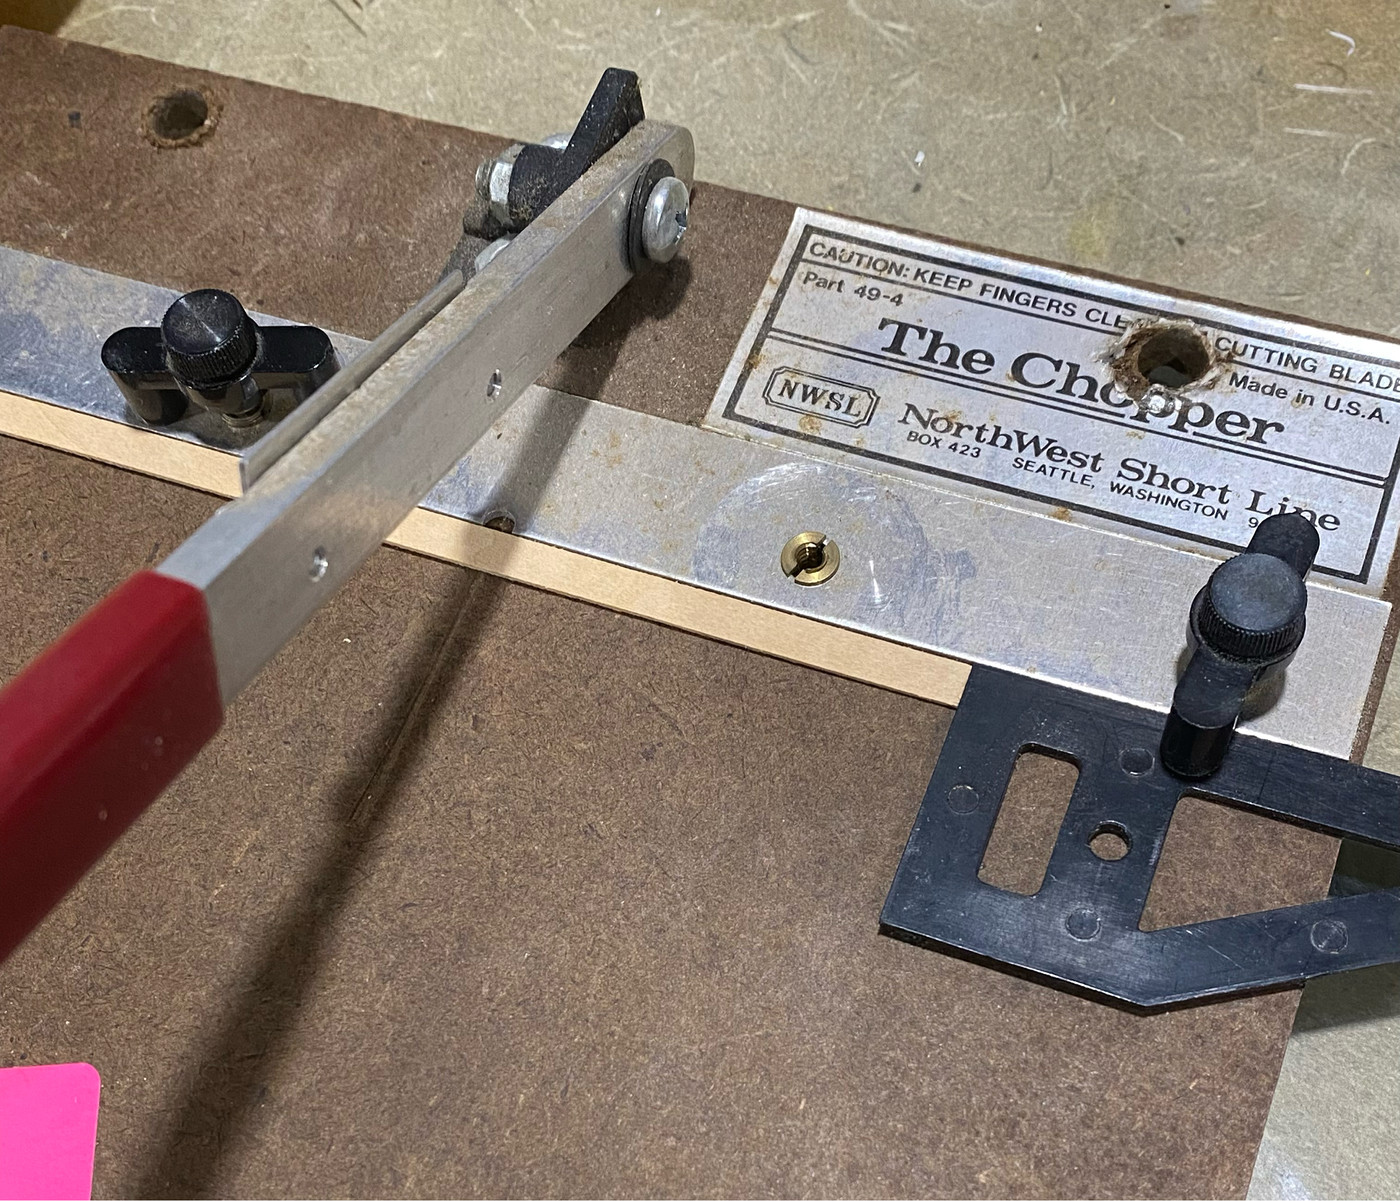 I hit the wood strips with a couple coats of Testors clear and then assembled everything together. 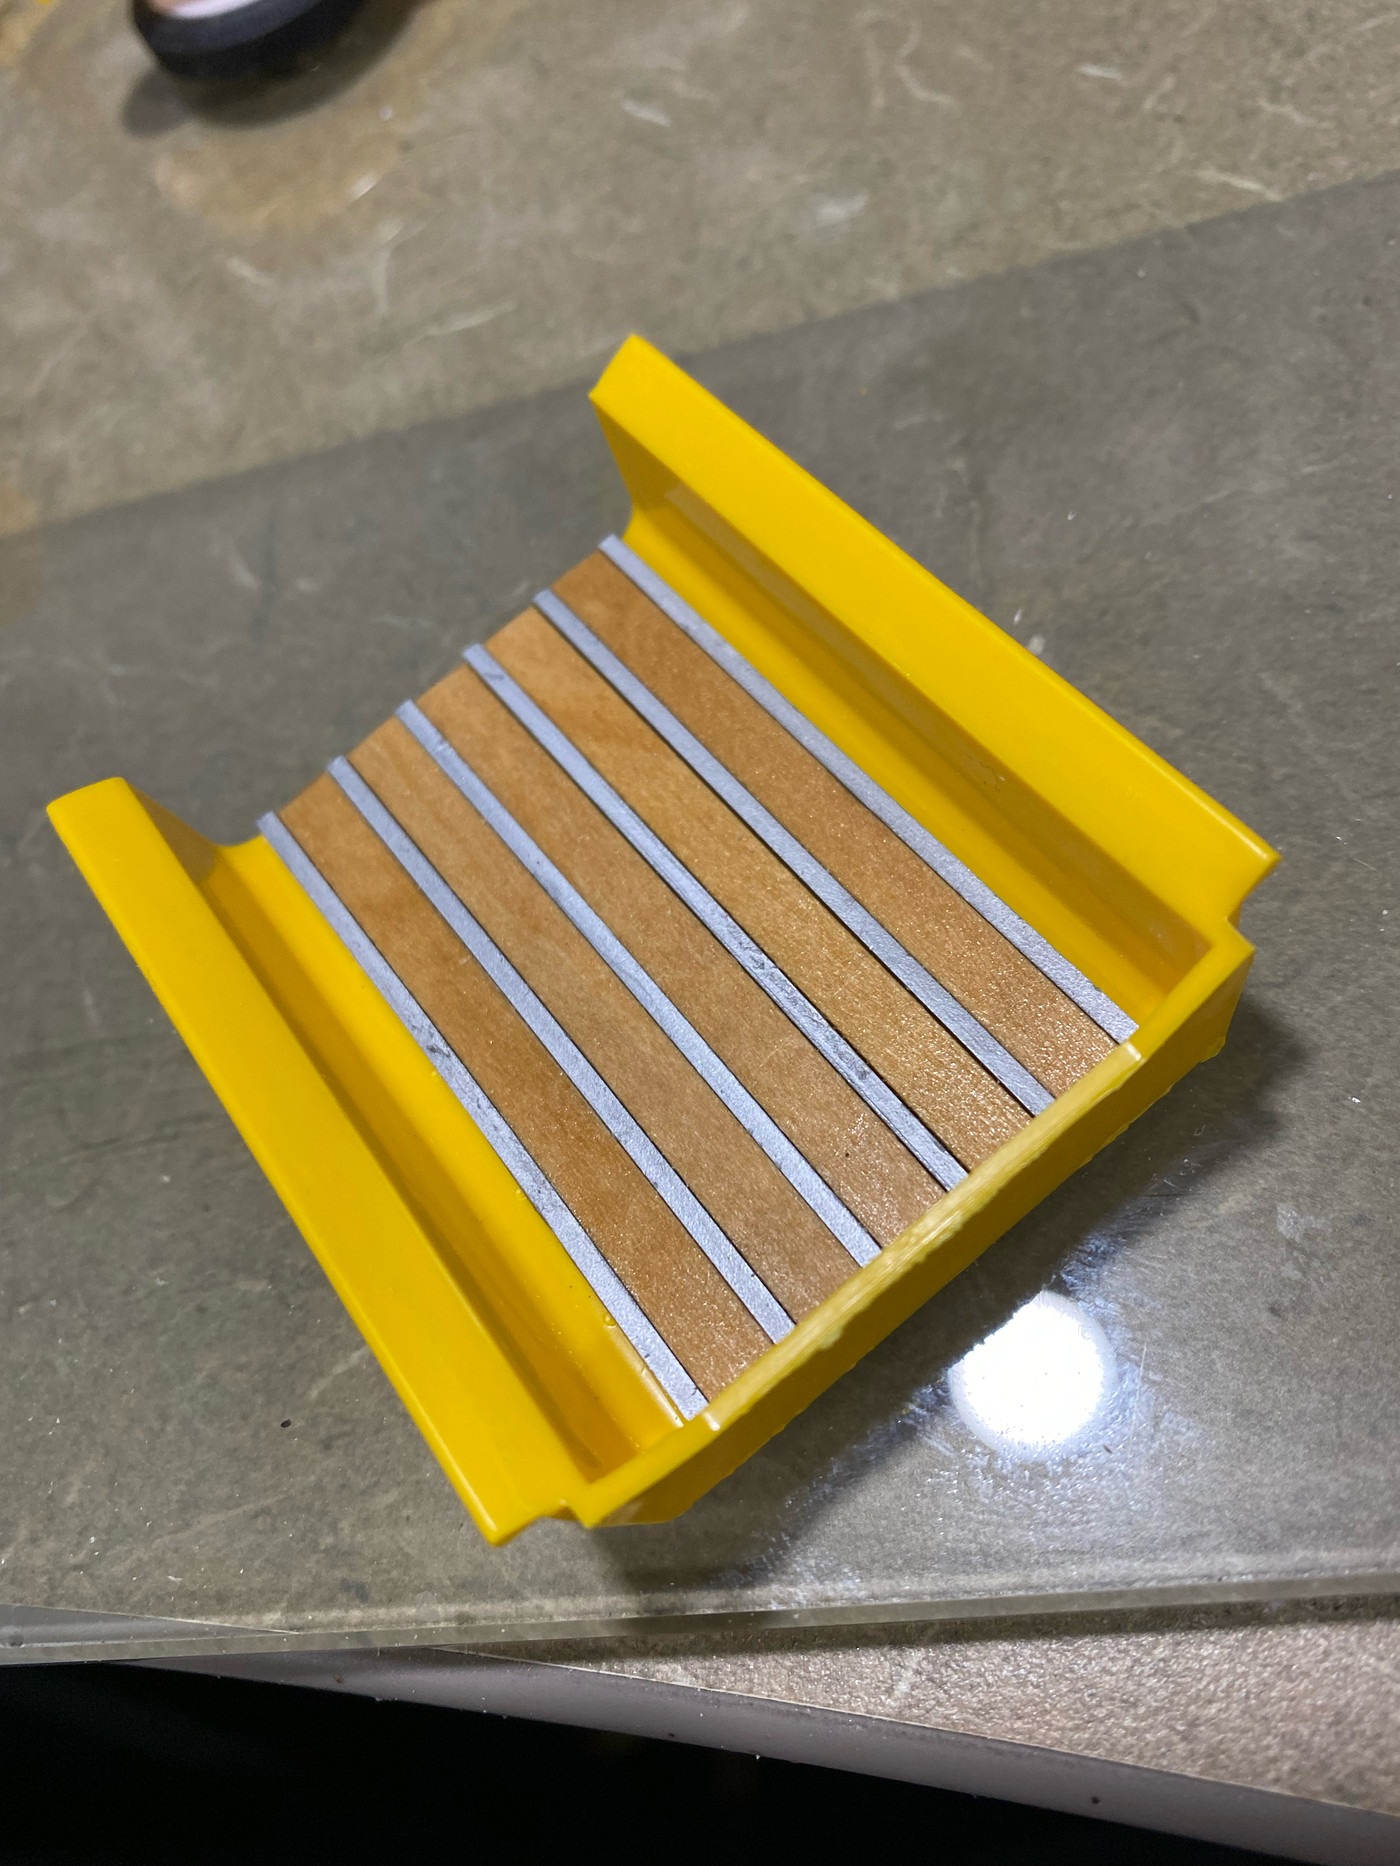 And just a taste of the finished product. 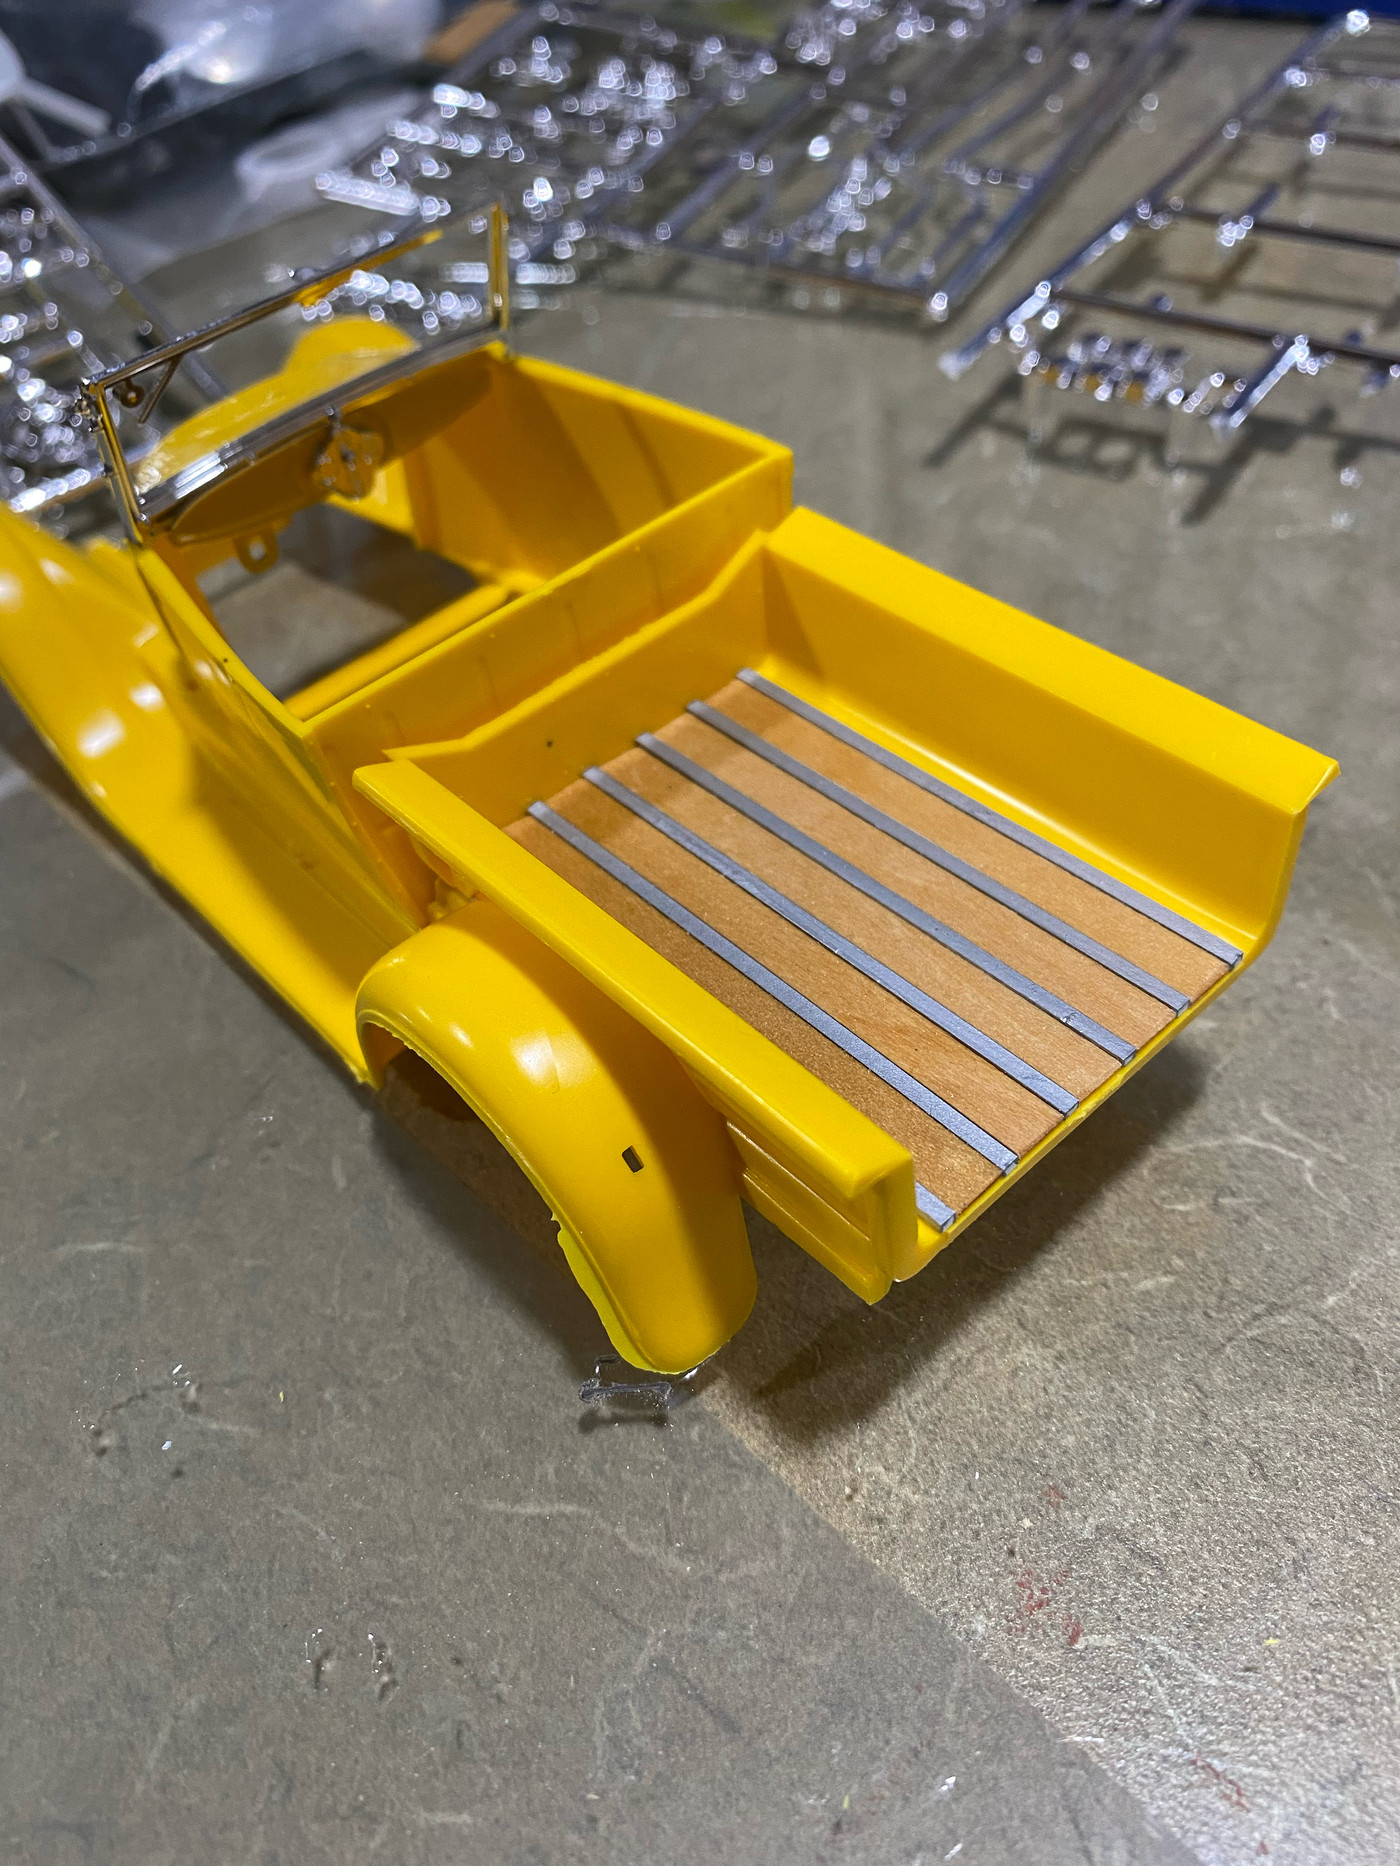 |
|
|
|
Post by skip on Sept 12, 2022 8:56:50 GMT -5
Craig - That bed looks great! Agree this is something that a builder of higher ability would have been able to do. Proof would be the Don Emmons articles in Rod & Custom, Model Car & Science magazines. Don presented quite a few ideas in his articles which were on a higher ability level than replacing bed boards, so it's all good.
|
|
|
|
Post by Dave from Pleasanton on Sept 12, 2022 11:12:43 GMT -5
Great looking bed Craig. Love the Chopper. I have the Chopper II which looks "better" but I think the first version was better.
|
|
|
|
Post by Mr. Metallic on Sept 12, 2022 13:33:30 GMT -5
Great looking bed Craig. Love the Chopper. I have the Chopper II which looks "better" but I think the first version was better. I don't think I've ever seen the Chopper II. What are the differences? |
|
|
|
Post by Dave from Pleasanton on Sept 12, 2022 17:30:49 GMT -5
Great looking bed Craig. Love the Chopper. I have the Chopper II which looks "better" but I think the first version was better. I don't think I've ever seen the Chopper II. What are the differences? Its made out of diecast aluminum and is 7x7 inches. Its much smaller than the Chopper. The problem I've had with it is that the razor blade or the cutting arm tends to flex on thicker plastic. Still I love the thing.  |
|