|
|
Post by spex84 on Apr 25, 2020 10:06:59 GMT -5
Your revised plan sounds pretty solid. Many years ago I built a channeled Revell 3-Window with that parts pack Caddy except that I replace the Hydro Stick trans with the 4-speed box from their parts pack 427 Ford big block. That motor is a great fit to these kits... Hey Dennis, did you use the Revell parts pack Caddy headers for that build? They look different where they meet the block, somehow. |
|
|
|
Post by Dennis on Apr 25, 2020 10:21:46 GMT -5
Your revised plan sounds pretty solid. Many years ago I built a channeled Revell 3-Window with that parts pack Caddy except that I replace the Hydro Stick trans with the 4-speed box from their parts pack 427 Ford big block. That motor is a great fit to these kits... Hey Dennis, did you use the Revell parts pack Caddy headers for that build? They look different where they meet the block, somehow. They are modified Monogram ‘29 Roadster Pickup headers. |
|
|
|
Post by chepp on May 23, 2020 13:33:09 GMT -5
... I think the frame would look better body color too.......just an opinion though.
I'll be painting my body and frame the same color.
|
|
|
|
Post by chepp on Jul 2, 2020 18:35:51 GMT -5
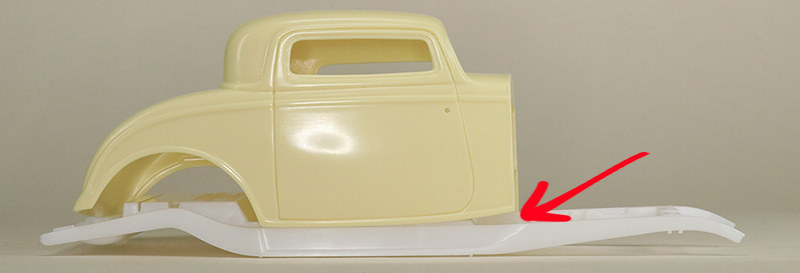
Here's Ed's great Drag City Casting chopped 3-window body on a Revell 5-window coupe frame. Just like the real thing there's a gap at the front of the body (red arrow).
It looks like the thing to do is channel the body over the frame the same amount as the gap.
What's the best way to do this?
A. Narrow the frame rails B. Spread the body a little C. Deepen the molded-in channel on the top of the frame to follow the curve of the bottom of the body D. Other.
|
|
|
|
Post by Bernard Kron on Jul 2, 2020 20:06:23 GMT -5
That's a good question and one to which I never gave much thought. So that means that it's most likely answer B - Spread the body a little. Here's the closest thing to this style of Deuce that I've done. It's from 2011 but these photos seem to confirm that I just made sure the body was channeled down slightly onto the rails. The firewall is from the AMT Phantom Vicky but is the correct length to allow the slight channel. One thing, though. Only the louvered hood sides from the Revell Highboy Roadster kit are extended to sit flush on the frame rails. All other hood sides from this series have a slight curve to clear the stock fenders and leave a gap when used on a fenderless highboy. You can see that in the side view.   |
|
|
|
Post by chepp on Jul 2, 2020 20:31:54 GMT -5
Thanks, Bernard. Mine will be hoodless so that part doesn't matter. I'll be using Ed's stock firewall so it will just need a little trimming.
I'm progressing very slowly on this so more comments are welcome. I have to make up some engine mounts to fit the Revell parts pack Cadillac, figure out a trans crossmember and mount for the B&M Hydro, think about whether to add a K stiffener, revise the frame to fit a rear transverse spring from a Monogram kit...
|
|
|
|
Post by krassandbernie on Jul 3, 2020 0:51:24 GMT -5
Personally, I like ideas to remedy problems in scale (with the models) that are fixed with the same methods as the 1:1: so I think we should wait for Dennis to chime in here. I'd opt not to spread the body because it throws things off......especially the hood/hood side fit. My gut tells me that that frame (or body) might not be scaled 100% to spec in relation to the 1:1; but I haven't looked into it at all either to confirm this. It also would not surprise me to find that there's some slight variation in dimensions between all of the Revell '32 Ford frames. Just look at how Revell screwed up the overall shape of the cowl by the time they brought the 5 window coupe out. It certainly is noticeably different than the shape of the cowl on the Tudor sedan, roadster, or 3 window coupe. It's a bit too rounded down the sides and pinched in towards the bottom. What I am getting at here is that perhaps one of the other '32 frames is slightly narrowed compared to the one you tried out; and that could solve your problem (or get you closer to a solution) with little to no work.
Revell also made the thickness of each of their '32 Ford bodies different with the 5 window coupe body being extremely thin. Perhaps you could thin down the inside of the 3 window resin body a bit and have it drop right down over the edge of the frame rails like you need it to? At the very least, it would cut down on the amount you'd have to spread the body to get it to drop down over the frame rails.......if you were to go that route. Your other body parts would not be thrown off as much for fit too!
|
|
|
|
Post by Dennis on Jul 4, 2020 15:16:20 GMT -5
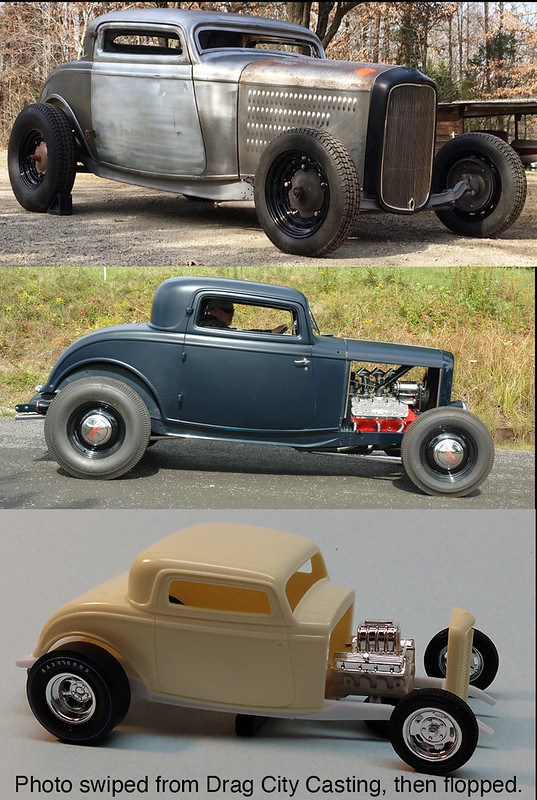
The way the two full scale cars are (pictured above, blue and bare metal) is how a ‘32 3-Window body fits onto the frame from the factory. They sit down over the frame noticeably, not flat on top of it like a Model A. All of the ‘32 car bodies are actually this way but the 3-Window especially.
|
|
|
|
Post by chepp on Jul 4, 2020 17:35:25 GMT -5
The way the two full scale cars are (pictured above, blue and bare metal) is how a ‘32 3-Window body fits onto the frame from the factory. They sit down over the frame noticeably, not flat on top of it like a Model A. All of the ‘32 car bodies are actually this way but the 3-Window especially. Thanks, Dennis. Now I get it. I taped the Revell '32 5-window interior together and fitted it and the 5-window onto the frame by spreading the body a little. That makes the bottom of the body below the top of the frame rails as you describe. As Ed suggested, I'll thin the side wall of the resin chopped '32 3-window so I won't have to spread it too much.
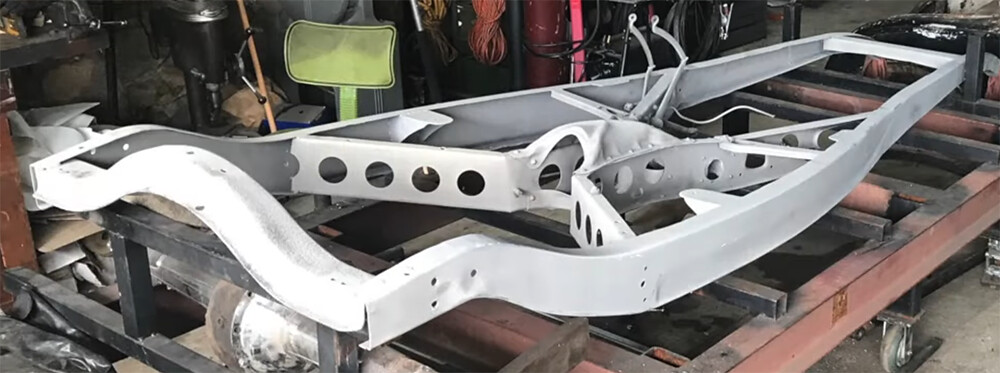
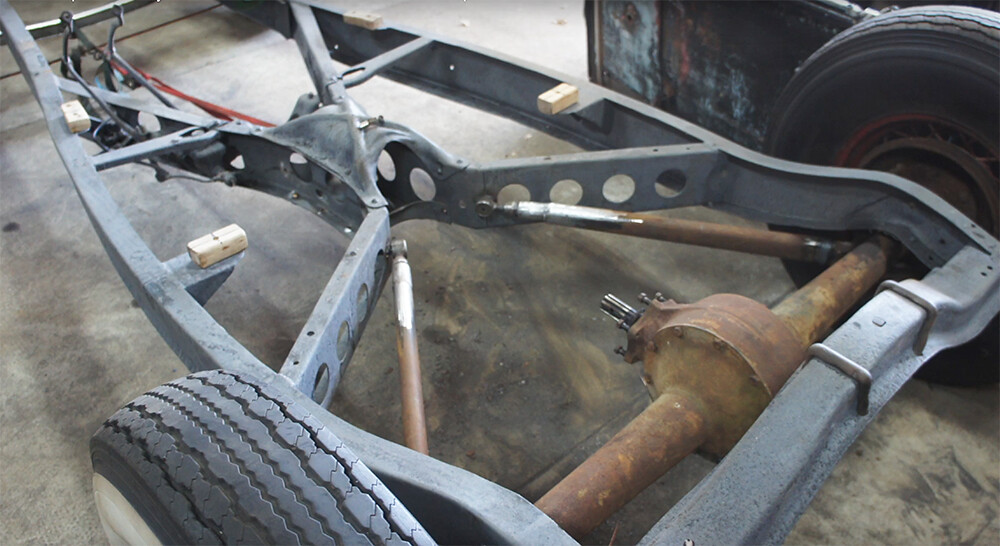
Here are some "before" shots of a taken-apart car being readied for a 9" channel. These should be useful for understanding the relationships of things. Somebody re-did the rear inner fender walls with flat stock.
You and Ed sure did a beautiful job on that chopped 3-window.
|
|
|
|
Post by Mr. Metallic on Jul 6, 2020 6:34:43 GMT -5
I've built a whole bunch of builds on the modern Revell 32 Ford seriesa, and have never noticed any dimensional differences between any of the frames from all the versions. The only one that really even differs from all the other versions is the Rat Roaster version with its new motor mounts and indentations in the underside to clear the exhaust in that kit. I've built a few channeled 32's, and don't recall having to do much more besides these key points 1- shorten legs on the firewall 2-section interior 3- trim rear frame rails and remove/modify gas tank. I typically add a couple pieces if plastic as "body mounts" just inside the cowl to give the body a positive resting point on the frame without having to always have the firewall in place. If you need any more tips let me know   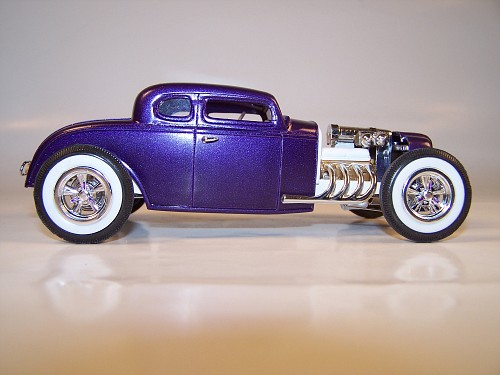  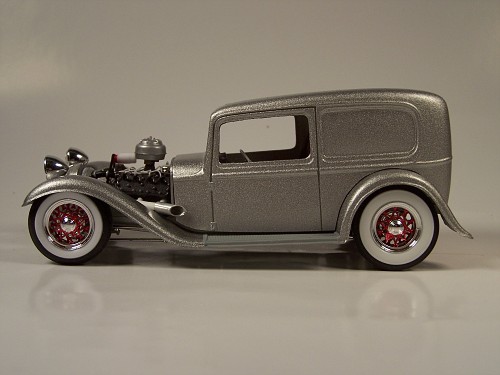 |
|
|
|
Post by chepp on Jul 9, 2020 11:54:11 GMT -5
Thanks, Craig. I'll be leaving the body-frame relationship stock (with the lower part of the body just below the top of the frame rail as Bernard shows above).
|
|
|
|
Post by chepp on Jul 9, 2020 12:16:53 GMT -5
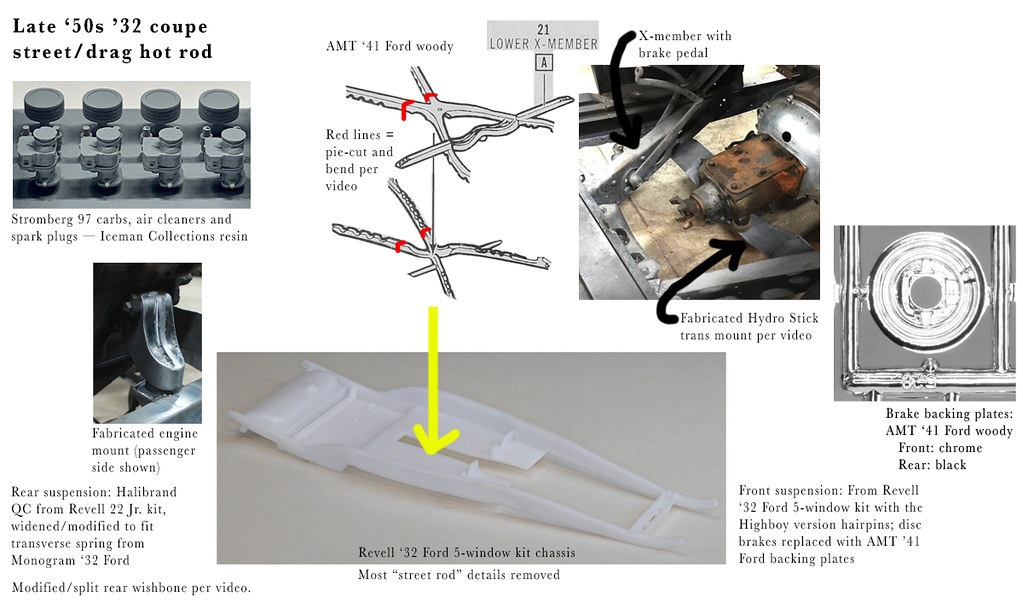
After a lot of online sleuthing I found videos by a couple of guys who are building a traditional rod with a '32 frame and Cad engine. Eureka!
X-member addition ('42-'46 Ford to '32 Ford frame) I'll be using one from the AMT '41 Ford woody. Like the frame it is "boxed" since the kit parts are molded that way. The rear part of the X-member is pie-cut and bent as shown below. See the video for details.
Engine mounts (Cad 331 to '32 Ford frame)
Trans mount (Cad Hydramatic to '32 Ford frame with added X-member)
Modified/split rear wishbones to the X-member
Here's the latest update to my plans.
|
|
|
|
Post by Mr. Metallic on Jul 9, 2020 13:10:34 GMT -5
I've had those carbs/air cleaners sitting in my watched items for awhile. Have you gotten them yet? they look nice in the pics, just wondering what they look like in person.
|
|
|
|
Post by chepp on Jul 9, 2020 14:03:16 GMT -5
I've had those carbs/air cleaners sitting in my watched items for awhile. Have you gotten them yet? they look nice in the pics, just wondering what they look like in person. Yes, they look really good. I'm speculating that they were drawn in a 3D app and printed on a high-res 3D printer. There are so many undercuts that I don't think that it was cast in resin.
It includes spark plugs, too, so this will be my first time building a 1/25 engine with separate plugs.
|
|
|
|
Post by chepp on Jul 16, 2020 14:09:07 GMT -5
The X-member from the AMT '41 Ford woody looks like it will be too much work to hide the glue joint so I'm working on making the channel parts from a styrene I-Beam.
This chassis is turning out to be a lot more work than I had expected. The stock floor didn't have a trans/driveshaft tunnel but it needs it to accomodate the '50s Cad engine and lowered rear end. The Revell '32 Ford kit floor appears to replicate a custom one with different beading in it so I'll probably add little "X" strips to suggest an original floor pattern for the traditional look.
On top I'll add parts that will look more like a rodder might have made them in the late '50s. I won't be using the interior floor from the Revell '32 kit — the seats will be glued to the floor that you see here.
|
|