|
|
Post by mod3llover on Nov 4, 2019 15:32:14 GMT -5
That's exactly what I was going say!! LOL!!!
Ok, . . . not really, but I know I like it!
|
|
|
|
Post by spex84 on Nov 4, 2019 18:26:36 GMT -5
It really did work out...I especially like how the hairpins mount in an attractive place on the frame rail, which can only happen with this extended wheelbase because of the spring-behind setup.
|
|
|
|
Post by krassandbernie on Nov 4, 2019 22:24:46 GMT -5
I am dig'n it Craig! I would likely dig it more with the front end shortened up a bit (or in the stock location); but then again, I've always had a thing for '60's fuel altereds with a short wheelbase! LOL! At first glance I thought you altered an AMT '36 Ford coupe roof; but then came to realize it was a Rep&Min casting.........pretty cool you throwing a handful of aftermarket parts in a box and shaking it up like this! LOL! I picture this thing black just like the Duane Spencer roadster now!
|
|
|
|
Post by Mr. Metallic on Nov 5, 2019 7:25:33 GMT -5
I am dig'n it Craig! I would likely dig it more with the front end shortened up a bit (or in the stock location); but then again, I've always had a thing for '60's fuel altereds with a short wheelbase! LOL! At first glance I thought you altered an AMT '36 Ford coupe roof; but then came to realize it was a Rep&Min casting.........pretty cool you throwing a handful of aftermarket parts in a box and shaking it up like this! LOL! I picture this thing black just like the Duane Spencer roadster now! Thanks Ed. The wheel base is only 3mm over stock. It appears longer because the body is set back 2mm from stock. And I honestly think the camera is exaggerating the length. But I knew I was going to need every "inch" to get that y block in there. And I love the lines it has created. The plan is to go with black, or a very very dark green or blue (near black). The look will mimic the Doane Spencer T-Bird  |
|
|
|
Post by Dennis on Nov 5, 2019 10:34:44 GMT -5
This is looking wicked-cool, Craig! Back when you asked I originally voted for the long "bed" but now seeing it with the shortened version I think it's just right! The stance is right-on and definitely digging Doane Spencer hard top/windshield.
The front dress on that Y-block stacks up pretty thick. To help fit it in my '32 5-Window I changed the fan for one without the molded-in spacer which isn't necessary in a hot rod.
|
|
|
|
Post by Mr. Metallic on Nov 5, 2019 12:13:39 GMT -5
This is looking wicked-cool, Craig! Back when you asked I originally voted for the long "bed" but now seeing it with the shortened version I think it's just right! The stance is right-on and definitely digging Doane Spencer hard top/windshield. The front dress on that Y-block stacks up pretty thick. To help fit it in my '32 5-Window I changed the fan for one without the molded-in spacer which isn't necessary in a hot rod. Thanks for the tip on the fan Dennis. In the real world, why is that spacer necessary? There are definitely things that can be done to make the y-block fit in a tighter spot, as you have illustrated with your 5W versus what I have done here. Different fan, snugging the block closer to the firewall, recessing the firewall into the body slightly, etc. But I like the proportions I have landed on here for this particular build. And I know you're not suggesting that I change it. We're just pointing out options for fellow builders  |
|
|
|
Post by Dennis on Nov 5, 2019 13:51:19 GMT -5
Definitely wasn’t implying you change anything. Just as you said, for the benefit of others. In a ‘57 Ford the spacer was needed to get the fan up to the radiator. Too far away and the fan won’t pull air through the core effectively.
Yeah, on my 5-Window I have the benefit of the recessed firewall. I would have preferred a stock style one from Ed but there was no way to fit the engine with it.
|
|
|
|
Post by acres on Nov 7, 2019 14:55:46 GMT -5
Awsome detailwork!!!!
|
|
|
|
Post by lo51merc on Nov 7, 2019 17:22:49 GMT -5
Now, if somebody (knowledgeable) could create a recessed Model A stock firewall......
|
|
|
|
Post by Mr. Metallic on Nov 21, 2019 7:37:31 GMT -5
Update! Bench time has been at a minimum the last couple weeks, so no progress to report until now. Installed the last full crossmember last night, so the frame is pretty much done except for adding some bolt details and then primer to see what finessing is needed. Also got the brake reservoir assembly installed. It's an old white metal piece I've had floating around my parts box forever, possibly an R+D Unique piece? 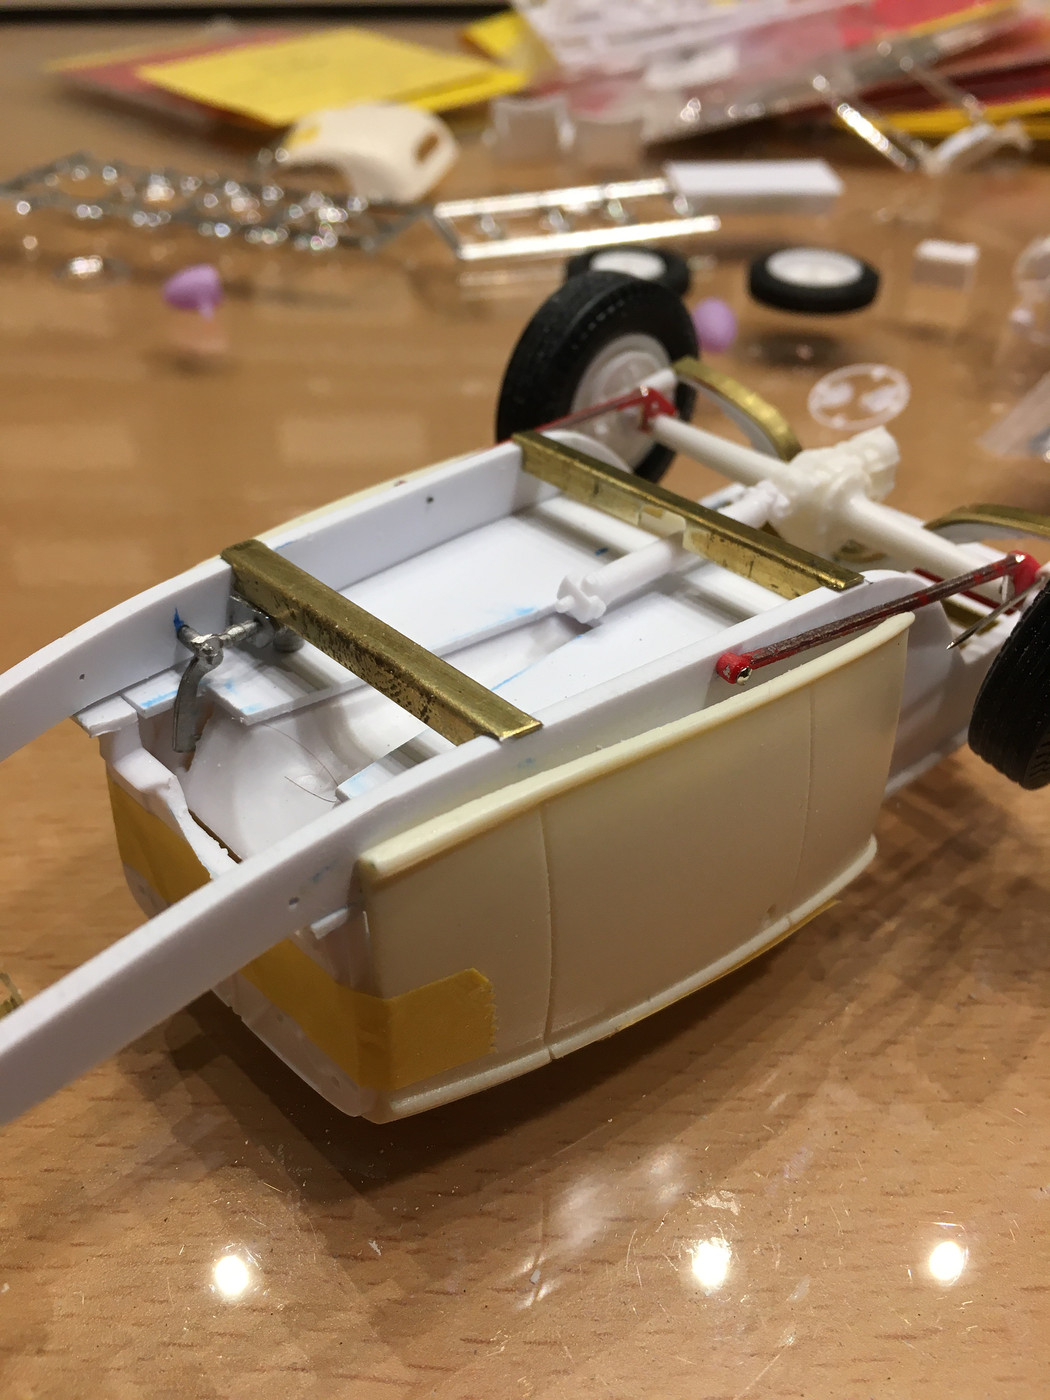 I knew I wanted to use the aircraft style seats, but didn't relish the idea of sitting on solid metal for an prolonged length of time. So I dug a couple of the jump seats from a Revell 40 coupe and cut them down into seat pads. 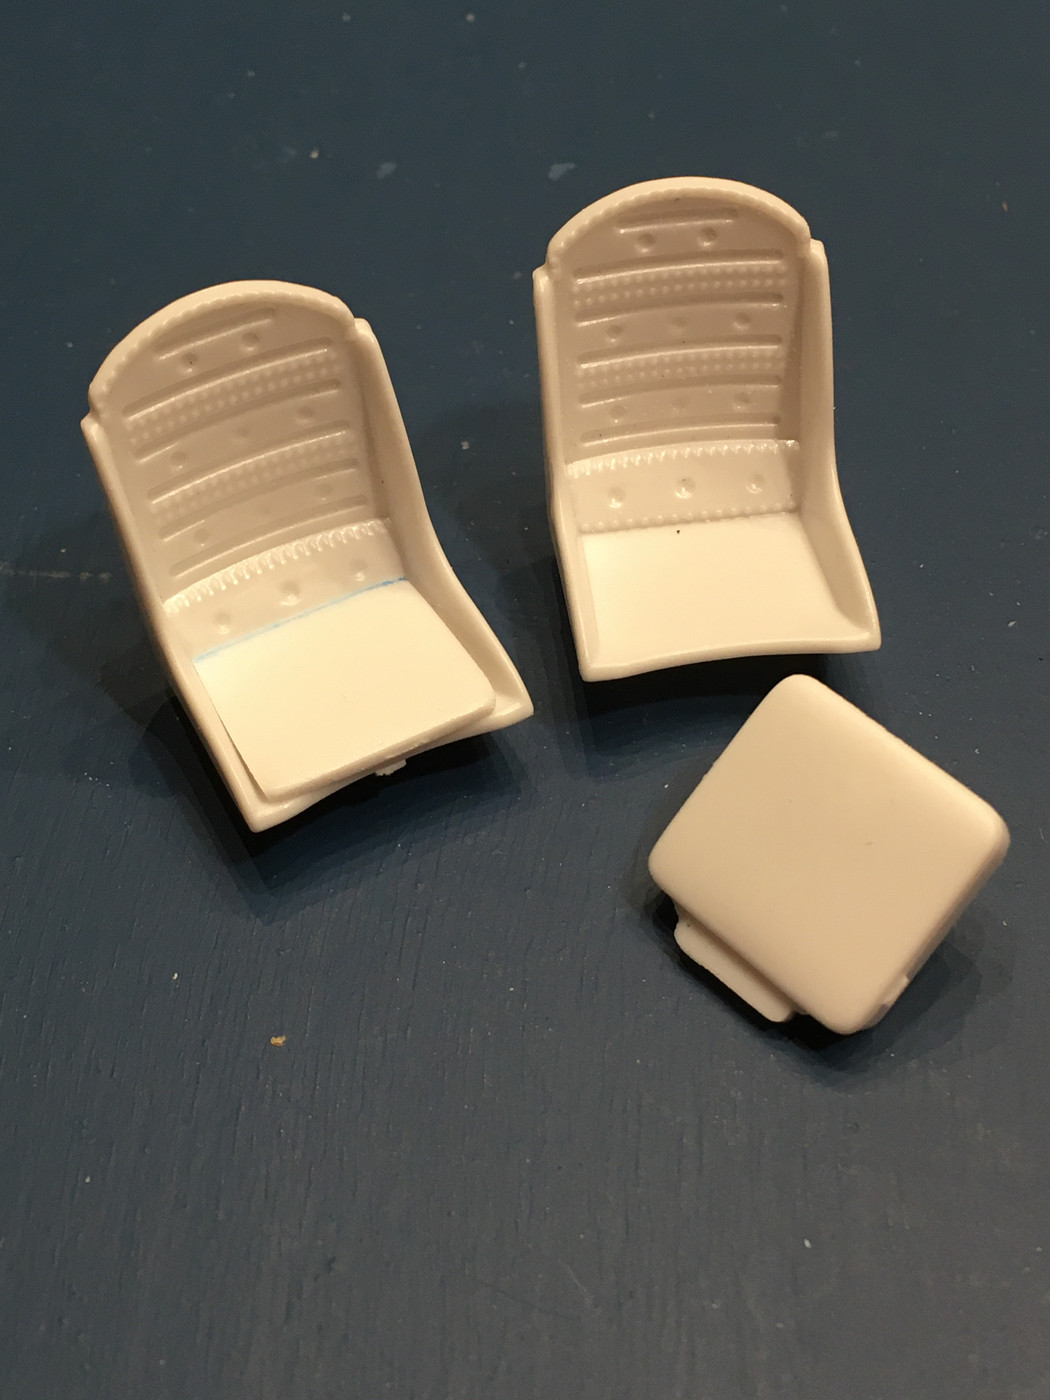 |
|
|
|
Post by krassandbernie on Nov 21, 2019 21:26:56 GMT -5
How small are you Craig? I know I wouldn't fit in your roadster pickup! LOL! I love the extra scratch built detail you are putting into this one! Reminds me of when I used to have bench time and would go nuts with the aluminum sheet stock, rivots, and real nuts and bolts! LOL!
|
|
|
|
Post by spex84 on Nov 22, 2019 22:56:11 GMT -5
I was just about to compliment you for building that awesome brake assembly, out of metal no less! It looks fantastic...a detail that most modelers forget or deliberately omit. Love that clevis end... |
|
|
|
Post by Mr. Metallic on Dec 2, 2019 8:09:56 GMT -5
Thanksgiving break! I've been slacking on this the last couple weeks, so I tried to hit it hard over the holiday. Got the steering all sorted out, got the headlights mounted and got the dash roughed in. Awhile back someone gave me a bunch of sprint car style steering setups. So I've been waiting anxiously to finally use one. This is the perfect application. I believe the steering box, pivot arm and steering link are from one of the AMT sprint cars. I then added straight pins, aluminum tubing and brass rod bits to make up the remainder of the steering setup. 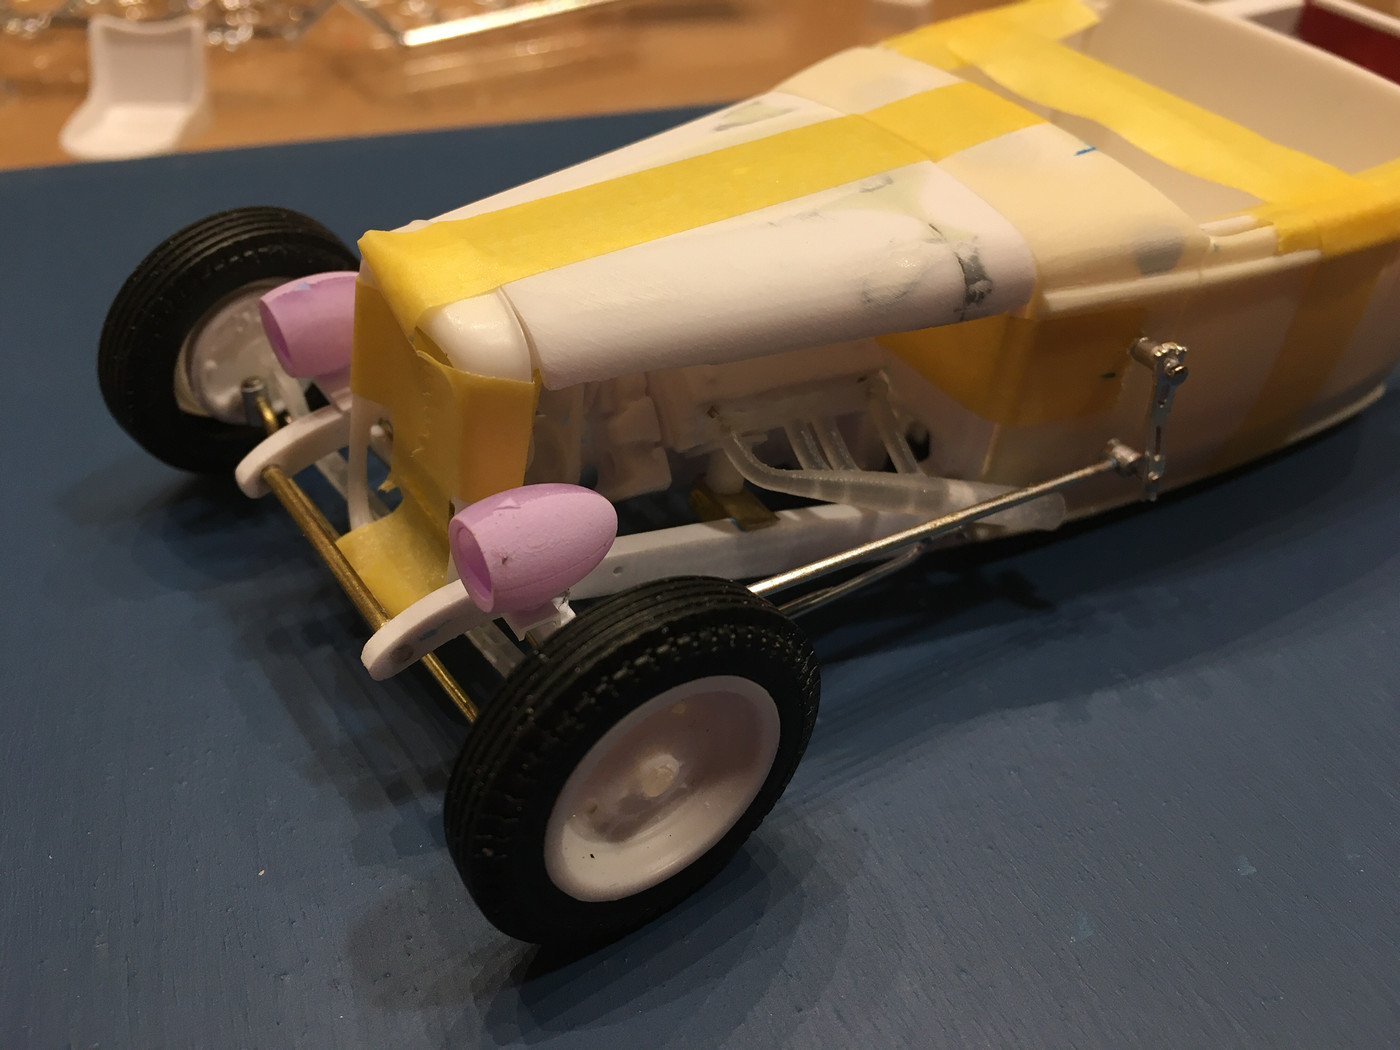 I also used some Evergreen C-channel to make some headlight mounts for the Maple Leaf Modelworks 3D printed E+J headlights Once I got the steering box mounted under the cowl I was able to figure out the last major fabrication bit for this project, the dash. While digging through the Revell Midget racer for the sweet photoetch steering wheel it comes with I stumbled on the petite dash that I decided to integrate into this build. I'm trying to keep the height of the dash minimized so it doesn't hide the sprint car steering box, and to provide leg clearance for the driver since this is a channeled car. So, I found the location of where the steering column will be, traced the shape of the cowl onto some .040 Evergreen sheet, and then put the midget dash on there to determine the shape. Then I cut it all out and began molding it into the cowl. 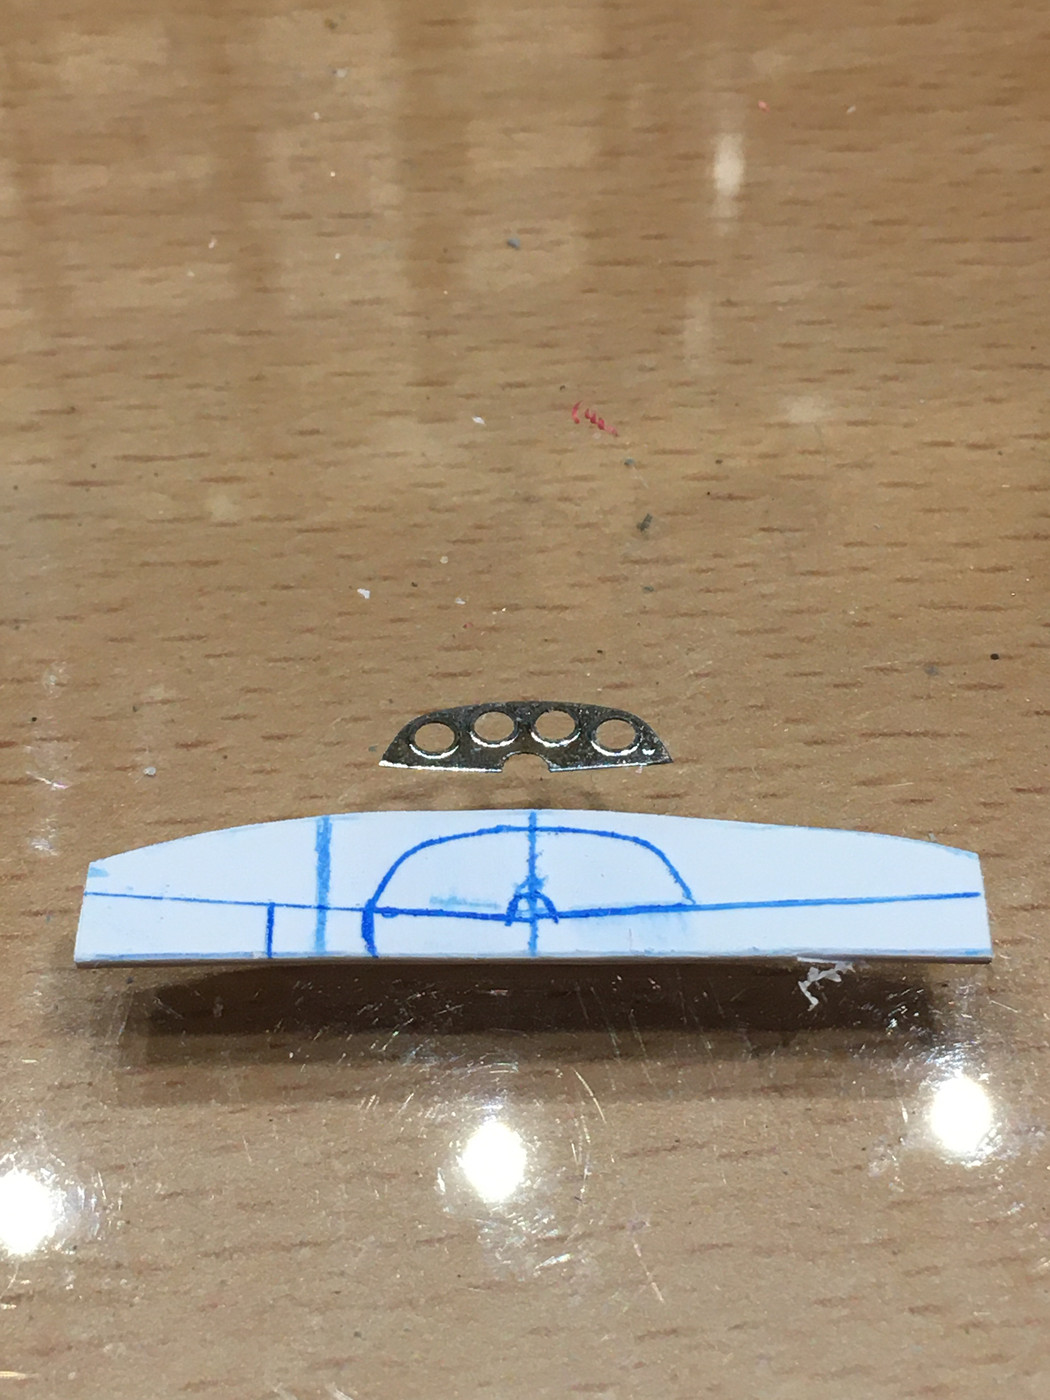 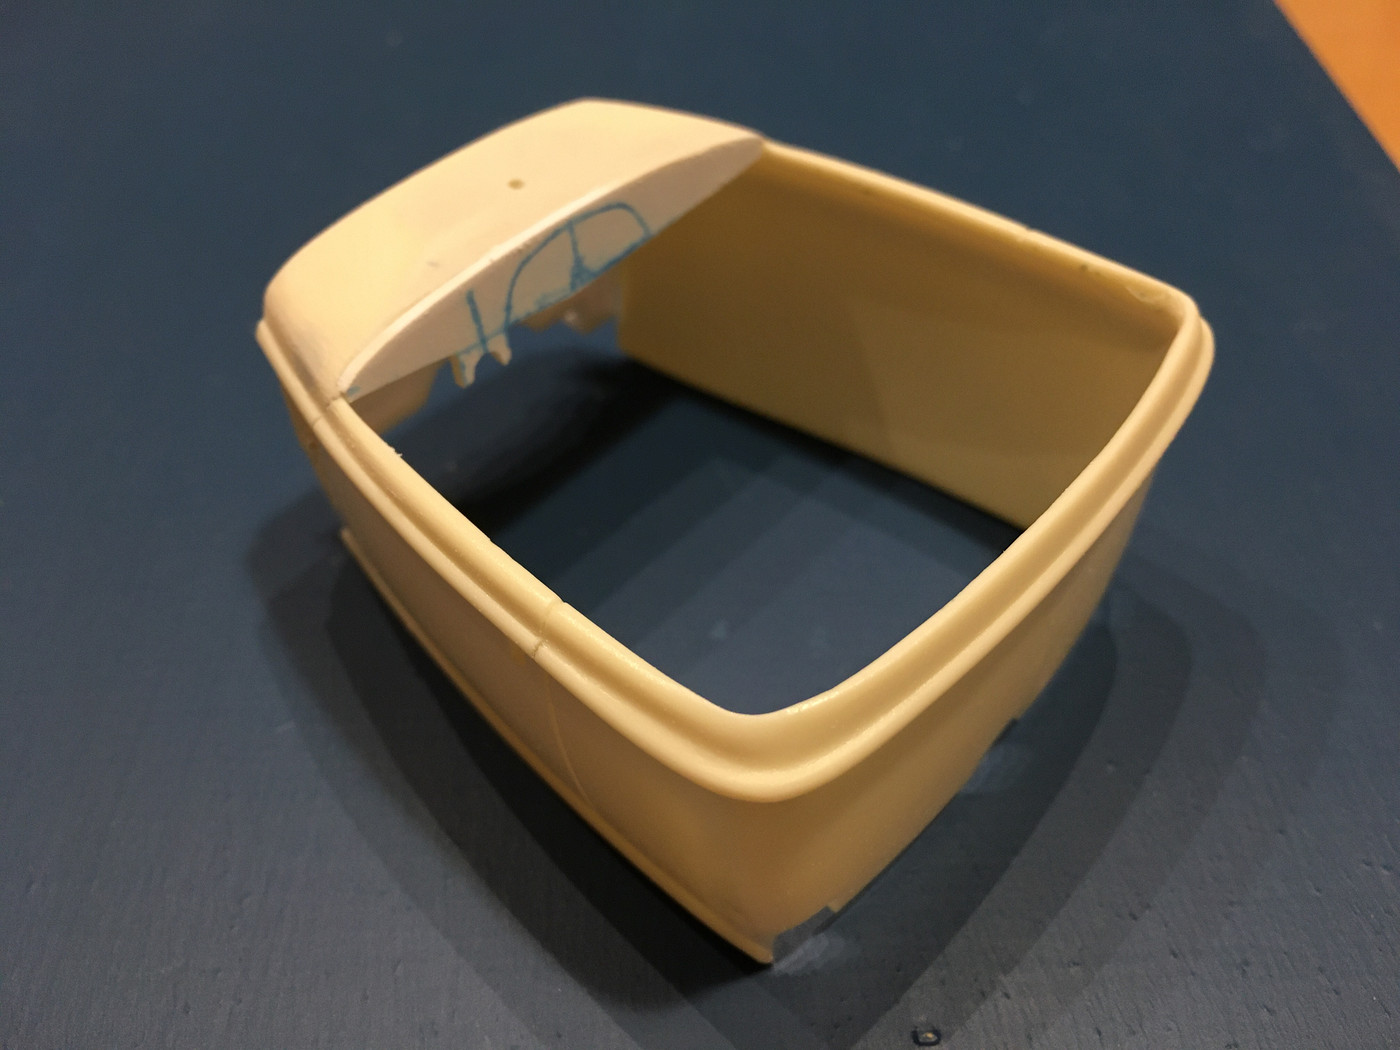 I will need to do a little finessing to it, but overall I'm very happy with it. Just need to sort out the little bits like taillights, shifter, etc. Hoping to get this done by years end as long as the weather cooperates with painting. |
|
|
|
Post by krassandbernie on Dec 2, 2019 17:34:17 GMT -5
I love the updates Craig! I especially like the dash!
|
|
|
|
Post by Mr. Metallic on Dec 31, 2019 11:27:59 GMT -5
Not Dead, not yet! Finally got the bodywork finished up and the body in primer. Feels good to see it all in one color.  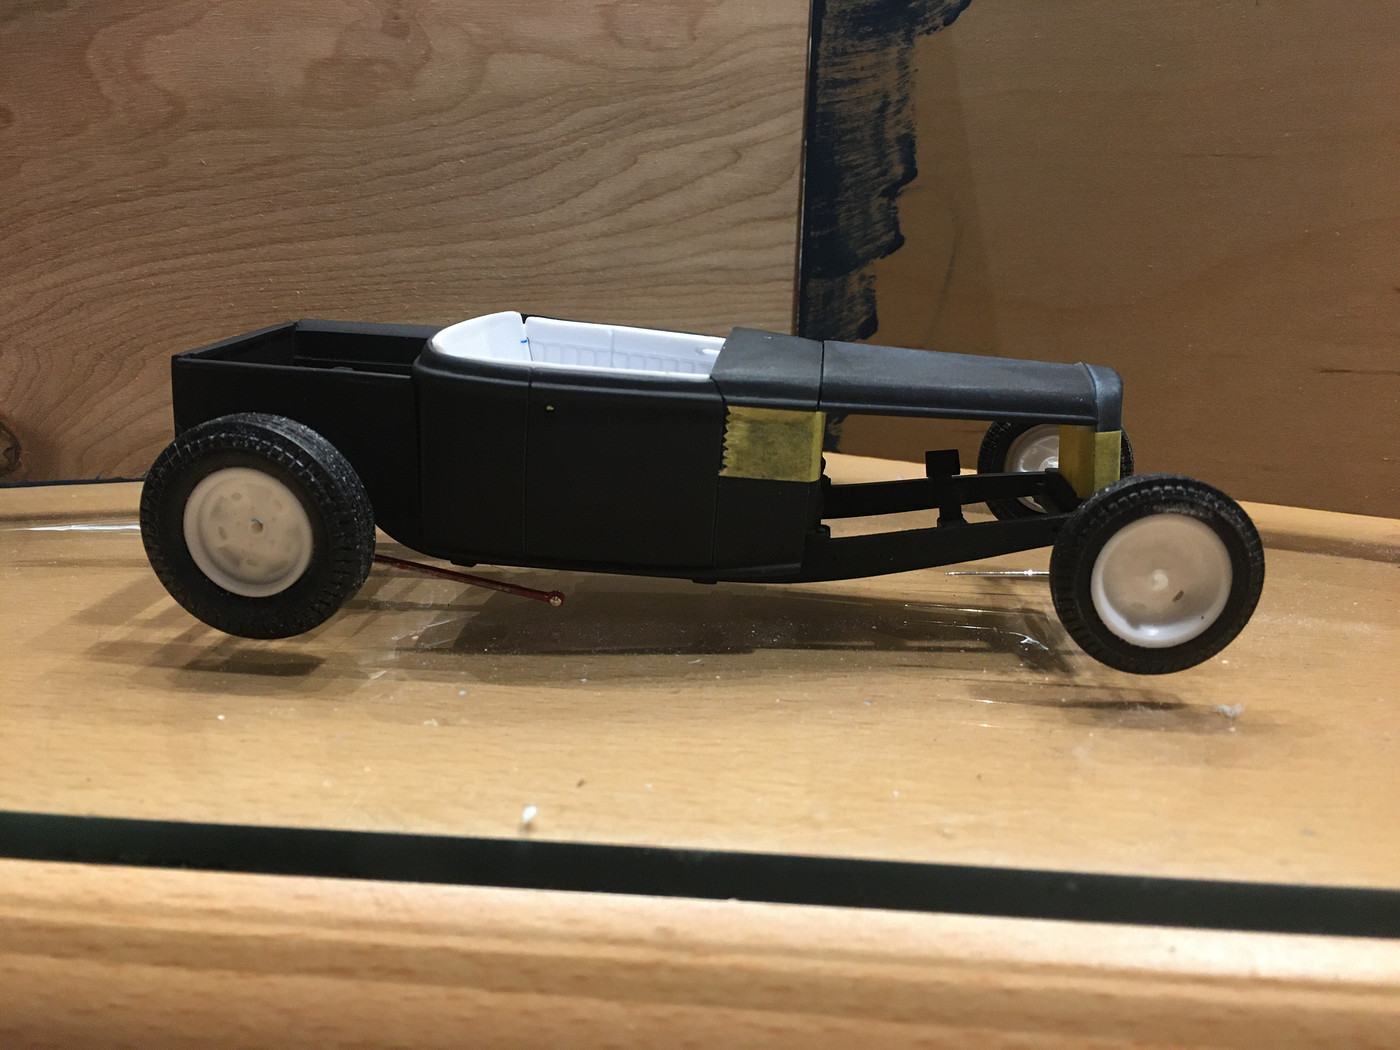 Also finished up detailing out the floor pan with Evergreen channel stock. 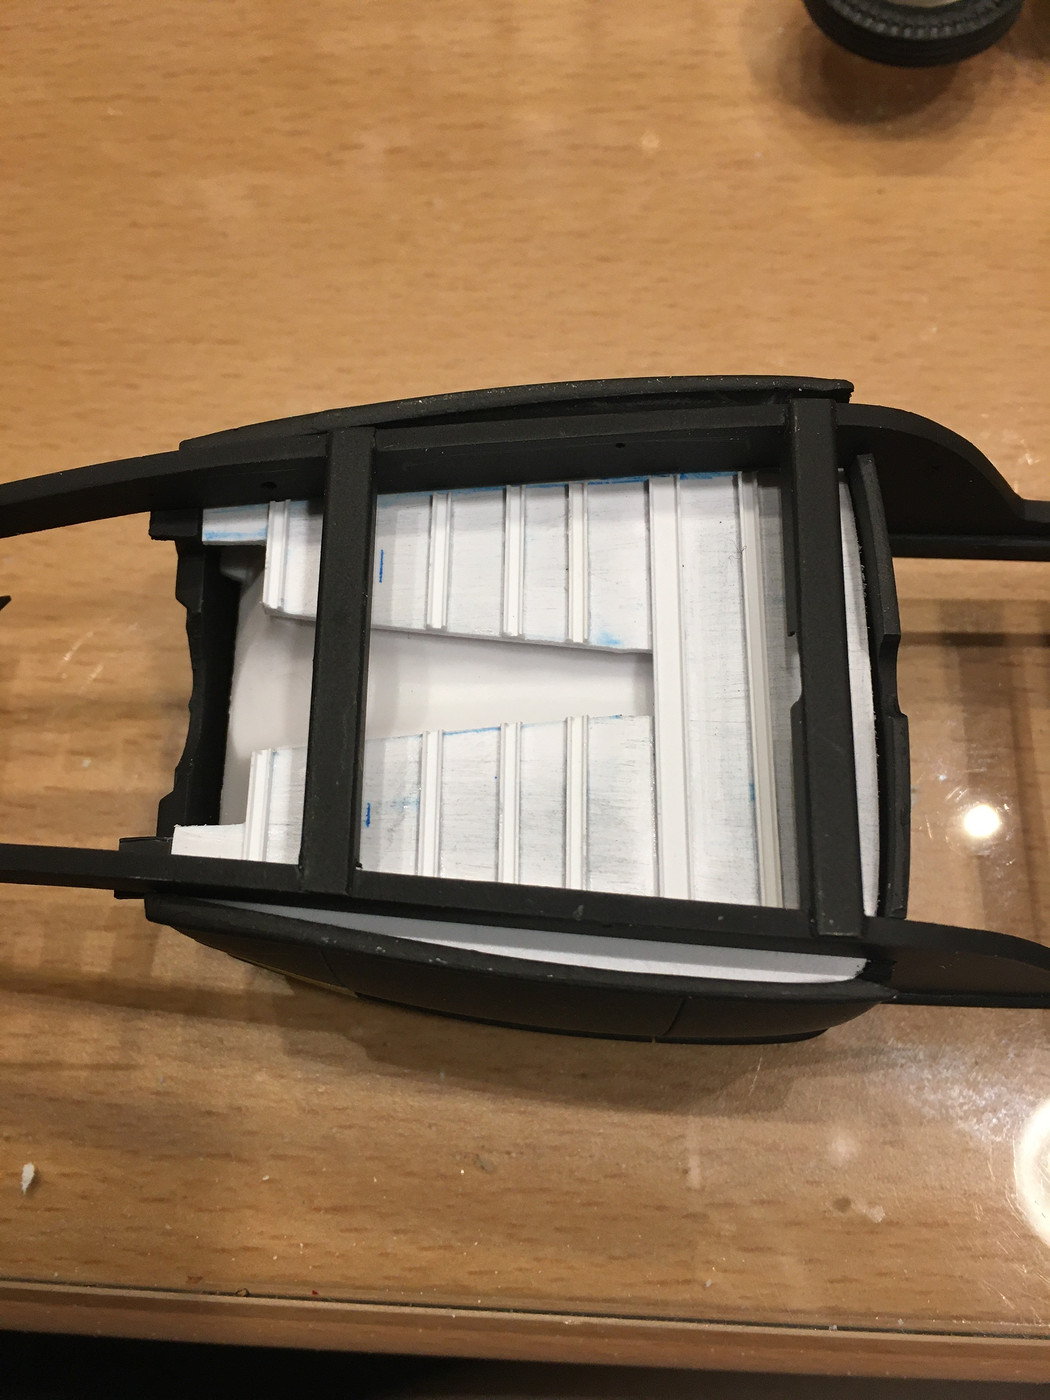 I bit the bullet and scratchbuilt the linkage for the FI setup. Straight pins and Evergreen stock. It was very tedious making up all these teenie-tiny parts. The main pins need to be trimmed for length, and the linkage needs a little finessing and cleanup, so it looks a little bulky right now. 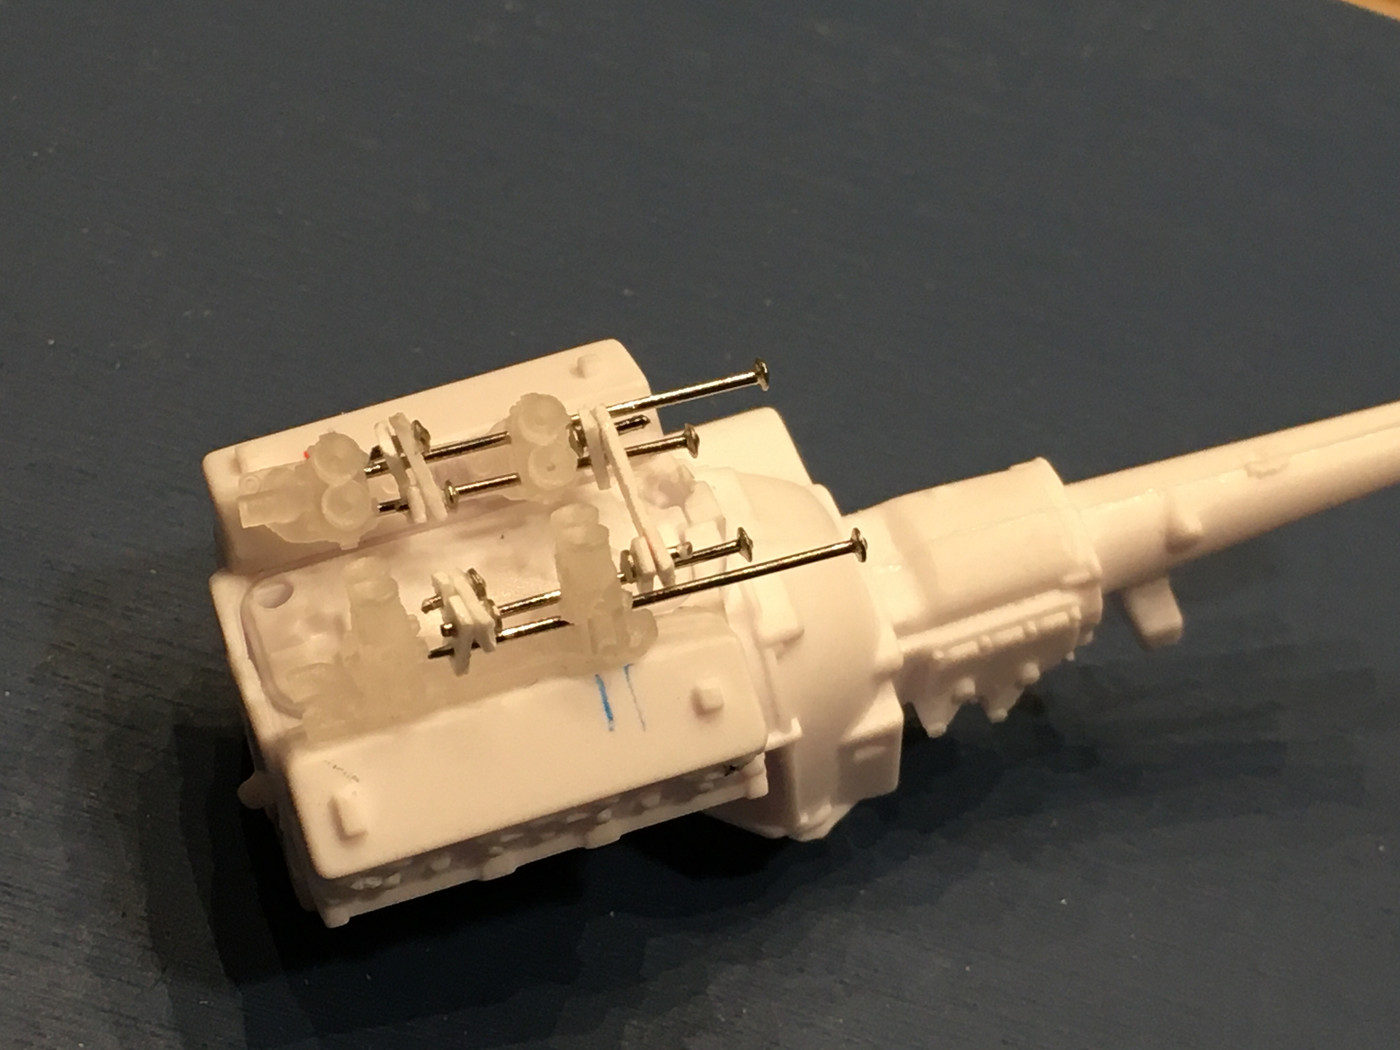 I just need to scratch up a fuel log and lines. Can I hook up the fuel log to the kit supplied fuel pump?  I don't know why I keep doing this to myself, but my friend made a very astute observation. Challenging yourself is how you expand your abilities. |
|