|
|
Post by zenrat on Aug 3, 2010 19:11:20 GMT -5
Gobsmacked!
You guys continue to amaze me by build up from styrene stock what i'd try to do by slapping on shed loads of filler followed by The Attack of the Sanding Sticks.
Only the fins & scoop give away it's origins.
What ya doing with the screen?
Bubble top?
Twin Bubbles (which would lead to my usual cry out for black paint, red striping and flying mammal symbols)?
Aero screens?
Or maybe, taking the cue from the split grille, a split screen (something like a wraparound Duval)?
|
|
|
|
Post by lo51merc on Aug 3, 2010 19:24:15 GMT -5
I wondered how it would look with a bubble top but don't have one. I was just going to cut the top half off of the stock windshield, and use the bottom half without the frame. Gary
|
|
|
|
Post by Bernard Kron on Aug 3, 2010 19:59:45 GMT -5
...You guys continue to amaze me by build up from styrene stock what i'd try to do by slapping on shed loads of filler followed by The Attack of the Sanding Sticks. .... What ya doing with the screen?... You really should try the styrene route. I've done it from time to time in the past but Jon Anderson's (Paraphrenic) work convinced me once and for all to avoid filler whenever I can. Styrene stock is so much cleaner and more stable than filler with no pssibility of shrinkage. It's not that hard. No problem with roughing the shape out in sticks of styrene. It doesn't matter if there's too much, you just knock it down to shape with a coarse sanding stick. I use cheap 80 grit nail files from my local drug store for shaping. If you can shape filler then you'll find styrene far easier to control and requiring much less finish filling and follow up work. Regarding the screen I think the idea of just a cut down stock screen is the way to go. The rest of the custom is so tastefully done that I wouldn't be drawn to a bubble top. |
|
|
|
Post by ChrisV on Aug 4, 2010 7:03:49 GMT -5
I wondered how it would look with a bubble top but don't have one. I was just going to cut the top half off of the stock windshield, and use the bottom half without the frame. Gary There might be an easier way to go about this without risking to break the windshield while cutting: At one point I thought about adding a cut-down windscreen to AMT's 1956 Thunderbird, and found that the backlight from the chopped HT roof in AMT's 1950 Ford Convertible (the roof is long gone from later issues, but the glass is still included) fit the T-Bird quite well.... |
|
|
|
Post by paraphrenic on Aug 4, 2010 14:11:19 GMT -5
I wondered how it would look with a bubble top but don't have one. I was just going to cut the top half off of the stock windshield, and use the bottom half without the frame. Gary Hey Gary... Jerry's building this cool one over on DPMCC! And I think he got the windshield just right... Thought you might want to check it out: drasticplastics.proboards.com/index.cgi?board=inaa&action=display&thread=2480 |
|
|
|
Post by Duane on Aug 5, 2010 14:08:48 GMT -5
what B said about flowing lines
etc. Gary !!!!! VERY VERY NICE !!!!!
|
|
|
|
Post by Dennis on Aug 5, 2010 14:16:09 GMT -5
I must openly admit that I don't care much for T-Birds, then there is this one. The front and rear custom treatments you have done are very well done and look right-on. There's a lot of customs that are changed for the sake of change, but what you have done is very stylish! I'm looking forward to seeing more from this project.
|
|
|
|
Post by scottyb on Aug 5, 2010 21:53:07 GMT -5
me likey!!!!
|
|
|
|
Post by zenrat on Aug 6, 2010 0:29:56 GMT -5
You really should try the styrene route. I've done it from time to time in the past but Jon Anderson's (Paraphrenic) work convinced me once and for all to avoid filler whenever I can. Styrene stock is so much cleaner and more stable than filler with no pssibility of shrinkage. It's not that hard. No problem with roughing the shape out in sticks of styrene. It doesn't matter if there's too much, you just knock it down to shape with a coarse sanding stick. I use cheap 80 grit nail files from my local drug store for shaping. If you can shape filler then you'll find styrene far easier to control and requiring much less finish filling and follow up work. I may have exaggerated slightly when I said shed loads. My usual technique is usually to bulk up with styrene to close to where I want to be and then to use filler for the final profile. Sometimes i'll do it the other way though and maybe I should try to more often. Now, back to this gorgeous T'Bird. |
|
|
|
Post by NitroMarty on Aug 6, 2010 7:59:54 GMT -5
What can I say that hasn't already been said.... Outstanding styling!!!  I love the flow of everything you've done so far.... I must say though, please don't put a bubble on it... IMHO, a cut down windshield would compiment your re-styling much better. |
|
|
|
Post by froghawk on Aug 6, 2010 8:53:27 GMT -5
Really, really nice work! The '57 T-bird is a hard car to improve on, but I think your successfully doing it! Excellent craftsmanship and design... love the way you eliminated the fake louvers and carried that character line forward. Looking forward to more.
|
|
|
|
Post by RodBurNeR on Aug 6, 2010 9:07:33 GMT -5
wow! the front is sweet! (back is too) |
|
|
|
Post by russb on Aug 7, 2010 22:45:57 GMT -5
nice styling! Looking forward to see more.
|
|
|
|
Post by lo51merc on Aug 10, 2010 14:46:23 GMT -5
Not much can stop me when I'm going hot and heavy on my modeling bench. Not even temps in the 90's. I'm almost to the point where I'll be doing the puttying. Not showing in these two pictures, but between yesterday and today I filled the side vent covers, the gas filler door, and the door handles with styrene pieces. And......I extended the fins (in length only) about a scale 3". Looks good! These pictures are from yesterday morning. Basically what I'm showing here is just the lowering job and the cut down windshield. I removed about 1/4" from the rear of the windshield, tapering to nothing where it starts to curve around. In scale, and due to the taper, this resulted in about a 4 1/2" chop. I had to add small filler pieces of styrene to the cowl to compensate for the narrower windshield. Thanks to all for the kind comments and to Bernard Kron for putting the link to this thread on his. Gary 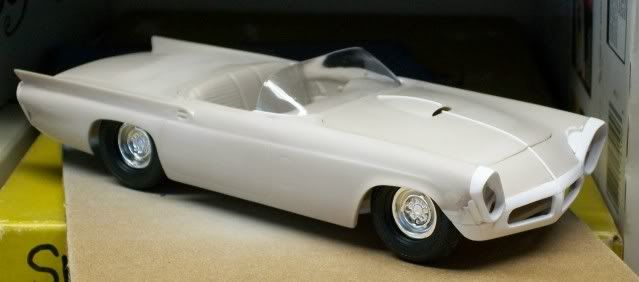 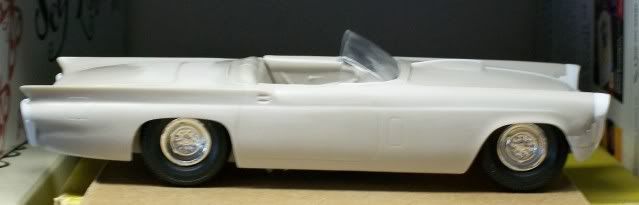 |
|
|
|
Post by Bernard Kron on Aug 10, 2010 18:30:29 GMT -5
The windshield chop and stance both look just right. Extending the fins was a good idea to balance out the rear entension, it doesn't look too exagerated, either - again, just right.
Coupla questions...
I'm not quite sure I understand how/where you cut your windshield. Did you cut it across the top? I'm very interested because the base appears to line up where the stock windshield base ends up at the door line.
Also what are your plans for matching the contour of the rear extensions to the stock fenders?
The whole thing is looking just great. Keep it coming...
|
|


