Deleted
Deleted Member
Posts: 0
|
Post by Deleted on Sept 27, 2014 7:29:51 GMT -5
You can never go wrong with black, deep maroon or green. Excellent build. Thanks for sharing your progress.
|
|
|
|
Post by spex84 on Sept 27, 2014 12:30:32 GMT -5
...why not take advantage of that and progress it through a few stages? Haha, I was thinking of doing that, in a way: setting it up to look like eventually the car will be black or a deep maroon, but in the meantime the body is in bare metal. I'm trying to get some other bodies prepped so I can practice painting, as my painting skills are not well developed, thanks to all the time my builds spend in construction. |
|
|
|
Post by spex84 on Oct 6, 2014 22:13:06 GMT -5
Oh man, just saw this and it stopped me cold: this car is basically what I've had in my head all this time (at least, one of the versions I've been imagining: www.jalopyjournal.com/?p=24214 I think I'm still going to do this one in bare metal, though, not brown. |
|
|
|
Post by Gluhead on Oct 7, 2014 20:39:37 GMT -5
Yeah, there are so many details on that car that I could not help but crack a smile at...besides all the hot rod done right buttons it pushes, which seem unending...like the bicycle novelty plate? That killed me. And what is that column hanger...kinda looks like part of an old parking meter??? Kills me as well. Just an amazing car that I could look over for days.
But as much as I like it, I'm with ya on the bare metal for yours!
|
|
|
|
Post by spex84 on Nov 10, 2014 0:00:19 GMT -5
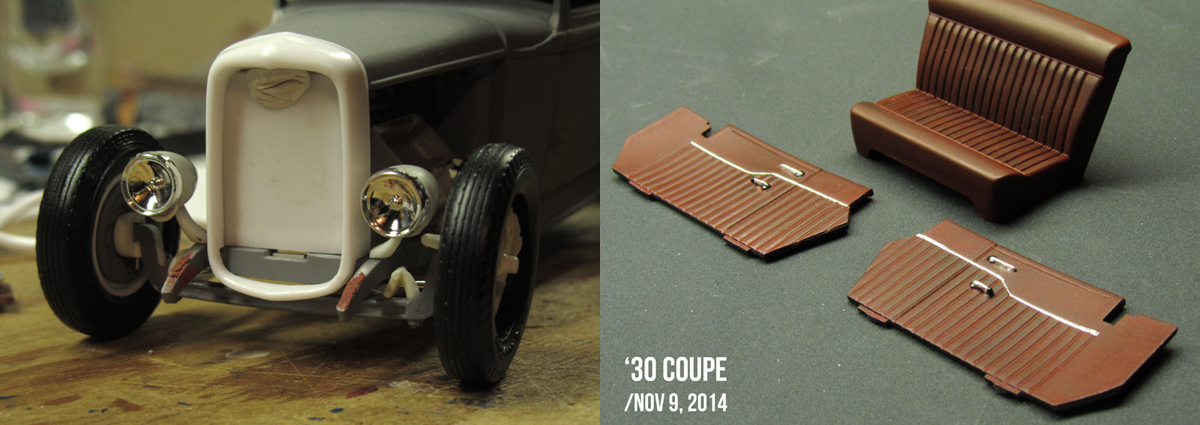
Rescuing this thread from the bottom of the page...the drip-feed continues, lol. I was in love with the chrome headlight rings planned for this build, but it turned out that they were a funny size and none of the lenses in the parts box fit. Also, the rings were not molded with the holes perfectly centered...dealbreaker! So now it has AMT Phantom Vicky headlights adapted to the "Rides" '40 ford buckets. Buckets had the mounting tabs trimmed off and were mounted on cut-down headlight stands from the Boyd '32. The interior is my first stab at creating oxblood leather. It's tremclad flat black topped with 4 very thin coats of maroon acrylic craft paint and a couple thin coats of Naphthol Red acrylic artist's paint. The blemishes visible on the seat aren't so noticeable in real life, thankfully. It's also less brown and more red in reality.  |
|
|
|
Post by Dennis on Nov 10, 2014 1:23:36 GMT -5
I really like the interior. Sweet! Keep poking at it. It's gonna be so worth it.
|
|
|
|
Post by Gluhead on Nov 10, 2014 21:24:47 GMT -5
That's looking really good. I like the new headlights, and the upholstery finish is very convincing.
|
|
|
|
Post by Bernard Kron on Nov 10, 2014 21:50:30 GMT -5
Glad to see this is still kickin'. I like the interior, even if the color balance doesn't show off the red. Is that the Revell Snap Kit '34 Ford Coupe bench seat, or is it from the Phantom Vicky (and perhaps the side panels as well)? I have a '34 Snap Kit bench seat I squirreled away for just this effect. I'll remember the Rides '40 Ford SD buckets, they look great! There are all these otherwise funky kits just dripping with cool parts. Just make sure there are enough of them to pass the aftermarket equivalence test...
|
|
|
|
Post by spex84 on Nov 11, 2014 3:16:10 GMT -5
Hey Bernard, the interior panels and bench seat are Revell '32 5-window. The kit I stole them from is being built as the channeled-to-death 60s style custom I was working on last year at about this time...so that build will need a scratchbuilt interior. I hope to get back to that one soon.
Yeah, the '40 "woody" is bizarre, and the clear headlights are pretty blobby and weak, but the buckets themselves are cool. That, said, they're basically the same shape as a pen lid, so I bet with some searching one could find a suitable pen for a couple bucks at most. I picked up the kit several years ago because it was really cheap. I think the '40 "Woody" is also where I found the little chrome "V"-shaped piece that is supposed to be an antenna or something, but makes a handy 50s-style grille ornament.
|
|
|
|
Post by spex84 on Nov 15, 2014 5:09:04 GMT -5
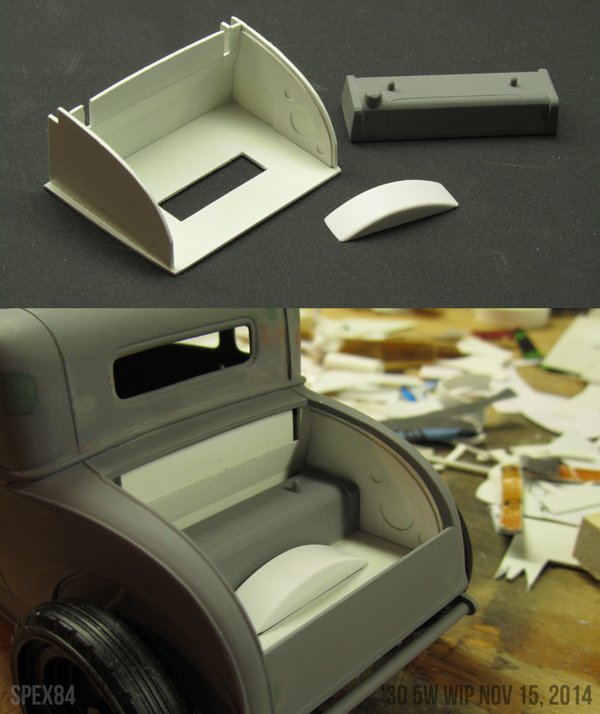
Update: junk in da trunk! The tank is from a Lindberg kit I think. I might add better breather/filler cap detail at some point. The trunk was going to be upholstered, changed my mind on that... Also (not shown), I cut down some '37 (I think) taillight housings and am trying to find/make a bezel to fit. Don't want bullet taillights, but something flatter. Broke the trunk hinges...I need to come up with a tougher solution for those.  |
|
|
|
Post by spex84 on Nov 19, 2014 1:06:31 GMT -5
Got some taillight buckets attached to match the headlight buckets...I think they're Revell '37 Ford. They come with a clear plastic taillight/bezel (lame!) so I experimented with making my own...segments of aluminum tube filled with clear red styrene shavings, melted down with Ambroid and topped with layers of Future to try and give the lenses more convexity. ...also realized the interior bucket was functioning as the floor when viewed from below, and it didn't look very good, nor was there clearance to slip in another layer of plastic. So the side tabs were partially filled,leaving just enough for the interior door panels to locate, and the floor extended on the edges. Not graceful, but it'll do. Just a some edge cleanup and it's ready for paint.  |
|
|
|
Post by Murphy on Nov 19, 2014 10:23:03 GMT -5
Looking good, I like your tail lights - I've never thought of using "Future" for lenses...I usually use epoxy.
This one's gonna be cool!
|
|
|
|
Post by Dennis on Nov 19, 2014 10:27:56 GMT -5
The floor and taillights look great, Chris! Same way I did the lights on the '34 Cabriolet I built a few months back. I like the lenses you made. I've always thought it was really lame that all of those '37 kits come with clear lenses.
|
|
|
|
Post by spex84 on Nov 19, 2014 12:58:40 GMT -5
Re: taillights, Epoxy is possibly the better choice--what you see in that photo is the lenses with a bead of wet Future on top; it will dry and the lenses will appear to be almost flat. I may still mix up some epoxy and apply it on top to get the lens to look curved, but on the other hand epoxy yellows a lot, so I might just leave them alone.
|
|
|
|
Post by randfink on Nov 19, 2014 13:21:32 GMT -5
epoxy yellows a lot, so I might just leave them alone. I don't know of this first hand, but I've been told that the epoxies that take longer to cure, like 30 minutes, don't yellow as much. |
|