|
|
Post by chepp on Feb 8, 2019 2:03:35 GMT -5
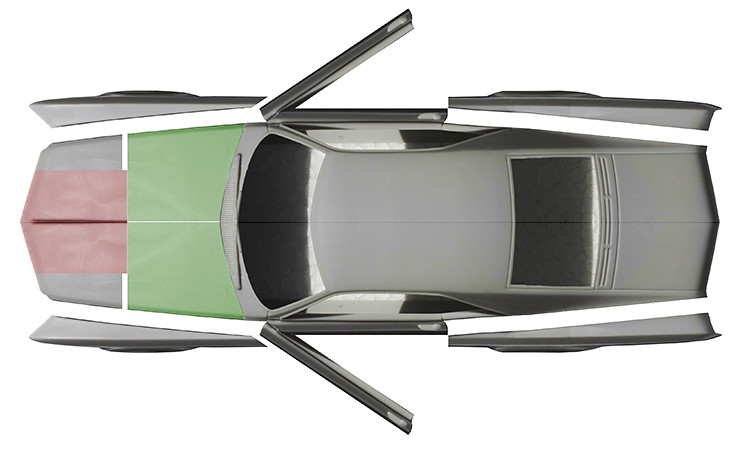
Back in the olden days, cars had a single visual unit of a grille/hood/cowl/cabin/trunk that had four separate fenders covering the wheels.
As time went by the fenders were better integrated into the body but they were still bulbous and the hoods/trunks were tapered -- think "fat fendered" cars.
Eventually auto styling became sleeker and sleeker until the car body looked (from above) like a rectangle that covered everything -- such as a '58 Chevy.
In the '60s, some cars evoked earlier styling by tapering (again, as seen from above) the hoods and trunks with the fenders looking sort-of added on -- such as the '66 Riv.
So, here's what the Riv would look like if the four fenders were left in their original locations but the grille/hood/cowl/cabin/trunk was narrowed. The front fenders would allow the doors to open.
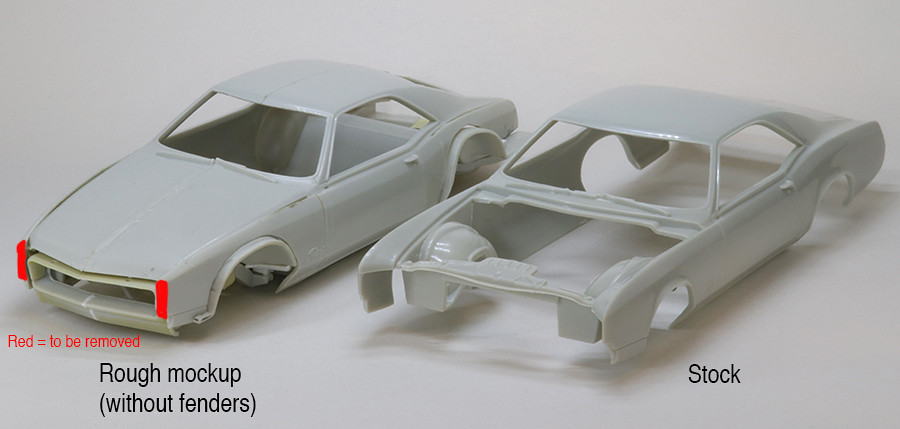
On the left, this is what it looks like with the fenders removed and the body narrowed. What used to be the sides of the fenders have been trimmed and reshaped to become the sides of the body.
It sits on a chassis that will use the original-width suspensions and wheel wells but with a narrowed floor pan.
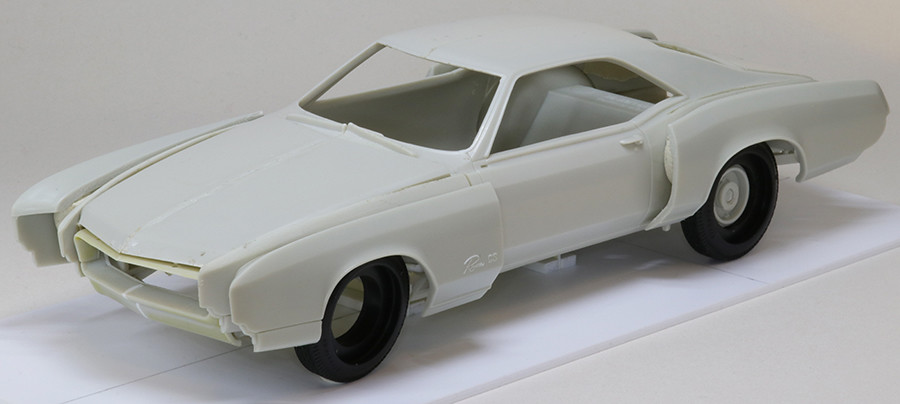
Here is a very rough mockup showing the narrowed body with the four fenders in their original locations. Now the trick will be to fill in the now-exposed parts of the fenders to make them look finished but still separate from the body. The red areas on the first photo are yet to be removed.
Since it evokes an earlier time using a TRAK-friendly vehicle I'm posting it here instead of in the "Is this TRAKable?" forum. Everything on it will be TRAK friendly.
What do you think? All comments -- postive, negative or otherwise are welcome.
Although it's OT, GM stylists made some renderings and models in the late '60s along this theme but they used early '70s styling. They called them "four-fendered farkles" -- you could look it up.
|
|
|
|
Post by spex84 on Feb 8, 2019 2:56:58 GMT -5
You're a madman, lol. Love it! I like that there's a clear design methodology at work here. I immediately thought of this concept when I saw your mockup of what today's kids would call a "widebody". It may look 70s, but as you mention, most of the styling elements we think of as being '70s design were actually on the drawing board by the mid 60s!  This is going to be a fascinating project to watch. I can just imagine George Barris getting a glimpse of some studio design drawings in '66 and saying "well shoot, I can build that right now!!" |
|
|
|
Post by SteveMilberry on Feb 10, 2019 12:18:43 GMT -5
I can just imagine George Barris getting a glimpse of some studio design drawings in '66 and saying "well shoot, I can build that right now!!" George "BareAss" couldn't build that in a 1000 years with a 10,000 monkeys helping him ,, unless of corse someone else had already built it so he could paint his name on it and claim he built it. But, yea. neat concept. The Alexander Bros. or one of the better custom shops could pull it off. |
|
|
|
Post by chepp on Feb 14, 2019 22:08:15 GMT -5
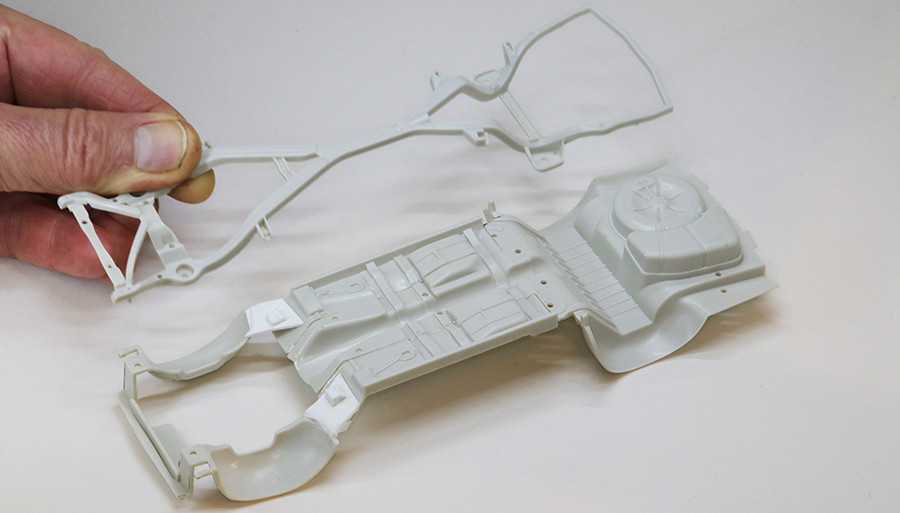
Here's what I did to get the chassis ready for the narrowed body.
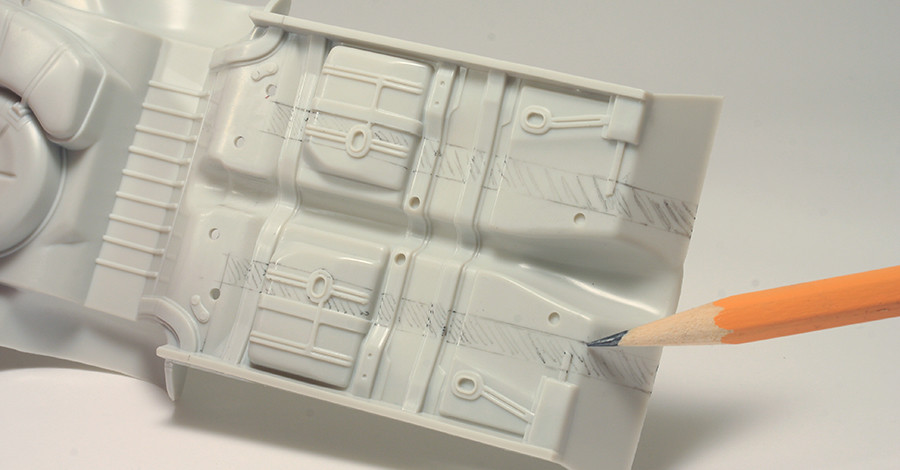 Penciled areas show the strips of the floor pan to be cut and discarded.
Here it is after the modifications:
1. The narrowed floor pan pieces were cemented in place.
2. The inner fenders were removed from the body.
3. The cut-down inner fenders were put in the correct relationship to the floorpan. Pieces were made from sheet styrene to fill in the gap. The two bumps on the filler panel match up to the simulated mounting pads on the frame.
The X-frame will be used without modification. Not having a perimeter frame really helped this project.
Bwa-ha-ha...now I can move on to some bodywork if those nice men in the white uniforms don't take me away first.
|
|
|
|
Post by spex84 on Feb 14, 2019 22:55:00 GMT -5
Amazing--it shouldn't work that well, but it does! X-frame to the rescue  |
|
|
|
Post by constructionbob on Feb 15, 2019 12:03:39 GMT -5
.. this is exiting! Can U post anything from that place they go with U?
|
|
|
|
Post by chepp on Feb 19, 2019 0:30:21 GMT -5
.. this is exiting! Can U post anything from that place they go with U? Ummm, not right now. People say that it's a happy home with trees and flowers and chirping birds... |
|
|
|
Post by chepp on Feb 21, 2019 23:52:44 GMT -5
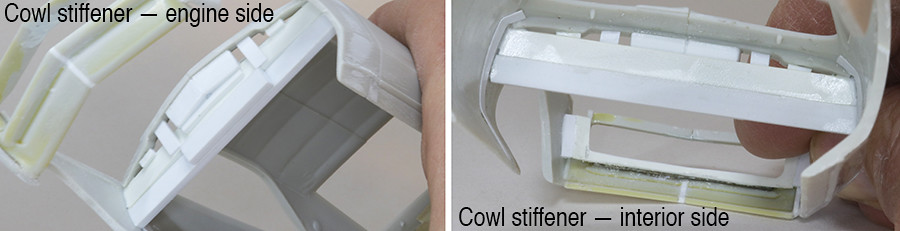
A massive cowl stiffener was built up with many pieces of styrene. The leading edge of the cowl is a sharp V shape so a straight piece wouldn't work. Also, the mounting area for the base of the windshield needed to be kept clear so the stiffener was built up to not interfere. A lot of grinding, cutting, shimming and gluing was needed to get the body and chassis to be reasonably square and strong. Some of the gaps and problem areas got a first application of filler and sanding. Once the body is OK the four fenders (not shown here) will be added.
|
|
|
|
Post by spex84 on Feb 22, 2019 0:54:32 GMT -5
Looking tight! The cowl stiffener is a familiar problem--I had to do the same thing on my SurfStar project, and the short space between the hood opening and windshield made it a little tricky! So now you're going to put long-arm independent suspension on there, right? And some 26" narrow whitwall firestones with wire wheels? No? Oh. |
|
|
|
Post by constructionbob on Feb 22, 2019 5:40:40 GMT -5
Hey.. what suspension? I presume this is a model of a clay model that could have been, or?
-Nah. I'd like to se joysticksteering and asymetrical experiments what to go with in production..
..now thats an idéa.. where do i put that one?? Ahh.. did´nt got it with me to this joint
with all wallpainted green trees, butterflies and uggly bearded nurses.
Love the craftmanship!
|
|
|
|
Post by chepp on Feb 23, 2019 18:59:03 GMT -5
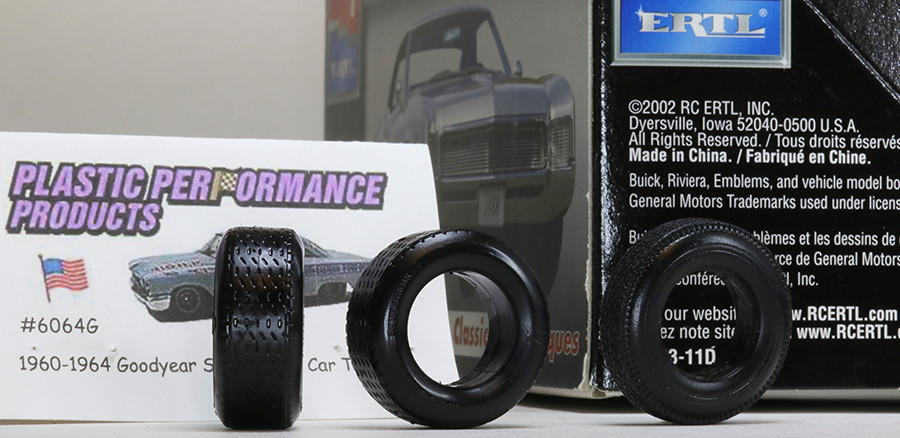
Thanks, spex84. For those who haven't seen it, go see his SurfStar build thread at trakinscale.proboards.com/thread/18310/63-vette-surfstar right now. The Riviera kit tires are 1.3" in diameter. I'm thinking of using PPP #6064G 1960-1964 stock car tires that are 1.1" in diameter. That would lower it a little while using the stock suspension. My idea is to make it a sporty custom kind of like a '60s version of a '20s boattail Auburn and not a "draggin' on the ground" show car.
constructionbob: no joystick or assymetrical styling on this one...yet. I'm kinda designing it as I go, though. I did build this three-wheeled '60 Ford with the joystick/interior/bubble top from the Roth Beatnik Bandit a couple of years ago. When I was a kid in '63 I was impressed with the AMT '63 Impala with the Advanced Styling assymetrical custom parts. But I built it as a stripped-down street machine.
|
|
|
|
Post by chepp on Feb 28, 2019 22:24:07 GMT -5
Here are front and angle views of the stock car tire I'm thinking of using. At the right is the kit tire.
OT things kept me from working on the Riviera this week.
|
|
|
|
Post by chepp on Mar 18, 2019 22:03:31 GMT -5
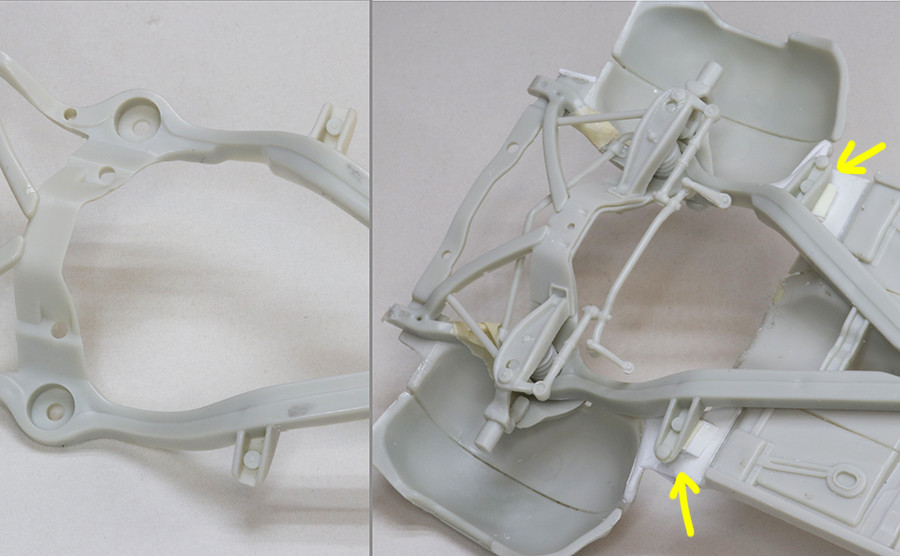
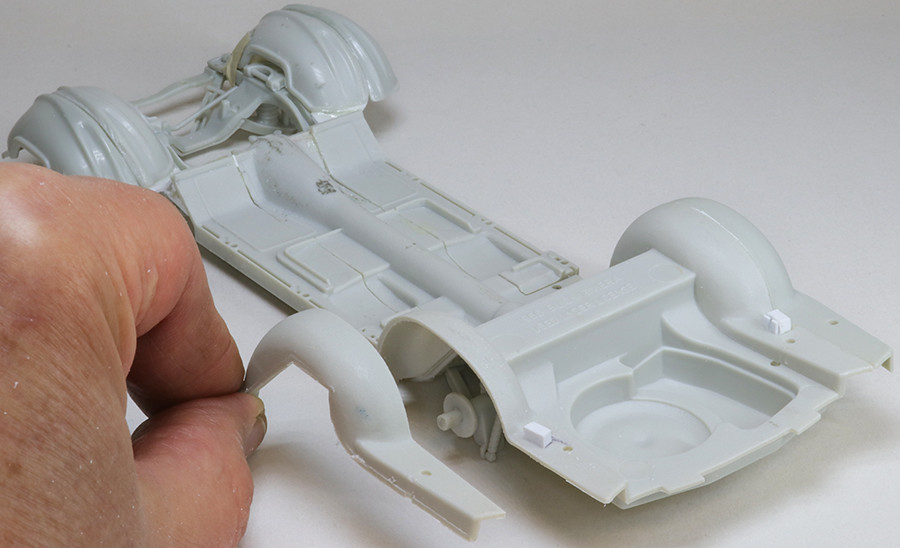
OT things and working on my other on-the-daggumb-bench project have slowed my progress on this one. On the left is the frame that I used to rough in the floor pan. But since I wasn't absolutely sure where the wheels would be located I cleaned up the frame from my second kit and assembled the suspensions. Then I discovered that the frame from the second kit has DIFFERENT floor pan brackets! Now I've got to make the pads (yellow arrows) larger to look right. There goes another hour of my life on a detail that nobody will ever notice — but they would notice if I didn't do it.
From the second kit I hacked out the inner fenders and, after some cutting and fitting, cemented them on. The lefts went onto the rights and the rights went onto the lefts. Don't be concerned about the weird look of the new outboard areas — they'll be trimmed back to hide under the four outer fenders to be attached later. |
|
|
|
Post by chepp on Mar 28, 2019 22:25:17 GMT -5
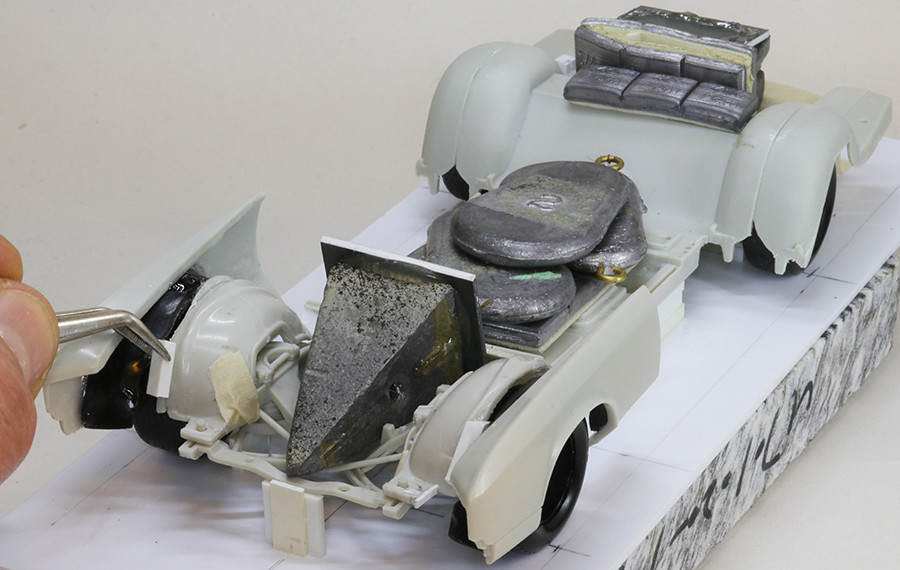
After seemingly endless futzing, I just couldn't get the frame, floor and narrowed body to sit properly on the frame stand. The parts were all a little wavy and had a kind of "springiness" to them that kept me from getting them to be consistent when fitted together. That's normal for injection molded parts -- there are a lot of variables in what polystyrene does when it comes out of the mold. When the parts are glued together as the manufacturer intended they're fine. However, it's a problem for somebody like me who is cutting things up and rearranging them while trying to get them aligned while dry fitting. So, I loaded it up with fishing weights to simulate them being glued together. Supports under the model keep the suspension from collapsing.
Anyway, I hacked away most of the front inner fenders added last week. Black plastic inner fenders from an OT kit were fitted to the outer fenders and, with the narrowed body in place, were "tacked" in place with a blob of CA. When they seemed to be in the right place I carefully removed the body and glued on a couple of pieces of white styrene (shown above) to further secure them.
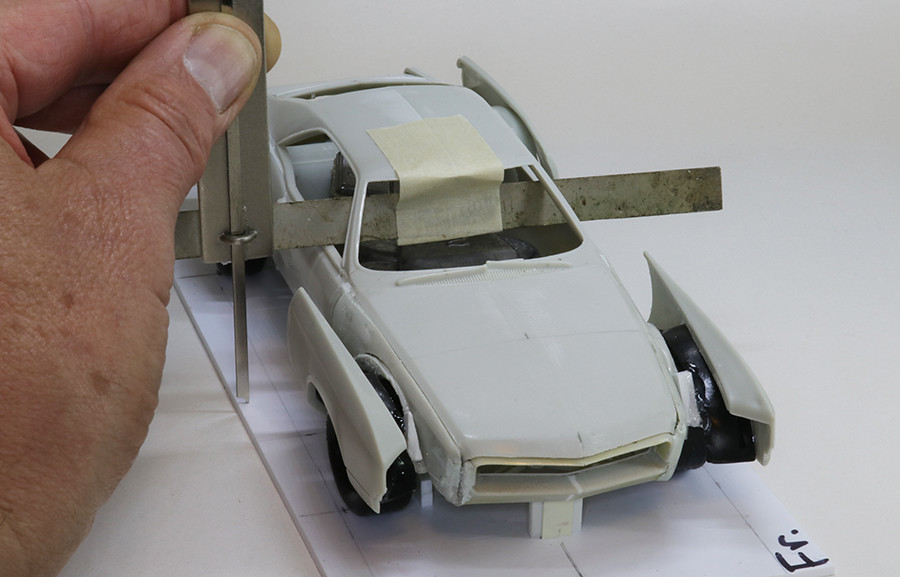
Here it is with the body in place. I'm checking to see that it's level side-to-side by using the depth gauge on a vernier caliper to make sure the height of both sides of the metal strip are the same. You can see one of the new rear fenders in the background. It didn't need an additional inner fender — the extended ones added last week were good enough.
This shows the goal in aligning the fenders. When seen from the side the character lines in the fenders and on the narrowed body line up. It doesn't sound too difficult but one must also get them in the right place when looking down from above, too. Then you've got to do it on the other side but reversed.
|
|
|
|
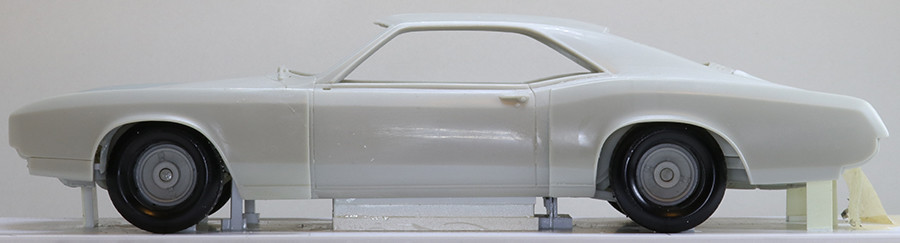
Post by ChrisV on Mar 31, 2019 10:04:11 GMT -5
This is a refreshingly different take on a kit that's rarely seen built anything but box stock. From these angles it actually reminds me of a 1st. gen. Toyota Celica, but don't let that stop you - I'd really like to see, where this is going!: 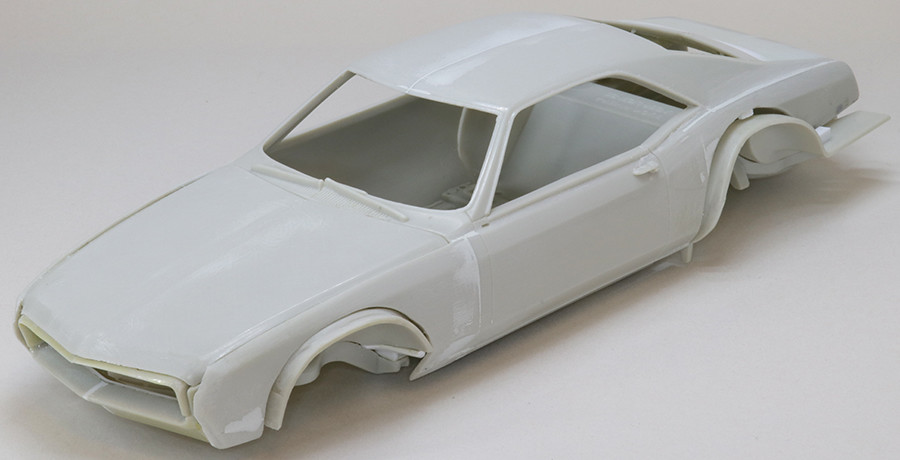 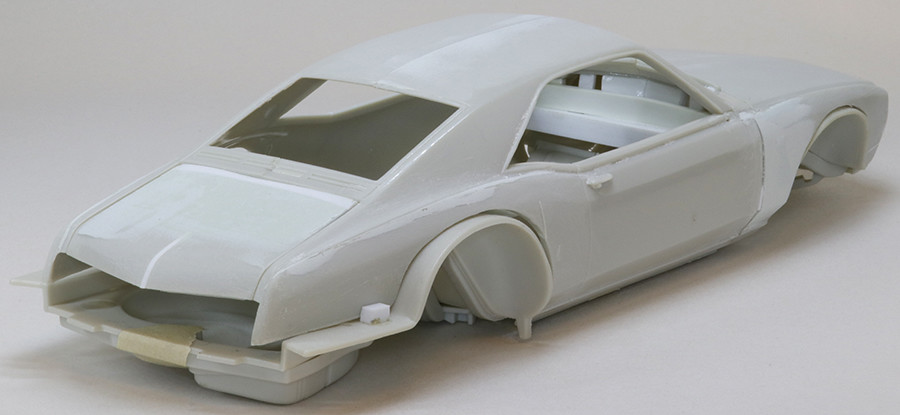 |
|